There’s something uniquely comforting about the aroma of a hearty roast wafting through the house on a Sunday afternoon. It conjures images of family gatherings, shared laughter, and a table laden with wholesome goodness. Yet, for many home cooks, the dream of a truly tender beef roast often bumps up against the reality of dry, tough meat. We’ve all been there, carving a roast that refuses to yield, leaving us wondering where we went wrong.
The secret to achieving that coveted, fall-apart, fork-tender beef isn’t some elusive culinary magic; it’s a beautiful blend of choosing the right cut, understanding the science of low-and-slow cooking, and a healthy dose of patience. Forget the struggles of the past; with the right approach, you can master the art of the perfect Sunday pot roast dinner, transforming an ordinary meal into an unforgettable feast. Let’s dive into how to make your next beef roast so tender, it practically melts in your mouth.
Choosing the Best Cut for a Tender Beef Roast
The foundation of any great tender beef roast begins with selecting the appropriate cut of meat. While leaner cuts might seem appealing for quick cooking, they are not your friend when it comes to achieving that coveted tenderness in a pot roast.
The King of Pot Roast: Why Beef Chuck Roast Reigns Supreme
For truly exceptional results, the best meat for pot roast is undeniably the beef chuck roast, often labeled as chuck roll, shoulder roast, or pot roast. This cut comes from the shoulder of the animal, an area that gets a lot of exercise, making it inherently tougher than more expensive, tender cuts like tenderloin. But here’s the brilliant part: that toughness is precisely what makes it perfect for braising.
The Science: Marbling and Connective Tissue Breakdown
What sets chuck roast apart is its generous marbling – those tiny streaks of fat interspersed throughout the muscle – and a significant amount of connective tissue, primarily collagen. When subjected to long, slow cooking in a moist environment (the essence of slow cooked beef recipes), something magical happens. The marbling melts, basting the meat from within and adding incredible flavor and moisture. More importantly, the tough collagen slowly breaks down and transforms into gelatin. This gelatin is what gives the meat its unctuous, succulent texture and contributes to a rich, velvety sauce. This is exactly how to tenderize roast beef to perfection.
Alternatives: Brisket or Bottom Round
While chuck is king, other cuts can also be transformed into a delicious tender beef roast with the right technique. Brisket, particularly the “flat” cut, is another excellent option for braising, known for its deep beefy flavor. Bottom Round, a leaner cut, can also work, but it benefits from even longer cooking times and perhaps a slightly more generous amount of braising liquid to prevent it from drying out. Remember, no matter the cut, patience is key to breaking down those tough fibers and achieving that incredible tenderness.
The Braising Method Explained
Braising is the cornerstone technique for creating a magnificent tender beef roast. It’s a classic culinary method that has been used for centuries to transform tougher cuts of meat into sublime, melt-in-your-mouth dishes.
What is Braising? Cooking Low and Slow in Liquid
At its heart, braising involves searing meat at a high temperature to develop flavor, then finishing it by cooking it slowly in a covered pot with a moderate amount of liquid. This combination of dry and wet heat, along with the extended cooking time, is the ultimate method for achieving fork-tender beef. It’s ideal for a hearty Dutch oven beef roast or any other heavy-bottomed pot that can go from stovetop to oven.
The Sear: Why You Cannot Skip Browning the Meat (Maillard Reaction)
Before any liquid enters the pot, a crucial step for any braised beef chuck roast is searing the meat. This isn’t just about appearance; it’s about flavor. Searing the beef over high heat creates a rich, caramelized crust through the Maillard reaction. This complex chemical process develops hundreds of new flavor compounds that simply cannot be achieved by boiling or steaming. This deep, savory crust will infuse your entire dish with an incredible depth of flavor that defines a truly remarkable pot roast.
The Deglaze: Unlocking the Flavor from the Bottom of the Pot (Fond)
After searing the beef and often sautéing some aromatics like onions and garlic, you’ll notice delicious browned bits stuck to the bottom of your pot. This concentrated flavor, known as ‘fond,’ is pure gold. Deglazing involves adding a cold liquid, such as red wine pot roast friendly red wine or beef broth, to the hot pot. As the liquid hits the fond, you can scrape it up with a wooden spoon, dissolving those flavorful bits into the liquid. This step dramatically enhances the depth and richness of your braising liquid and ultimately, your gravy.
Temperature Matters: Why 300°F (150°C) is the Magic Number
Once your beef is seared and the pot is deglazed, it’s time for the long, slow cook. A consistent oven temperature around 300°F (150°C) is ideal for a tender beef roast. This relatively low temperature ensures that the meat cooks gently and evenly, allowing ample time for the collagen to break down into gelatin without drying out the meat. Higher temperatures can cause the exterior to dry before the interior becomes tender. This steady, gentle heat is the cornerstone of great slow cooked beef recipes, ensuring a consistently succulent result.
Recipe: Perfect Braised Beef Pot Roast
This recipe for Perfect Braised Beef Pot Roast will guide you to a truly remarkable one pot beef dinner, yielding a rich, savory, and incredibly fork-tender beef that harks back to the best old fashioned pot roast memories.
Ingredients:
- 3-4 pounds beef chuck roast, trimmed of excess fat and cut into 2-3 large pieces
- 2 tablespoons olive oil or vegetable oil
- Salt and freshly ground black pepper to taste
- 1 large yellow onion, roughly chopped
- 2 carrots, peeled and roughly chopped
- 2 celery stalks, roughly chopped
- 4 cloves garlic, minced
- 2 tablespoons tomato paste
- 1 cup dry red wine (such as Cabernet Sauvignon or Merlot)
- 3 cups beef broth, low sodium
- 2 sprigs fresh rosemary
- 3 sprigs fresh thyme
- 2 bay leaves
- 1 1/2 pounds small potatoes (such as creamer or red potatoes), halved or quartered
- 1 pound large carrots, peeled and cut into 2-inch chunks
- Optional: 2 tablespoons all-purpose flour or cornstarch slurry for thickening gravy
Instructions:
- Prepare the Beef: Pat the beef chuck roast pieces completely dry with paper towels. Season generously all over with salt and black pepper. This step is crucial for developing a good crust.
- Sear the Beef: Heat the olive oil in a large Dutch oven beef roast pot or heavy-bottomed pot over medium-high heat until shimmering. Carefully add the beef in a single layer (work in batches if necessary to avoid overcrowding, which prevents browning). Sear for 4-5 minutes per side until deeply browned on all surfaces. Remove the beef to a plate and set aside.
- Sauté Aromatics: Reduce the heat to medium. Add the chopped onion, carrots, and celery to the pot. Cook, stirring occasionally, for 5-7 minutes until softened and lightly browned. Add the minced garlic and tomato paste; cook for another 1-2 minutes, stirring constantly until fragrant and the tomato paste darkens slightly.
- Deglaze the Pot: Pour in the red wine. Scrape the bottom of the pot vigorously with a wooden spoon, loosening all the browned bits (fond). Let the wine simmer for 2-3 minutes, reducing slightly.
- Combine and Braise: Return the seared beef to the pot. Pour in the beef broth. The liquid should come about halfway up the sides of the beef. Add the rosemary, thyme, and bay leaves. Bring the liquid to a gentle simmer on the stovetop.
- Oven Cook: Cover the Dutch oven tightly with a lid and transfer it to the preheated oven at 300°F (150°C). Cook for 2.5 to 3 hours.
- Add Vegetables: After 2.5 to 3 hours, carefully remove the pot from the oven. Add the potatoes and large carrot chunks around the beef. Re-cover and return to the oven for another 45-60 minutes, or until the beef is incredibly tender and the vegetables are cooked through. The beef should be easily pulled apart with a fork.
- Rest and Serve: Carefully remove the beef and vegetables to a platter. Tent loosely with foil and let rest for at least 15-20 minutes. This is a critical step for a juicy roast.
- Make Gravy (Optional): While the beef rests, strain the braising liquid through a fine-mesh sieve, pressing on the solids to extract all liquid. Discard solids. Return the strained liquid to the pot. If desired, bring to a simmer and whisk in a flour or cornstarch slurry (1 part flour/cornstarch to 2 parts cold water) until thickened to your liking. Season with salt and pepper.
- Serve: Shred or slice the beef, and serve hot with the tender vegetables and rich gravy. Enjoy your ultimate tender beef roast!
Chef’s Tips for Melt-in-Your-Mouth Results
Achieving truly fork-tender beef consistently comes down to a few expert tips that elevate your pot roast from good to unforgettable. These are the little nuances that make all the difference in how to tenderize roast beef for maximum succulence.
- Room Temp Meat: Tempering the Beef Before Searing: Allow your beef chuck roast to sit at room temperature for at least 30-60 minutes before searing. This helps the meat cook more evenly, preventing the exterior from overcooking while the interior struggles to catch up. A warmer starting temperature also aids in achieving a better, more consistent sear.
- Vegetable Timing: When to Add Potatoes and Carrots So They Don’t Turn to Mush: Adding all your vegetables at the beginning of a 3+ hour braise is a common mistake. Root vegetables like potatoes and carrots, if added too early, will become overly soft and mushy. For perfect texture, add them about 45-60 minutes before the end of the cooking time. This ensures they are tender but still hold their shape and offer a pleasant bite.
- The Liquid Ratio: Don’t Boil the Meat; Bathe It: When adding your braising liquid (broth, wine, etc.), ensure it comes about halfway or two-thirds up the sides of the beef, but doesn’t completely submerge it. The goal is to create a moist, steamy environment, not to boil the meat. This allows the top portion of the beef to benefit from the direct heat of the oven, developing a slightly crusty exterior, while the submerged portion tenderizes in the flavorful liquid. This balance is key for a deeply flavored braised beef chuck roast.
- Resting: The Most Critical Step for Juiciness: This step cannot be overstated. Once your tender beef roast is out of the oven, transfer it to a cutting board or platter, tent it loosely with foil, and let it rest for at least 15-20 minutes (longer is even better for larger roasts). During cooking, the muscle fibers contract, pushing juices to the center. Resting allows these juices to redistribute throughout the meat, resulting in an incredibly moist and flavorful roast. Skipping this step leads to dry meat, no matter how perfectly it was cooked.
Frequently Asked Questions
Here are answers to some common questions about making the perfect tender beef roast.
Why is my pot roast tough?
There are several reasons your pot roast might be tough:
- Wrong Cut: Using a lean cut that lacks sufficient marbling and connective tissue (e.g., sirloin tip) is a common culprit. Stick to chuck roast, brisket, or bottom round for braising.
- Not Enough Cooking Time: Tough cuts require long, slow cooking to break down collagen into gelatin. If it’s tough, it likely needs more time in the oven.
- Too High Heat: Cooking at too high a temperature can dry out the meat before it has a chance to tenderize. Stick to 300°F (150°C).
- Skipping the Rest: Not allowing the meat to rest after cooking can lead to a dry, seemingly tough texture as juices escape when cut.
Can I make this in a Slow Cooker or Instant Pot?
Absolutely! Both appliances are excellent for creating a tender beef roast, perfect for an old fashioned pot roast experience.
- Slow Cooker: Sear the beef and sauté aromatics on the stovetop first for best flavor. Then transfer everything to the slow cooker, ensuring liquid covers about two-thirds of the beef. Cook on low for 6-8 hours or high for 3-4 hours, until fork-tender.
- Instant Pot: Use the “Sauté” function to sear the beef and cook aromatics. Deglaze with liquid. Add beef and enough liquid to cover two-thirds. Cook on high pressure for 60-75 minutes for a 3-4lb roast, followed by a natural pressure release for at least 15 minutes before quick releasing any remaining pressure.
How do I thicken the gravy?
To thicken the rich braising liquid into a luscious gravy for your Dutch oven beef roast:
- Strain the braising liquid after removing the beef and vegetables.
- Return the strained liquid to the pot and bring to a simmer over medium heat.
- In a small bowl, whisk together 2 tablespoons of all-purpose flour or cornstarch with 4 tablespoons of cold water until smooth (a “slurry”).
- Slowly whisk the slurry into the simmering liquid, allowing it to thicken for 1-2 minutes. Add more slurry if a thicker consistency is desired. Season with salt and pepper to taste.
Best wine for pot roast (and non-alcoholic substitutes)?
For a truly flavorful red wine pot roast, a dry, full-bodied red wine works best. Excellent choices include:
- Cabernet Sauvignon
- Merlot
- Pinot Noir
- Zinfandel
Non-alcoholic substitutes that still provide depth of flavor include:
- More beef broth (an equal amount)
- Tomato juice
- Grape juice (use sparingly, perhaps mixed with broth, as it can be sweet)
- Non-alcoholic red wine substitutes
There you have it – the comprehensive guide to achieving a spectacular tender beef roast every single time. With these techniques and tips, you’re now equipped to create a memorable, melt-in-your-mouth meal that will impress your family and friends. Get ready to experience the true joy of a perfectly cooked, fork-tender beef dinner. Happy cooking!
For more delicious recipes and cooking tips, be sure to follow us on Facebook! You’ll find us at our Facebook Page – we’d love to connect with you there!

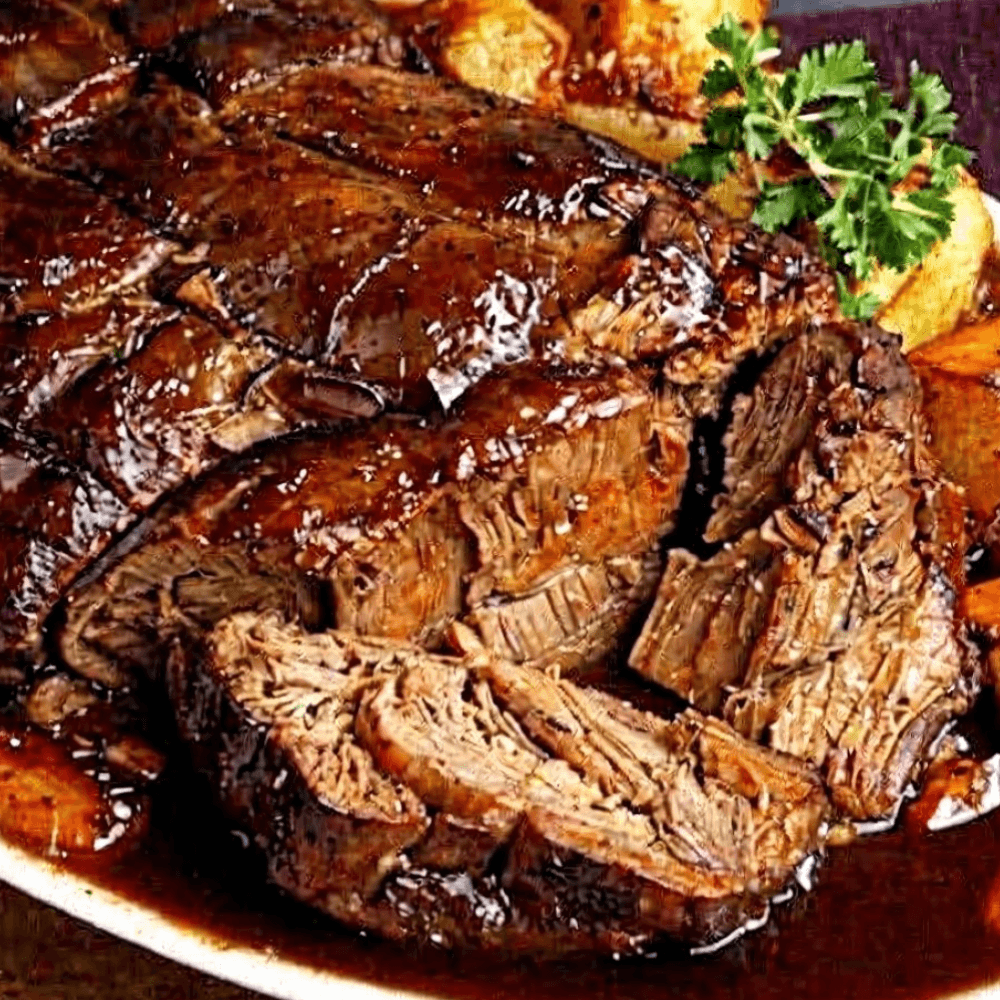
Melt-in-Your-Mouth Tender Beef Roast
Ingredients
- Boneless beef chuck roast Trimmmed of excess fat, tied with twine if preferred for shape (approx. 3-4 lbs / 1.5-1.8 kg). DO NOT SUBSTITUTE for lean cuts like round or sirloin i...
- Salt and freshly cracked black pepper Generous amount for seasoning the beef.
- Olive oil For searing.
- Yellow onions Roughly chopped.
- Garlic cloves Smashed and peeled.
- Dry red wine Cabernet Sauvignon, Merlot, or Pinot Noir. (Can substitute with extra beef broth).
- Beef broth Low sodium preferred.
- Tomato paste Adds depth and umami.
- Worcestershire sauce Flavor enhancer.
- Fresh thyme sprigs Tied in a bundle.
- Fresh rosemary sprigs Tied in a bundle.
- Bay leaves Dried or fresh.
- Carrots Peeled and cut into 2-inch chunks.
- Yukon Gold potatoes Cut into 2-inch chunks (skins left on).
- Fresh parsley Chopped, for garnish.
- Cornstarch Optional, mixed with water for thickening gravy.
Instructions
- Preheat your oven to 300°F (150°C).
- Pat the beef chuck roast completely dry with paper towels. Season generously on all sides with salt and black pepper.
- Heat olive oil in a large Dutch oven or heavy-bottomed oven-proof pot over high heat. Once the oil is shimmering, add the beef. Sear aggressively for 4-5 minutes per side until a deep, dark brown crust forms. Remove the beef and set aside on a plate.
- Reduce heat to medium. Add the chopped onions to the pot and sauté for 3-4 minutes until softened. Add the smashed garlic and tomato paste, stirring constantly for 1 minute until fragrant.
- Deglaze the pot by pouring in the red wine. Use a wooden spoon to scrape up all the browned bits (fond) from the bottom of the pot. Let the wine simmer and reduce by half.
- Return the beef (and any accumulated juices) to the pot. Pour in the beef broth, Worcestershire sauce, and add the thyme, rosemary, and bay leaves. The liquid should cover the meat about halfway. If not, add a little more broth or water.
- Cover the pot with a tight-fitting lid and transfer to the preheated oven. Braise for 2 hours.
- After 2 hours, carefully remove the pot from the oven. Arrange the carrots and potatoes around the beef, submerging them in the liquid as much as possible. Cover and return to the oven.
- Cook for another 1 to 1.5 hours, or until the beef is fork-tender (it should shred easily) and the vegetables are cooked through.
- Remove the pot from the oven. Transfer the roast and vegetables to a serving platter and tent loosely with foil to rest for at least 15-20 minutes.
- While the meat rests, place the pot on the stove over medium-high heat. Skim off excess fat from the surface. If you prefer a thicker gravy, mix cornstarch with a splash of cold water and whisk it into the simmering liquid. Cook until thickened.
- Slice or shred the roast against the grain. Serve topped with the rich gravy, surrounded by the potatoes and carrots, and garnished with fresh parsley.
For more daily recipes and tips, follow us on Facebook!
Click here to join our community!