
Creating a Japanese steakhouse experience at home is simpler than you might think. This quick and straightforward recipe delivers the savory, slightly sweet flavors of your favorite restaurant in a convenient bowl format. Master the art of the Hibachi Shrimp Rice Bowl with this detailed guide, bringing the essence of a lively teppanyaki grill directly to your kitchen. Forget crowded restaurants and long waits; a delicious, comforting shrimp fried rice bowl is now within your reach.
Why Make This Teppanyaki Seafood Dish at Home?
Cooking this dish in your own kitchen offers total control over the ingredients and sodium levels. You decide exactly what goes into your food, allowing for a healthier, more personalized version of this beloved classic. Beyond the health benefits, preparing your own teppanyaki shrimp and fried rice is significantly more cost-effective than dining out. This recipe also serves as a fantastic lunch meal prep option, holding up well in the fridge for several days. It’s an ideal solution for those seeking a quick seafood meal prep that doesn’t compromise on flavor or satisfaction. Enjoy a restaurant-quality Japanese steakhouse style dinner without leaving your home, making weeknight meals or weekend gatherings special and effortless.
Core Ingredients
To ensure your dish tastes authentic and delivers the characteristic flavors of a classic hibachi meal, gather the following precise components. Each ingredient plays a crucial role in building the layered taste and texture of your ultimate shrimp fried rice bowl.
- The Protein: For this recipe, you will need 1 lb of peeled, deveined shrimp. Opt for medium to large shrimp for the best texture and visual appeal in your bowl. Ensure they are completely thawed if using frozen shrimp.
- The Vegetables: A vibrant mix of fresh produce adds color, crunch, and essential nutrients. You will need 1 cup chopped zucchini, 0.5 cup diced carrots, 0.5 cup diced yellow onion, and 0.5 cup frozen peas (thawed). These vegetables are chosen for their ability to hold up well to stir-frying and complement the shrimp and rice without overpowering them. The combination of stir-fry zucchini and carrots provides both sweetness and a delicate bite.
- The Rice Base: The foundation of any good fried rice. Use 3 cups of day-old cooked white rice. The “day-old” aspect is critical for achieving the right texture, preventing a mushy outcome. Flavor for the rice base will come from 1 tbsp vegetable oil (used in the cooking process), 2 tbsp butter (divided for vegetables and rice), 3 tbsp soy sauce, and a total of 1 tsp garlic powder, divided between the sauce and the rice itself.
- The Creamy Sauce: No hibachi experience is complete without its signature sauce. Our homemade yum yum sauce, also known as a creamy hibachi sauce, is a simple yet incredibly flavorful condiment. You will need 0.5 cup mayonnaise, 1 tbsp ketchup, and a pinch of garlic powder to create this delectable topping.
Step-by-Step Instructions
Follow these steps precisely to replicate the recipe card exactly for perfect results every time. Attention to detail and adherence to the specified quantities and cooking times are key to achieving an authentic Hibachi Shrimp Rice Bowl.
1. Prepare the Creamy Sauce
Begin your culinary journey by preparing the essential creamy sauce. In a small bowl, whisk together 0.5 cup mayonnaise, 1 tbsp ketchup, and a pinch of the garlic powder. Whisk thoroughly until all ingredients are well combined and the sauce is smooth and uniform. This simple mix forms your delicious homemade yum yum sauce. Once prepared, cover the bowl and set it aside in the refrigerator. Allowing the sauce to chill and rest gives the flavors time to meld and intensify, resulting in a more complex and satisfying condiment when drizzled over your finished bowl.
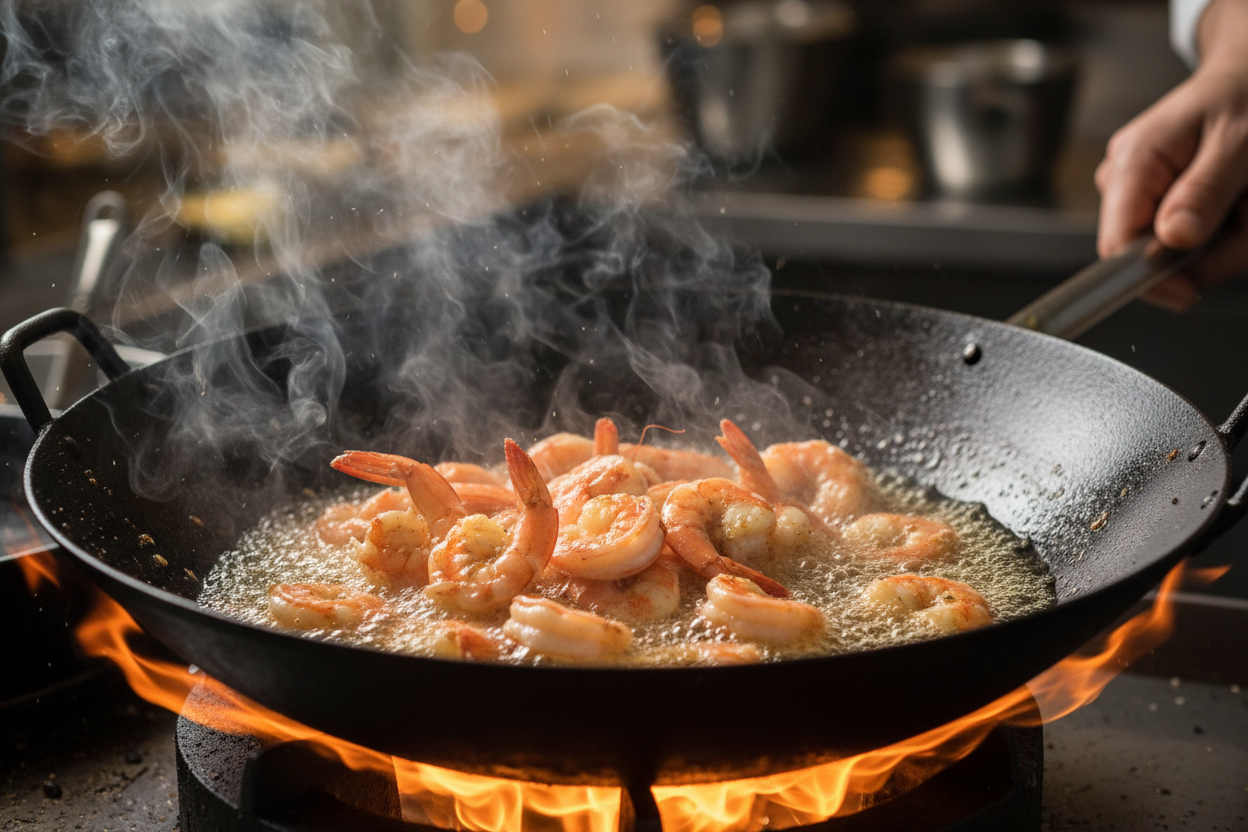
2. Cook the Shrimp
Next, focus on the succulent shrimp. Heat 1 tbsp of vegetable oil in a large skillet or wok over medium-high heat. Ensure the oil is shimmering but not smoking before adding the shrimp. Add the 1 lb of peeled, deveined shrimp to the hot skillet in a single layer, making sure not to overcrowd the pan. Cook the shrimp for approximately 2 minutes per side. The shrimp should curl slightly and turn pink and opaque, indicating they are perfectly cooked through. Overcooking shrimp will make them tough, so watch them carefully. Once cooked, promptly remove the shrimp from the pan and transfer them to a clean plate. Set them aside while you prepare the remaining components.
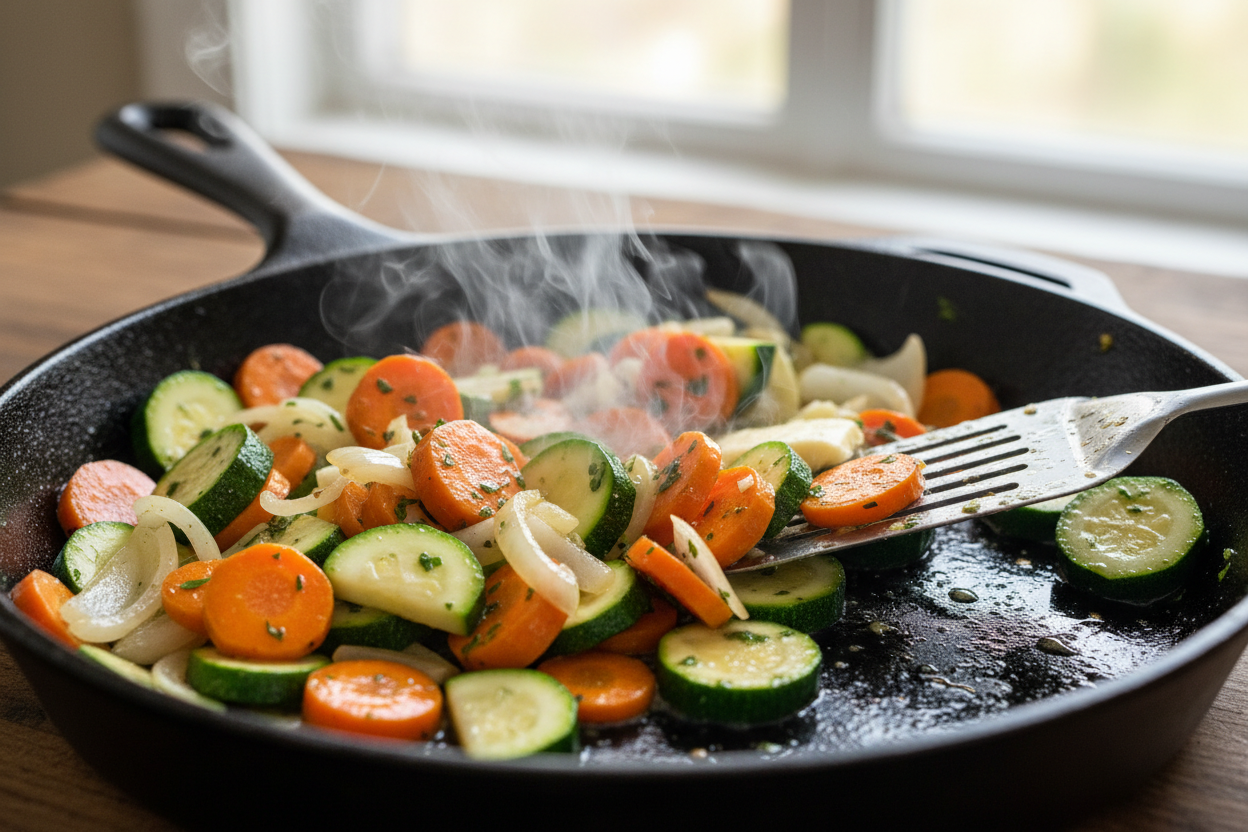
3. Sauté the Vegetables
Using the same skillet, without cleaning it, melt 1 tbsp of butter over medium-high heat. The residual flavors from the shrimp will enhance the vegetables. Once the butter has melted and begins to sizzle, add the 1 cup chopped zucchini, 0.5 cup diced carrots, and 0.5 cup diced yellow onion to the pan. These vegetables form the vibrant, flavorful base of your hibachi experience. Stir-fry zucchini and carrots along with the onion for approximately 5 minutes. Continue stirring frequently to ensure even cooking. The goal is for the vegetables to become tender-crisp – cooked through but still retaining a slight bite. Once they reach this desired texture, remove them from the skillet and set them aside on the same plate as the cooked shrimp. Keeping them separate for now prevents them from becoming overcooked while you prepare the rice.
4. Fry the Rice
Now, it’s time to build the heart of your Hibachi Shrimp Rice Bowl – the fried rice. Melt the remaining 1 tbsp of butter in the same skillet over medium-high heat. Add the 3 cups of day-old rice to the skillet. It is crucial to use day-old rice for optimal results, as its lower moisture content prevents stickiness. Break up any clumps of rice with your spatula as you add it to the pan. Next, add the 0.5 cup thawed frozen peas. Pour in the 3 tbsp soy sauce and the remaining garlic powder (from your initial 1 tsp total). Stir continuously for approximately 3 minutes, ensuring all ingredients are well distributed and the rice is thoroughly heated through. Continue stirring until the rice is lightly toasted and has absorbed the flavors of the soy sauce and garlic powder.
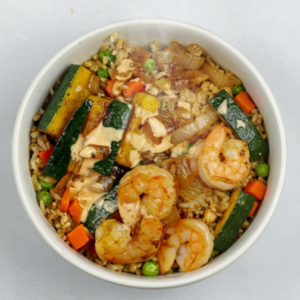
5. Assemble the Bowls
With all components ready, it’s time for assembly. Divide the freshly fried rice evenly among 4 bowls. Next, artfully top each portion of rice with the cooked vegetables and shrimp. Arrange them attractively over the rice. The final flourish is a generous drizzle of the chilled creamy sauce you prepared earlier. This creamy hibachi sauce ties all the flavors together, providing a tangy, rich counterpoint to the savory shrimp and vegetables. Serve immediately and enjoy your homemade Japanese steakhouse style dinner.
Expert Tips for the Best Fried Rice
Achieving restaurant-quality fried rice at home is entirely possible with a few key techniques. These tips are crucial for perfecting the texture and flavor of your shrimp fried rice bowl.
Use Cold, Day-Old Rice: This is arguably the most critical tip for superior fried rice. Freshly cooked rice retains a significant amount of moisture, making it prone to steaming rather than frying in the pan. When you try to fry fresh, wet rice, it often becomes clumpy and mushy. Chilling the rice, ideally overnight, allows it to dry out considerably. This reduced moisture content ensures that when it hits the hot skillet, the grains separate beautifully and develop a slight crispness rather than sticking together. This drier texture is what gives authentic fried rice its characteristic chew and prevents a soggy outcome. Always plan ahead by cooking your white rice the day before you intend to make this dish.
High Heat is Essential: The success of any stir-fry, including fried rice, hinges on using adequate heat. A very hot pan prevents the ingredients from stewing or steaming in their own juices. Instead, high heat promotes quick cooking, allowing the shrimp to sear rapidly and the vegetables to become tender-crisp while maintaining their vibrant color and fresh texture. For the rice, high heat helps to evaporate any remaining moisture and encourages a light toasting of the grains, enhancing their flavor and preventing gumminess. Ensure your skillet or wok is thoroughly preheated before adding any ingredients, especially when cooking the shrimp and frying the rice. This rapid, intense cooking method is what separates truly excellent fried rice from merely cooked rice and ingredients.
Storage and Meal Prep Guidelines
This Hibachi Shrimp Rice Bowl is an excellent candidate for a meal prep seafood recipe, making it a convenient option for healthy lunches or dinners throughout the week. Proper storage is key to maintaining quality and flavor. After assembling, divide the cooked fried rice, vegetables, and shrimp into airtight containers. For the best results and to prevent the rice from getting soggy, it is highly recommended to store the creamy sauce separately in small, individual containers. This allows you to add the fresh sauce just before eating. Store the sealed containers in the refrigerator for up to 4 days. When ready to eat, simply microwave the rice, vegetables, and shrimp until warmed through. Once heated, drizzle generously with the chilled homemade yum yum sauce. This methodical approach ensures you can enjoy a delicious, ready-to-eat quick seafood meal prep whenever hunger strikes, preserving the integrity of each component.
Mastering this simple recipe allows you to bring the beloved flavors of a Japanese steakhouse style dinner into your daily routine. Enjoy the process of creating a delicious, customizable meal that is both satisfying and incredibly convenient. We hope this guide helps you create the perfect Hibachi Shrimp Rice Bowl every time. For more exciting recipes, cooking tips, and culinary inspiration, be sure to follow our community on Facebook. You can find us and join the conversation by visiting our Facebook page. We look forward to connecting with you there.
Homemade Hibachi Shrimp Rice Bowl
Ingredients
- 1 lb Shrimp peeled, deveined
- 3 cups Cooked white rice day-old, cold
- 1 cup Zucchini chopped
- 0.5 cup Carrots diced
- 0.5 cup Peas frozen, thawed
- 0.5 cup Yellow onion diced
- 3 tbsp Soy sauce low sodium preferred
- 2 tbsp Butter divided
- 0.5 cup Mayonnaise for creamy sauce
- 1 tbsp Ketchup for creamy sauce
- 1 tsp Garlic powder divided
- 1 tbsp Vegetable oil for cooking
Instructions
- Whisk together mayonnaise, ketchup, and half the garlic powder to create the creamy sauce. Set aside in the refrigerator.
- Heat vegetable oil in a large skillet or wok over medium-high heat. Add shrimp and cook for 2 minutes per side until pink. Remove and set aside.
- In the same skillet, melt 1 tbsp of butter. Add zucchini, carrots, and onions. Stir-fry for 5 minutes until tender-crisp. Remove and set aside with the shrimp.
- Melt the remaining 1 tbsp of butter in the skillet. Add the day-old rice and peas, breaking up any clumps. Pour in the soy sauce and remaining garlic powder, stirring continuously for 3 minutes.
- Divide the fried rice into bowls, top with the cooked vegetables and shrimp, and drizzle generously with the prepared creamy sauce.
For more daily recipes and tips, follow us on Facebook!
Click here to join our community!