
For anyone seeking truly exceptional flavor and tender, succulent meat, the allure of slow-cooked beef back ribs is undeniable. This method transforms a humble cut into a centerpiece, showcasing the rich, savory depth of beef. Achieving this culinary feat at home hinges on one fundamental principle: low and slow smoking. This approach coaxes out incredible tenderness, allowing the connective tissues to break down, resulting in beef that is both flavorful and incredibly tender.
## Understanding the Cut: Beef Back Ribs
Beef back ribs are cut from the prime rib section of the steer, located along the backbone. These ribs are renowned for the generous amount of rich, flavorful meat nestled between and around the bones, as well as the marbling within. Unlike other beef rib cuts, back ribs typically have less meat on top of the bone, with most of the muscle residing between the bones. This makes them an excellent choice for smoking, as the meat benefits immensely from extended cooking. Their inherent fat content renders beautifully during a long smoke, contributing to a moist and deeply satisfying eating experience. The robust flavor of beef back ribs stands on its own, making them a favored choice for barbecued beef ribs.
## Essential Equipment and Wood Selection
Successful smoking of beef back ribs requires a few key pieces of equipment. A reliable smoker or charcoal grill capable of maintaining a consistent low temperature is paramount. Whether you use a dedicated pellet smoker, an offset smoker, or a charcoal grill with indirect heat, stability is key. For those utilizing pellet smoker recipes, consistency is easily achieved.
The choice of wood greatly influences the final flavor profile. Hickory wood smoke imparts a classic, strong, and distinct barbecue flavor that pairs exceptionally well with beef. For a milder, fruitier note, applewood smoked beef offers a delicate sweetness that complements the richness of the ribs without overpowering them. Mesquite provides an even stronger, more pungent smoke flavor, often favored by those who prefer an intense smokiness. Experiment with different woods to find your preferred balance.
Finally, you will need a reliable meat thermometer to monitor both your smoker’s ambient temperature and the internal temperature of the beef. Butcher paper or heavy-duty aluminum foil will be essential for the wrapping stage, helping to tenderize the meat and lock in moisture.
## Step-by-Step Preparation Guide
Preparing your beef back ribs properly lays the foundation for that coveted fall-off-the-bone beef experience. Begin with two racks of beef back ribs, weighing approximately 2-3 pounds each.
### Step 1: Removing the Membrane
The first crucial step is to remove the silver skin membrane from the back of the ribs. This thin, tough membrane does not break down during cooking and can result in tough, chewy ribs. To remove it, slide a knife under the membrane at one end of the rack, then grip it with a paper towel and pull it cleanly off. This ensures a tender texture throughout the finished product.
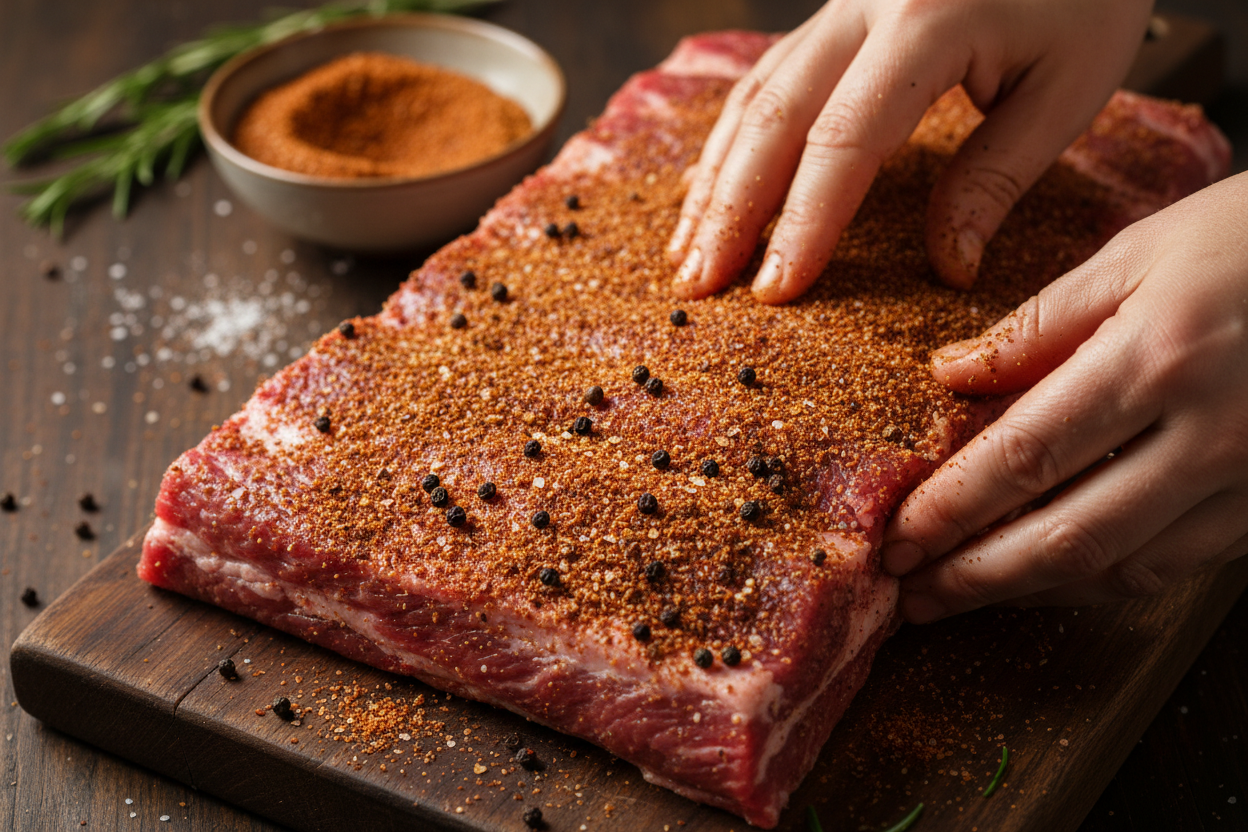
### Step 2: Crafting the Perfect Dry Rub
A well-balanced beef dry rub recipe adds a significant layer of flavor and helps create a delicious bark on the ribs. In a small bowl, combine 1/4 cup of brown sugar, 2 tablespoons of kosher salt, 1 tablespoon of black pepper, 1 tablespoon of garlic powder, and 1 tablespoon of paprika. Mix these ingredients thoroughly. Liberally apply this dry rub to all sides of the beef back ribs, pressing it gently into the meat to ensure it adheres. Allow the rubbed ribs to sit at room temperature for at least 30 minutes, or refrigerate for up to 4 hours, allowing the flavors to meld.
### Step 3: Preheating the Smoker
While the ribs absorb the rub, preheat your smoker or charcoal grill. The goal is to maintain a consistent temperature of 250°F throughout the cooking process. If using a charcoal grill for smoking beef on a grill, arrange your coals for indirect heat and add your chosen wood chunks or chips. For pellet smokers, simply set your desired temperature. Stable temperature control is vital for successful low and slow beef.
## The Cooking Process
The journey to perfect smoked beef ribs involves distinct phases, each contributing to tenderness and flavor.
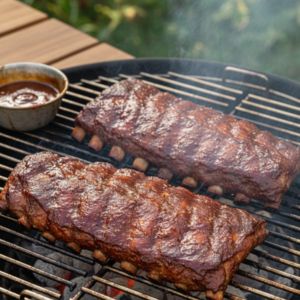
### Step 4: The Initial Smoke
Once your smoker is at a stable 250°F, place the dry-rubbed beef back ribs directly on the grates. Close the lid and begin the initial smoke. Allow the ribs to smoke undisturbed for 3 hours. During this phase, the meat absorbs the rich hickory wood smoke or applewood smoked beef flavor, and the dry rub begins to form a flavorful crust. After the first hour, begin spritzing the ribs every 45-60 minutes with 1 cup of apple cider vinegar. This spritz keeps the surface moist, helps the smoke adhere, and adds a subtle tang.
### Step 5: The Wrap (Texas Crutch)
After 3 hours of initial smoking, the ribs will have developed a good color and taken on a significant amount of smoke flavor. This is when the “Texas Crutch” comes into play – wrapping the ribs to tenderize them further. Lay out a large piece of heavy-duty aluminum foil or butcher paper. Place each rack of ribs on its own piece. Drizzle 1/2 cup of your favorite barbecue sauce over each rack before securely wrapping them. Ensure the wrap is tight to prevent steam and moisture from escaping. Return the wrapped ribs to the smoker, maintaining the 250°F temperature. Continue cooking for another 2 to 3 hours, or until the ribs reach an internal temperature of around 200-205°F and are probe tender. The meat should feel very soft when probed with a meat thermometer.

### Step 6: Glazing and Finishing
Once the ribs are probe tender, carefully unwrap them. If desired, you can discard any accumulated liquid in the foil, or reserve it to mix with more sauce. At this point, apply a final, generous coat of 1/2 cup of your favorite barbecue sauce (or more, to taste) to the unwrapped ribs. Place them back on the smoker, directly on the grates, for a final 30-60 minutes. This last step allows the sauce to caramelize and thicken, forming a glossy, delicious glaze on your barbecued beef ribs. Monitor them closely to prevent burning. The ribs are ready when the sauce is tacky and lightly caramelized.
## Resting and Serving Suggestions
Patience is key even after the ribs are cooked. Once glazed, remove the smoked beef ribs from the smoker and let them rest, loosely tented with foil, for at least 15 minutes. This resting period allows the juices within the meat to redistribute, ensuring every bite is moist and flavorful. Skipping this step can result in drier ribs.
When ready to serve, slice the ribs between the bones. They should exhibit that desirable fall off the bone beef tenderness. Pair your perfect smoked beef ribs with classic barbecue side dishes such as creamy coleslaw, sweet and savory baked beans, and warm cornbread for a complete and satisfying meal.
## Frequently Asked Questions
### How do I know when the meat is done?
The most reliable indicator of doneness for smoked beef ribs is tenderness, not just a specific internal temperature. While an internal temperature range of 200-205°F is a good target, the meat should feel extremely tender when probed with a meat thermometer. If the probe slides in with very little resistance, much like pushing into soft butter, the ribs are done. The meat should also have pulled back from the ends of the bones, exposing about a quarter to half-inch of bone. Rely on the “probe test” for truly tender ribs, as meat thermometer temperatures can vary slightly.
### Can I use a gas grill for this recipe?
Yes, you can adapt this recipe for smoking beef on a grill, specifically a gas grill. The key is to set up your gas grill for indirect heat. This typically involves lighting burners on one side and placing the ribs on the unlit side. Use a smoker box or foil pouch filled with wood chips over a lit burner to generate smoke. Maintaining a consistent 250°F temperature on a gas grill can be challenging but is achievable with careful monitoring and adjustment of burner settings. Ensure you have a reliable grill thermometer.
### How to store and reheat leftovers safely.
To store leftover smoked beef ribs, allow them to cool completely, then wrap them tightly in aluminum foil or place them in an airtight container. Refrigerate for up to 3-4 days. For reheating, the best method is low and slow to prevent drying out. Preheat your oven to 250°F. Place the ribs, wrapped in foil with a splash of water or broth, in the oven until heated through, typically 20-30 minutes. You can also reheat them, wrapped, on a smoker or grill at a low temperature.
For more mouth-watering recipes and smoking tips, follow our Facebook page: https://www.facebook.com/profile.php?id=61568538666337
Slow-Cooked Barbecued Beef Back Ribs
Ingredients
- 2 racks Beef back ribs Membrane removed from the back
- 1/4 cup Brown sugar Light or dark, packed
- 2 tbsp Smoked paprika Sweet or hot based on preference
- 1 tbsp Kosher salt
- 1 tbsp Black pepper Coarsely ground
- 1 tbsp Garlic powder
- 1/2 cup Apple cider vinegar Placed in a spray bottle for spritzing
- 1 cup Barbecue sauce Divided for wrapping and glazing
Instructions
- Remove the membrane from the back of the beef ribs using a butter knife to lift the edge, gripping it with a paper towel, and pulling it off.
- Mix the brown sugar, smoked paprika, kosher salt, black pepper, and garlic powder in a small bowl. Apply the dry rub evenly across all sides of the ribs.
- Preheat your smoker or grill to 250°F using hickory, mesquite, or applewood for smoke.
- Place the ribs bone-side down on the grates. Smoke for 3 hours, spritzing the meat lightly with apple cider vinegar every hour to retain moisture.
- Remove the ribs from the smoker. Wrap them tightly in heavy-duty aluminum foil, pouring half of the barbecue sauce inside the wrap. Return the wrapped ribs to the smoker for 1.5 hours.
- Carefully unwrap the ribs, brush the top with the remaining barbecue sauce, and place them back on the smoker uncovered for 30 minutes until the sauce is sticky and caramelized.
- Remove from the smoker and let the ribs rest for 15 minutes before slicing and serving.
For more daily recipes and tips, follow us on Facebook!
Click here to join our community!