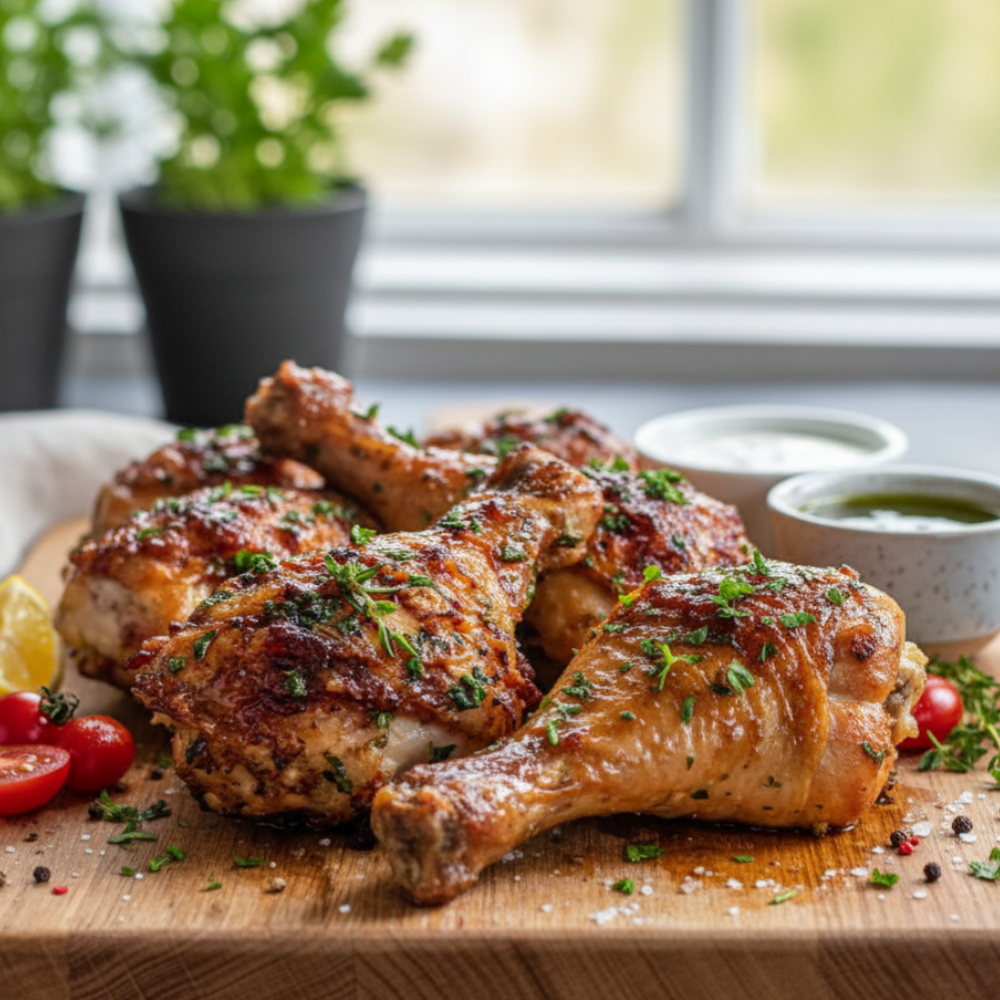
Crispy Oven-Baked Drumsticks with Flavorful Herbs
There’s something incredibly satisfying about a meal that delivers big on flavor without demanding hours in the kitchen. Today, we’re diving into a recipe that promises just that: incredibly juicy drumsticks with a golden, crackling skin, all achieved in your oven. Forget the deep fryer; these Crispy Oven-Baked Drumsticks are about to become your new favorite way to enjoy chicken, perfect for any night of the week.
Why You’ll Love This Recipe
Life gets busy, and finding a delicious, healthy meal that fits into a hectic schedule can feel like a quest. That’s precisely why these oven-baked drumsticks are a game-changer. They embody the essence of an easy chicken dinner, requiring minimal hands-on prep before you simply slide them into the oven to roast to perfection. Beyond their simplicity, they’re wonderfully budget-friendly, making them an excellent choice for feeding a crowd or simply stretching your grocery dollar.
What truly sets this recipe apart is the incredible crunch you’ll achieve on the outside, without any deep frying. We’re talking legitimately crispy chicken skin that shatters with every bite, revealing tender, succulent meat beneath. This makes them a fantastic option for a lighter, yet utterly satisfying meal. Plus, because they’re so straightforward and flavorful, they easily become one of those go-to family friendly meals that everyone, from toddlers to grandparents, will request again and again. You can even double the batch for efficient healthy meal prep, ensuring you have wholesome options ready for lunches or future dinners.
Key Ingredients
The beauty of this dish lies in its simplicity, relying on fresh, vibrant ingredients to elevate humble drumsticks into a feast. Here’s what you’ll need:
- Chicken Drumsticks: Bone-in, skin-on are crucial for that incredible crispiness and flavor.
- Fresh Herbs: A generous handful of fresh parsley and thyme are non-negotiable. They infuse the chicken with an aromatic, earthy note that’s simply irresistible. Don’t skimp on fresh; it makes a huge difference.
- Garlic: Lots of it! Minced fresh garlic penetrates the chicken, creating that signature garlic herb chicken flavor profile.
- Lemon: Sliced lemon adds a bright, zesty counterpoint to the richness of the chicken and herbs. It also helps tenderize the meat slightly and provides a beautiful aroma as it roasts.
- Cherry Tomatoes: Scattered around the drumsticks, these burst slightly in the oven, releasing their sweet, acidic juices which meld beautifully with the other flavors, creating a rustic pan sauce as they bake.
- Olive Oil: Essential for coating the chicken, helping the seasonings adhere, and promoting that golden-brown finish.
- Seasonings: Salt, freshly ground black pepper, and a touch of smoked paprika (optional, but highly recommended for depth and color).
- Baking Powder: Our secret weapon for truly crispy skin! Don’t worry, you won’t taste it.
The Secret to Crispy Skin
Achieving truly crispy chicken skin in the oven isn’t just luck; it’s a science, and it boils down to two critical steps. Master these, and you’ll never settle for flabby skin again!
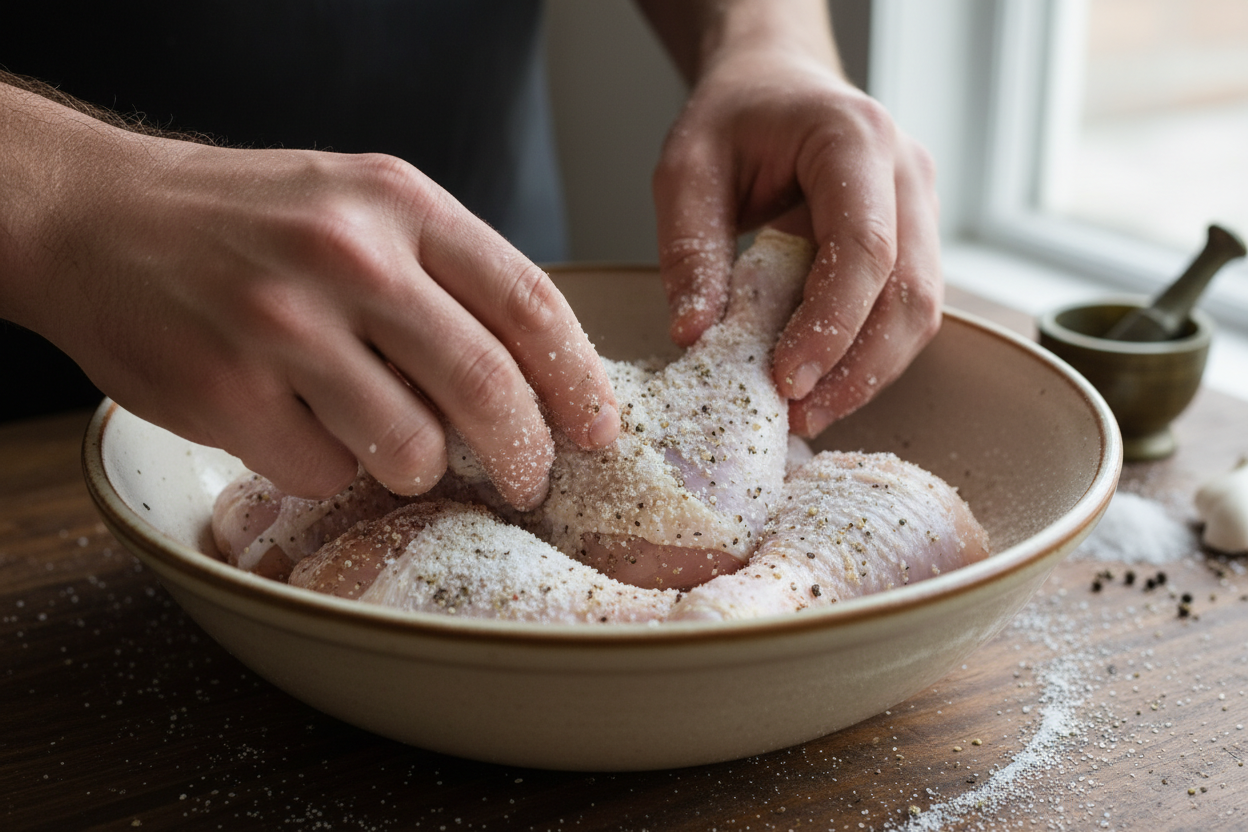
First and foremost, you must ensure your chicken drumsticks are completely dry. Moisture is the enemy of crispiness. Before seasoning, take the time to thoroughly pat each drumstick dry with paper towels. You want to remove as much surface moisture as possible. This allows the skin to render its fat and crisp up beautifully rather than steaming in its own juices.
Secondly, and this might sound unusual, but a small amount of baking powder is your secret weapon. When combined with salt and tossed with the chicken, baking powder raises the skin’s pH, which helps the proteins break down more effectively. More importantly, it creates tiny air bubbles on the skin’s surface. As the chicken cooks, these air bubbles expand and crisp, resulting in an incredibly light, airy, and shatteringly crispy texture. Don’t worry, you won’t taste it; its magic is purely textural. Just make sure to use aluminum-free baking powder to avoid any metallic aftertaste. It’s truly a game-changer for any bone-in chicken recipes where crispy skin is the goal.
Step-by-Step Instructions
Get ready to create some of the best baked chicken legs you’ve ever tasted. Following this simple roasted drumsticks preparation style will lead you to golden-brown perfection every single time.
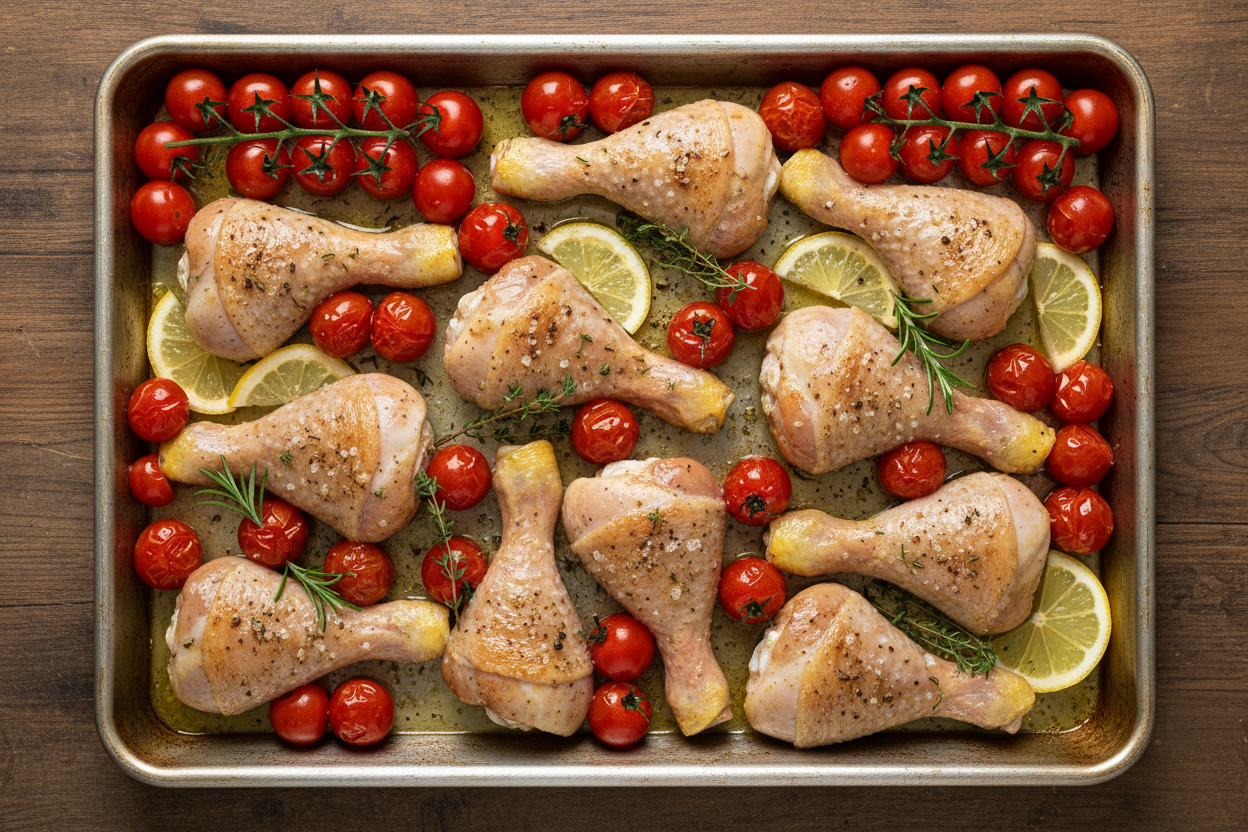
- Prep the Chicken: Start by preheating your oven to 400°F (200°C). Line a large baking sheet with parchment paper or foil for easy cleanup, and place an oven-safe wire rack on top. This allows air to circulate around the drumsticks, promoting even crisping.
- Dry and Season: Pat the chicken drumsticks extremely dry with paper towels. This is crucial for crispy skin! In a large bowl, toss the drumsticks with olive oil, salt, black pepper, smoked paprika (if using), minced garlic, and the baking powder. Ensure every drumstick is evenly coated.
- Add Herbs and Aromatics: Add the fresh parsley and thyme leaves to the bowl, along with the lemon slices and cherry tomatoes. Gently toss again to combine, ensuring the herbs stick to the chicken and the aromatics are well distributed.
- Arrange for Roasting: Arrange the seasoned drumsticks in a single layer on the wire rack, making sure they are not touching each other. Scatter the lemon slices, cherry tomatoes, and any extra herbs around and under the chicken.
- Roast to Perfection: Transfer the baking sheet to the preheated oven. Roast for 35-45 minutes, or until the internal temperature of the thickest part of the drumstick reaches 165°F (74°C) and the skin is deeply golden brown and wonderfully crispy. For an extra crisp finish, you can broil for the last 2-3 minutes, watching carefully to prevent burning.
- Rest and Serve: Once cooked, remove the drumsticks from the oven and let them rest on the rack for 5-10 minutes before serving. This allows the juices to redistribute, ensuring maximum tenderness.
Flavor Variations to Try
While the classic garlic herb chicken profile is undeniably delicious, these drumsticks are incredibly versatile! Looking to mix things up? Here are a few ideas to get your creative juices flowing:
- Spicy Kick: For those who love a bit of heat, add a teaspoon of red pepper flakes or a pinch of cayenne pepper to your seasoning mix. You could also toss the drumsticks with a dash of your favorite hot sauce before baking, or make a simple spicy glaze with sriracha and honey to brush on during the last 10 minutes of cooking.
- Sweet & Tangy BBQ: Skip the fresh herbs and instead, coat the drumsticks with a generous rub of brown sugar, paprika, garlic powder, onion powder, and a touch of dry mustard. During the last 15-20 minutes of baking, brush them with your favorite tangy BBQ sauce, allowing it to caramelize and become sticky.
- Extra Garlicky Goodness: If you’re a true garlic lover, double the amount of minced garlic in the original recipe. You could also smash whole cloves of garlic and tuck them under the skin of the drumsticks before roasting for an even deeper, sweeter garlic flavor as they bake.
- Mediterranean Twist: Replace thyme with dried oregano, add finely chopped sun-dried tomatoes to the mix, and include some pitted Kalamata olives alongside the cherry tomatoes. A sprinkle of feta cheese over the top during the last 5 minutes of baking would also be divine.
Serving Suggestions
These crispy baked chicken legs are fantastic on their own, but pairing them with the right sides elevates them into a complete and truly satisfying meal experience. The recipe suggests two delightful dips, which we’ll elaborate on:
- Refreshing Green Dip: Imagine a vibrant, cool dip made from fresh Greek yogurt or sour cream blended with finely chopped cucumber, fresh mint, a squeeze of lemon juice, and a pinch of salt. This tzatziki-like dip provides a fantastic, cooling contrast to the rich chicken and garlic herb flavors. It’s light, bright, and incredibly refreshing.
- Creamy White Dip: For something richer and more savory, consider a creamy garlic aioli or a simple homemade ranch dip. A quick aioli can be made by whisking mayonnaise with minced garlic, lemon juice, and a touch of Dijon mustard. Alternatively, a blend of sour cream, mayonnaise, chives, dill, and garlic powder makes a quick and easy ranch-style dip that kids and adults alike will adore.
Beyond the dips, consider these fantastic companions: a simple green salad with a light vinaigrette, fluffy couscous or quinoa to soak up the pan juices, or roasted root vegetables like carrots and potatoes that can share the oven with your drumsticks. Steamed green beans or asparagus also make a perfect, healthy complement.
Storage and Reheating Tips
Leftovers of these delicious drumsticks are a real treat, but the key is to keep that skin as crispy as possible! Here’s how to store and reheat them:
- Storage: Allow the drumsticks to cool completely to room temperature before storing. Place them in an airtight container and refrigerate for up to 3-4 days. Separating them with parchment paper can help prevent them from sticking together.
- Reheating for Crispness: To bring back that glorious crisp skin, avoid the microwave!
- Oven Method: This is the best way. Preheat your oven to 375°F (190°C). Place the drumsticks on a wire rack set over a baking sheet (just like you cooked them initially). Reheat for 15-20 minutes, or until heated through and the skin has re-crisped.
- Air Fryer Method: If you have an air fryer, this is an excellent option for quick reheating. Place the drumsticks in a single layer in the air fryer basket and “fry” at 350°F (175°C) for 8-12 minutes, flipping halfway, until hot and crispy.
With these tips, your leftover drumsticks will be nearly as good as fresh, making them perfect for lunch the next day or a quick snack.
We hope you love these Crispy Oven-Baked Drumsticks as much as we do! They truly are a testament to how simple ingredients and smart techniques can create unforgettable meals.
If you enjoyed this recipe, be sure to follow us on Facebook for more delicious ideas, cooking tips, and behind-the-scenes fun! Find us at: https://www.facebook.com/profile.php?id=61568538666337

Crispy Oven-Baked Drumsticks
Ingredients
- 8 pieces chicken drumsticks bone-in, skin-on
- 1 tbsp baking powder aluminum-free
- 2 tbsp olive oil divided
- 1 tsp salt
- 1/2 tsp black peppercorns crushed
- 2 tbsp parsley freshly chopped
- 1 tbsp thyme fresh leaves
- 1 cup cherry tomatoes whole
- 1 whole lemon sliced
- 1/4 cup green dip for serving
- 1/4 cup white dip for serving
Instructions
- Preheat the oven to 400°F (200°C) and line a large baking sheet with parchment paper or a wire rack.
- Pat the chicken drumsticks completely dry with paper towels. Toss them in a large bowl with the baking powder, salt, and crushed black peppercorns until evenly coated.
- Drizzle one tablespoon of olive oil over the drumsticks and toss to combine. Arrange the chicken on the prepared baking sheet, ensuring they do not touch.
- Bake for 20 minutes, then flip the drumsticks. Scatter the cherry tomatoes and lemon slices around the chicken.
- Continue baking for another 20 to 25 minutes until the skin is golden and crispy, and the internal temperature reaches 175°F (80°C).
- Remove from the oven and garnish with fresh parsley and thyme. Serve immediately with the green dip and white dip on the side.
For more daily recipes and tips, follow us on Facebook!
Click here to join our community!