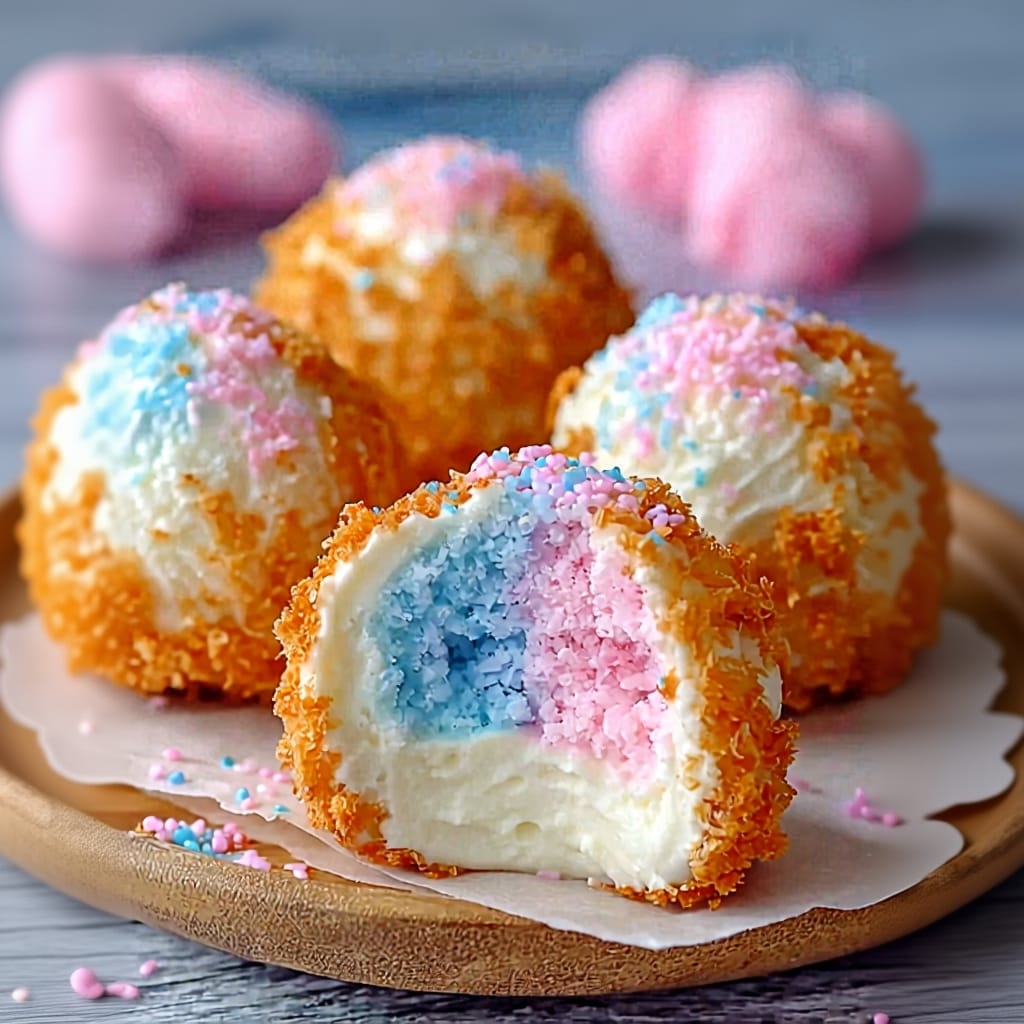
Step right up, sweet tooth adventurers! Remember that feeling of pure, unadulterated joy when you’d spot the fluffy clouds of cotton candy at the fair? That magical, melt-in-your-mouth sweetness that instantly transported you back to childhood? Well, get ready to recapture that whimsical wonder, because today we’re diving into a dessert creation that’s as enchanting as it is delicious: our incredible Cotton Candy Cheesecake Bombs. Imagine the dreamiest, creamiest cheesecake filling, infused with that unmistakable cotton candy charm, then perfectly coated in a delicate layer of toasted coconut. These aren’t just desserts; they’re tiny, spherical bites of pure happiness, perfect as homemade dessert truffles for any occasion.
Why You’ll Love This Recipe
There are countless reasons why these delightful sweet cheese balls will become your new go-to for celebrations, spontaneous cravings, or just a touch of everyday magic. From their effortless preparation to their dazzling appearance, they tick all the boxes for a show-stopping treat.
- No-Bake Ease: Say goodbye to oven-bound desserts, especially during those sweltering summer months! These no-bake cheesecake bites are a breeze to prepare, requiring no baking whatsoever. They’re the ultimate easy party desserts, freeing you up to enjoy the festivities without being tied to the kitchen.
- Customizable Charm: One of the most enchanting aspects of these dessert bombs is their versatility. While we love the classic pink and blue cheesecake swirl reminiscent of a carnival sky, you can easily adapt the colors to suit any theme. Think pastel hues for baby showers, vibrant shades for a kids’ birthday party, or even festive colors for holidays. The possibilities are as endless as your imagination!
- Irresistible Texture Contrast: Prepare your palate for a symphony of textures. Each bite offers the luxuriously smooth, tangy, and sweet cream cheese filling, which then gives way to the delightful crunch and nutty aroma of the perfectly toasted coconut balls coating. It’s a textural journey that keeps you coming back for more.
Ingredients and Substitutions
Crafting the perfect Cotton Candy Cheesecake Bombs begins with selecting quality ingredients. Here’s what you’ll need and some expert tips for making the best choices:
- Cream Cheese: This is the star of our cream cheese dessert bombs, so choose wisely! Always opt for full-fat block cream cheese, not the spreadable cream cheese that comes in a tub. Block cream cheese has a lower water content, resulting in a much firmer, richer, and more stable filling that holds its shape beautifully when chilled.
- Cotton Candy Flavoring: This is where the magic truly happens! You can typically find cotton candy flavoring extracts in specialty baking stores, online retailers, or even in the baking aisle of larger supermarkets. If you’re having trouble locating it, a tiny piece of actual cotton candy can be melted into a small amount of warm milk or cream and then added to the mixture, though the extract provides a more concentrated and consistent flavor.
- Binding Agents: For the classic cheesecake texture, we recommend finely crushed graham cracker crumbs. They provide a sturdy base and a familiar flavor profile. However, if you’re looking for a gluten-free option, finely ground almond flour or even coconut flour can be excellent alternatives. Just be mindful that coconut flour absorbs a lot of liquid, so you might need slightly less.
- Coating Options: For a smooth, set finish, you have a few choices. High-quality white chocolate, almond bark, or candy melts all work wonderfully. White chocolate offers a richer flavor, while almond bark and candy melts are often easier to work with, setting quickly and providing a consistent sheen. Choose what you prefer or what’s most accessible.
- Sweetener & Flavor Enhancers: Powdered sugar helps achieve a smooth, lump-free texture. A touch of vanilla extract can enhance the overall sweetness without overpowering the cotton candy flavor.
- Coconut Flakes: For that irresistible outer crunch, fine unsweetened shredded coconut is ideal. Toasting it elevates its flavor profile significantly.
- Gel Food Coloring: For those vibrant, whimsical swirls, gel food coloring is preferred over liquid. It’s more concentrated, so you’ll need less, and it won’t thin out your cheesecake batter.
Step-by-Step Instructions
Let’s get down to the nitty-gritty of creating these delightful carnival themed treats. Follow these steps for perfect results every time!
Preparing the Filling
Soften the Cream Cheese: Start with softened cream cheese. This is crucial for a lump-free filling. In a large mixing bowl, combine the softened block cream cheese with the powdered sugar and vanilla extract. Use an electric mixer on medium speed to beat the mixture until it is completely smooth and creamy, with no lumps visible. This creates the optimal smoothness for your cheesecake base.
Add Flavoring: Once smooth, fold in your cotton candy flavoring extract. Start with a small amount (about 1 teaspoon) and taste, adding more if you desire a stronger flavor. Remember, a little goes a long way!
Incorporate Binder: Gently mix in the crushed graham cracker crumbs (or your chosen gluten-free alternative) until just combined. Be careful not to overmix.
Divide and Color: Divide the cheesecake mixture into two separate bowls. Add a few drops of pink gel food coloring to one bowl and a few drops of blue gel food coloring to the other. Mix each bowl gently until the color is evenly distributed. For a lovely marbled effect, you can lightly swirl the two colors together without fully mixing them, leaving distinct patches of pink and blue cheesecake.
Molding and Chilling
Form the Spheres: Using a small cookie scoop or two spoons, portion out the colored cheesecake mixture. Roll each portion gently between your palms to form uniform, golf-ball-sized perfect spheres. Place the rolled sweet cheese balls onto a parchment-lined baking sheet.
Chill Thoroughly: This is a critical step! Once all your cheesecake bombs are rolled, place the baking sheet into the refrigerator for at least 1-2 hours, or until they are very firm. The importance of the chilling stage cannot be overstated; it ensures they hold their shape during the coating process and makes them much easier to handle. For an even quicker chill, you can place them in the freezer for about 30-45 minutes.
Coating and Finishing
Toast the Coconut: While your cheesecake bombs are chilling, prepare your toasted coconut. Spread the shredded coconut evenly on a baking sheet. Bake in a preheated oven at 300°F (150°C) for 5-10 minutes, stirring occasionally, until it’s golden brown and fragrant. Alternatively, toast it in a dry skillet over medium-low heat, stirring constantly, until evenly browned. This is how to toast coconut evenly and enhance its nutty flavor. Let it cool completely.

Melt the Coating: Melt your white chocolate, almond bark, or candy melts according to package directions. You can use a microwave (in 30-second intervals, stirring between each) or a double boiler. Ensure it’s smooth and fluid.
Dip and Roll: Working with a few chilled cheesecake bombs at a time, use a fork or a dipping tool to carefully immerse each bomb into the melted coating. Tap off any excess coating gently. Immediately transfer the dipped bomb to the bowl of toasted coconut. Roll it gently to ensure it’s fully coated. These are your beautiful cotton candy truffles in the making!
Set and Serve: Place the coated Cotton Candy Cheesecake Bombs back onto the parchment-lined baking sheet. Allow them to set at room temperature for about 15-20 minutes, or return them to the refrigerator for faster setting. Once set, they’re ready to enjoy!
Tips for Perfect Cheesecake Bombs
Achieving bakery-worthy Cotton Candy Cheesecake Bombs is easier than you think with these expert pointers:
- Temperature Matters: Always start with softened cream cheese for the filling to prevent lumps. However, the cheesecake dough itself must be thoroughly chilled dough before rolling and coating. This ensures they hold their spherical shape and prevents them from melting into a sticky mess during the dipping process.
- Gel Food Coloring for Vibrancy: For those eye-catching, vibrant swirls and distinct colors, always use gel food coloring. It’s much more concentrated than liquid food coloring and won’t add excess moisture to your cheesecake mixture, maintaining its perfect consistency. Start with a tiny drop and add more until you achieve your desired hue.
- Storage Hacks: To keep your cheesecake bombs fresh and fabulous, store them in an airtight container in the refrigerator. They taste incredible when slightly chilled. For longer storage, consider freezing (see FAQ for details).
- Work Clean: Have a designated dipping station with your melted coating, a bowl of toasted coconut, and a clean parchment-lined tray ready to receive the finished bombs. This streamlines the process and minimizes mess.
- Don’t Rush the Chill: Patience is a virtue, especially when it comes to chilling. A properly chilled filling is the secret to perfectly formed, easy-to-handle sweet cheese balls.
Serving Suggestions
These Cotton Candy Cheesecake Bombs are not just desserts; they’re an experience! Elevate their presentation to truly impress your guests:
- Plating Perfection: Arrange them artfully on a tiered dessert stand or in mini cupcake liners for an elegant display. A sprinkle of edible glitter or a tiny piece of fresh cotton candy on top of each bomb can add an extra touch of magic, making them ideal for kids birthday party snacks or any festive gathering.
- Carnival Theme Dreams: Lean into the carnival themed treats vibe! Serve these alongside brightly colored lemonade, sparkling fruit punches, or even mini corn dogs (if you’re having savory elements). Create a fun dessert bar with other whimsical treats like popcorn, candied apples, and striped straws.
- Coffee or Tea Companion: For a more sophisticated pairing, serve these delightful cheesecake bombs with a delicate cup of herbal tea or a light-roast coffee. The creamy sweetness complements the warmth perfectly.
- Gift Giving: Package a few Cotton Candy Cheesecake Bombs in a decorative box tied with a ribbon for a thoughtful homemade gift that’s sure to bring a smile.
FAQ
Can I freeze these Cotton Candy Cheesecake Bombs?
Yes, absolutely! These Cotton Candy Cheesecake Bombs freeze beautifully. Once fully set and coated, place them in a single layer on a parchment-lined baking sheet and freeze until solid. Then, transfer them to an airtight freezer-safe container or bag, separating layers with parchment paper. They can be frozen for up to 1 month. Thaw them in the refrigerator for a few hours before serving.
How long do they last in the fridge?
Stored in an airtight container in the refrigerator, your Cotton Candy Cheesecake Bombs will stay fresh and delicious for up to 5-7 days. The coating helps to seal in the moisture, keeping the creamy filling perfectly delightful.
Can I make them without cotton candy extract?
While the extract provides the most authentic flavor, you can certainly make a delicious version without it. For a subtle hint of cotton candy, you could very carefully melt a tiny amount of actual cotton candy into a tablespoon of warm milk or cream and then incorporate that into the cheesecake base. Alternatively, you can pivot the flavor profile entirely, using other extracts like raspberry, strawberry, or even a touch of lemon zest for a different but equally delightful “sweet cheese balls” experience.
Conclusion
There you have it – a recipe for pure, unadulterated joy in every bite! These Cotton Candy Cheesecake Bombs are more than just a dessert; they’re a celebration of whimsy, a nod to nostalgia, and an incredibly satisfying treat that’s surprisingly easy to make. Whether you’re planning a grand celebration, a cozy get-together, or simply treating yourself to a moment of sweet bliss, these no-bake cheesecake bites are guaranteed to bring smiles and delight. So go ahead, whip up a batch, and let the magic of cotton candy and creamy cheesecake transport you to your happiest place. Don’t forget to share your creations with us!
For more delicious recipes, behind-the-scenes fun, and community interaction, be sure to follow our Facebook page: https://www.facebook.com/profile.php?id=61568538666337. We can’t wait to connect with you!

Crispy Cotton Candy Cheesecake Bombs
Ingredients
- Cream cheese, softened Full-fat brick style works best for stability (approx 8 oz)./n/n**Substitutions:** - If you need a dairy-free option, high-quality vegan cream cheese ...
- Powdered sugar Also known as confectioners' sugar (approx 1/2 cup). Sift before using to remove clumps.
- Graham cracker crumbs Acts as a binder for the filling (approx 1 cup).
- Pure vanilla extract Adds depth to the flavor profile.
- Cotton candy extract Provides the signature carnival flavor. Start with 1/2 tsp and adjust to taste.
- White chocolate melting wafers For the coating shell (approx 10 oz).
- Sweetened shredded coconut Toasted until golden brown for the outer coating (approx 1.5 cups).
- Pink and Blue gel food coloring To create the colorful swirled effect.
Instructions
- Spread the shredded coconut on a baking sheet and bake at 325°F (163°C) for 5-7 minutes, stirring frequently until golden brown and crispy. Let cool completely.
- In a large mixing bowl, beat the softened cream cheese, powdered sugar, and vanilla extract until smooth and creamy.
- Add the cotton candy extract and graham cracker crumbs to the bowl. Mix on low speed until the crumbs are fully incorporated and the mixture is thick enough to hold its shape.
- Divide the cheesecake mixture into three small bowls. Leave one plain white, tint one pink, and tint the third blue using the food coloring.
- Take a teaspoon of each color (white, pink, blue) and press them together gently in your hand to form a marble-sized ball (about 1 inch in diameter). Repeat with the remaining mixture.
- Place the formed balls on a parchment-lined baking sheet and freeze for 20-30 minutes to firm up.
- Melt the white chocolate wafers in a microwave-safe bowl in 30-second intervals, stirring in between until smooth.
- Remove the cheesecake balls from the freezer. Dip each ball into the melted white chocolate, shaking off the excess.
- Immediately roll the chocolate-coated ball in the toasted coconut until fully covered.
- Place the finished bombs back on the parchment paper and refrigerate for at least 15 minutes to set the coating before serving.
For more daily recipes and tips, follow us on Facebook!
Click here to join our community!