When the sun shines brightest and fresh produce abounds, many gravitate towards quick, satisfying meals and sides. While grilling is a summer staple, bringing that same warmth and flavor indoors is often more convenient. Oven roasted corn offers a simple, mess-free solution for enjoying the sweetness of corn year-round. This method transforms humble ears of corn into a tender, flavorful side dish with minimal effort. It is perfect for those evenings when you crave fresh flavors without the fuss of outdoor cooking or boiling large pots of water.
This guide focuses on creating perfectly baked corn on the cob, emphasizing simplicity and delicious results. We will walk through everything you need to know to make truly remarkable roasted sweet corn right in your kitchen. From basic preparation to smart storage, every detail is covered, ensuring your corn turns out moist, sweet, and utterly enjoyable.
Why Try Oven Roasted Corn?
Choosing to prepare your corn in the oven comes with a host of advantages that often outweigh other cooking methods. One of the primary benefits is the convenience. Unlike boiling, which can dilute the natural sugars and flavor of the corn, or grilling, which requires constant attention and outdoor access, oven roasting is largely hands-off. You simply prepare the corn, place it in the oven, and let the heat do its work. This makes it an ideal option for anyone looking for easy dinner sides.
Another significant advantage is the minimal cleanup. When preparing foil wrapped corn, all the buttery goodness and seasoning stay contained within the foil packet. This prevents mess in your oven and on your stovetop, leaving you with little to scrub afterward. The foil also steams the corn as it roasts, ensuring each kernel is tender and juicy while still developing a slightly caramelized flavor that boiling cannot achieve.
Furthermore, oven roasting allows for consistent cooking. Each ear of corn receives even heat, resulting in uniformly tender kernels from tip to end. This reliability makes it a superior choice for gatherings or when you need a dependable side dish without much fuss. It is a fantastic addition to any meal, particularly as one of the quintessential summer vegetable sides, even if made indoors. The flavor profile of oven-roasted corn is subtly sweeter and richer, a direct result of the dry heat concentrating its natural sugars rather than leaching them out. It becomes a deeply satisfying accompaniment to a wide range of main courses, from roasted chicken to grilled fish or even simple vegetarian meals. This method prioritizes ease without sacrificing flavor, making it a go-to technique for home cooks everywhere.
Oven roasting corn is a superior method for achieving tender, flavorful results with minimal effort and cleanup. The dry heat concentrates the corn’s natural sugars, enhancing its sweetness and creating a deeply satisfying side dish.
Ingredients You Need
Creating delicious oven roasted corn does not require a long list of exotic ingredients. In fact, its beauty lies in its simplicity, relying on the inherent sweetness of fresh corn and a few basic additions to enhance its natural appeal. For this recipe, you will need a precise set of items, ensuring consistent results every time.
First and foremost, gather 4 ears of corn. When selecting corn, look for bright green husks that are tightly wrapped, and feel for plump, firm kernels beneath. The silk should be slightly damp and golden or brown, not black or slimy. Freshness is key to the success of this dish, as it directly impacts the sweetness and texture of your finished product.
Next, you will require 4 tablespoons of butter. Unsalted butter is generally preferred, as it allows you to control the overall saltiness of the dish. The butter melts into the corn during roasting, infusing it with richness and helping the kernels to achieve a beautiful, tender consistency. It also acts as a binder for the seasoning.
Finally, you will need 1 teaspoon of black pepper. Freshly ground black pepper offers a more vibrant aroma and flavor compared to pre-ground varieties. The pepper adds a subtle warmth and a gentle bite that complements the sweetness of the corn without overpowering it. This simple seasoning is enough to elevate the corn without complicating the flavor profile.
This short and sweet ingredient list ensures that the natural taste of the roasted sweet corn remains the star of the show. There are no unnecessary additions that distract from the pure, comforting flavors. The quality of these few ingredients directly translates to the quality of your finished dish.
Step-by-Step Instructions
Preparing oven roasted corn is a straightforward process that yields incredibly satisfying results. Follow these precise steps to ensure your baked corn on the cob is perfectly cooked, tender, and bursting with flavor.
1. Preheat Your Oven: Begin by preheating your oven to 400°F (200°C). Allowing the oven to come to a full, stable temperature before adding the corn is crucial for even cooking. While the oven preheats, you can prepare your corn.
2. Prepare the Corn: Carefully shuck the 4 ears of corn, removing all the green husks and silk strands. A stiff brush or a damp paper towel can help remove stubborn silks. Once shucked, rinse the corn under cool water and pat it dry with a clean cloth or paper towel. Drying the corn ensures that the butter adheres properly.
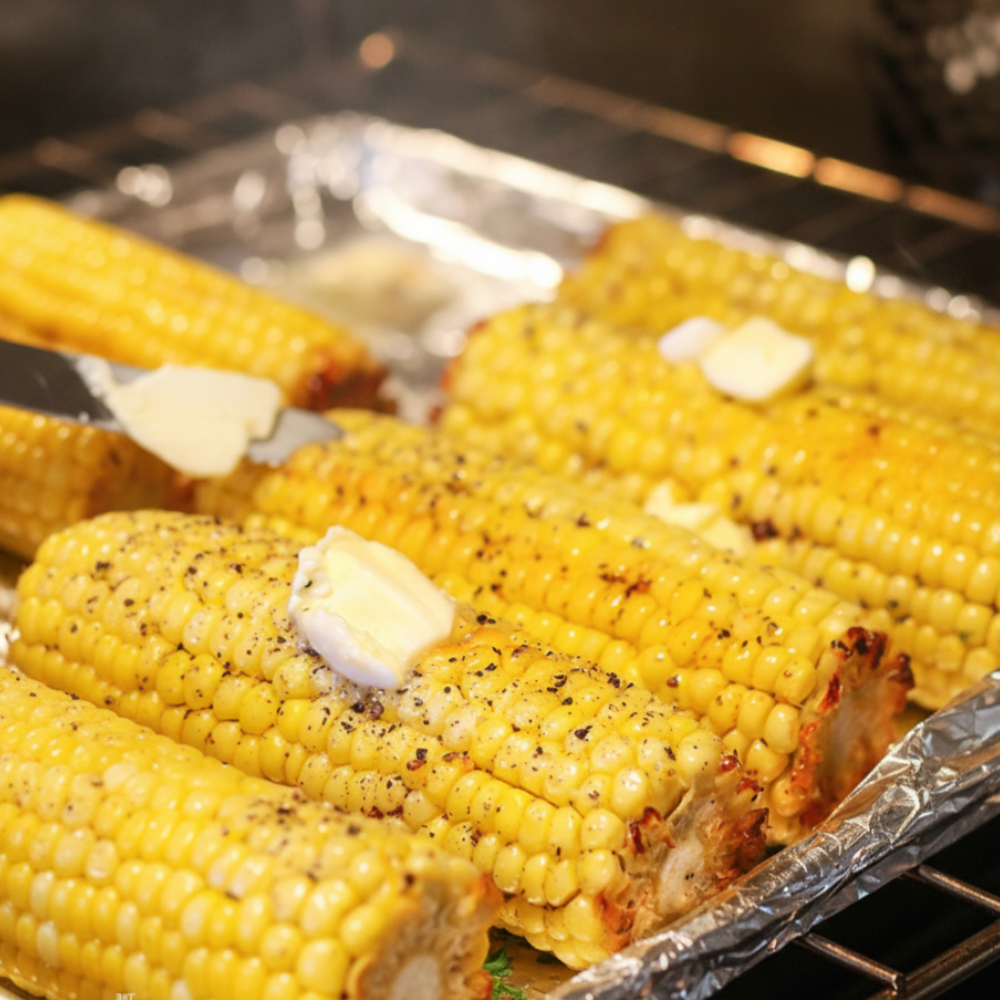
3. Butter the Corn: Place each ear of corn on its own sheet of aluminum foil, ensuring the foil is large enough to completely wrap around the corn. Take the 4 tablespoons of butter and divide it evenly among the four ears. You can spread the butter directly onto the corn or place small pats of butter on top of each ear. This generous coating of butter is essential for achieving buttered corn that is moist and flavorful.
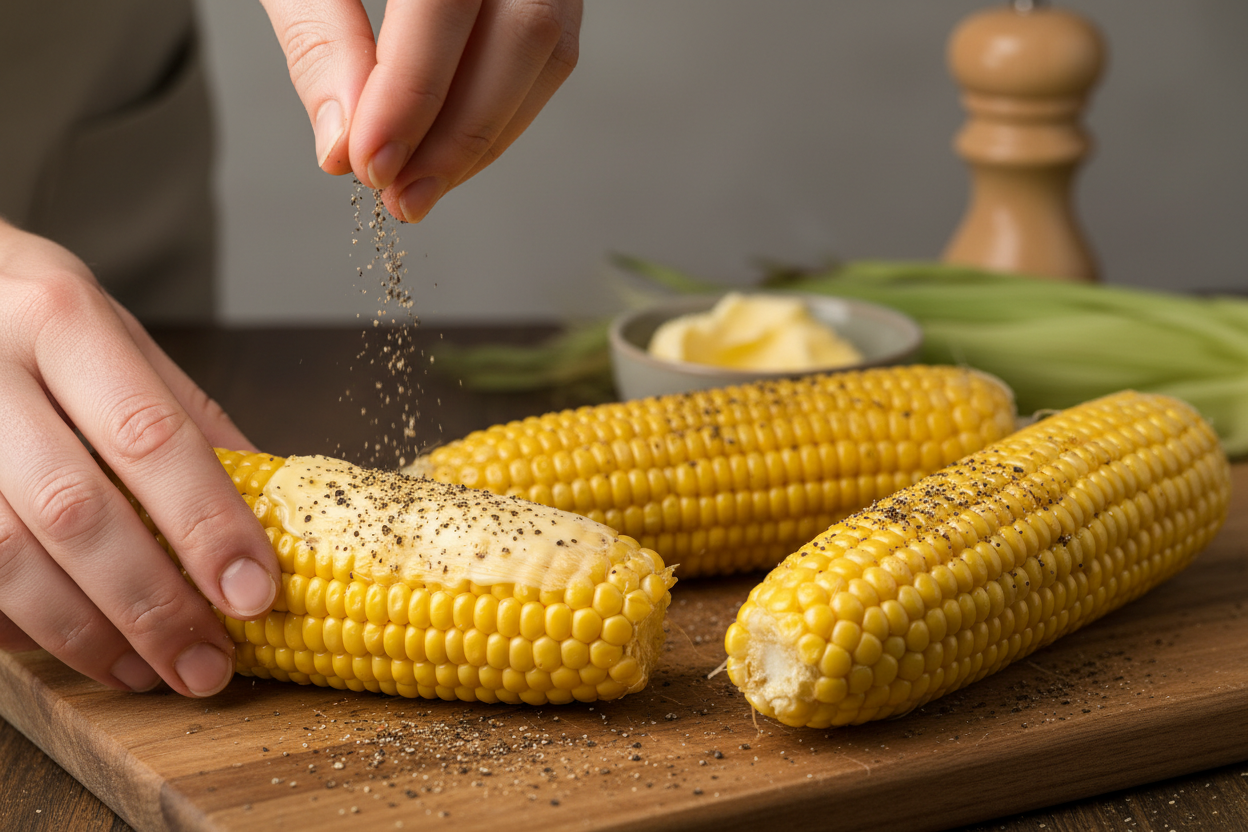
4. Season the Corn: Once buttered, sprinkle 1 teaspoon of black pepper evenly over the four ears of corn. Ensure every side of the corn receives some seasoning. The butter helps the pepper adhere, distributing the flavor throughout.
5. Wrap in Foil: Carefully wrap each ear of corn individually in its aluminum foil packet. Make sure the packets are sealed tightly to prevent steam and butter from escaping during the roasting process. This step is key to creating moist and tender foil wrapped corn. A tight seal also locks in the flavors.
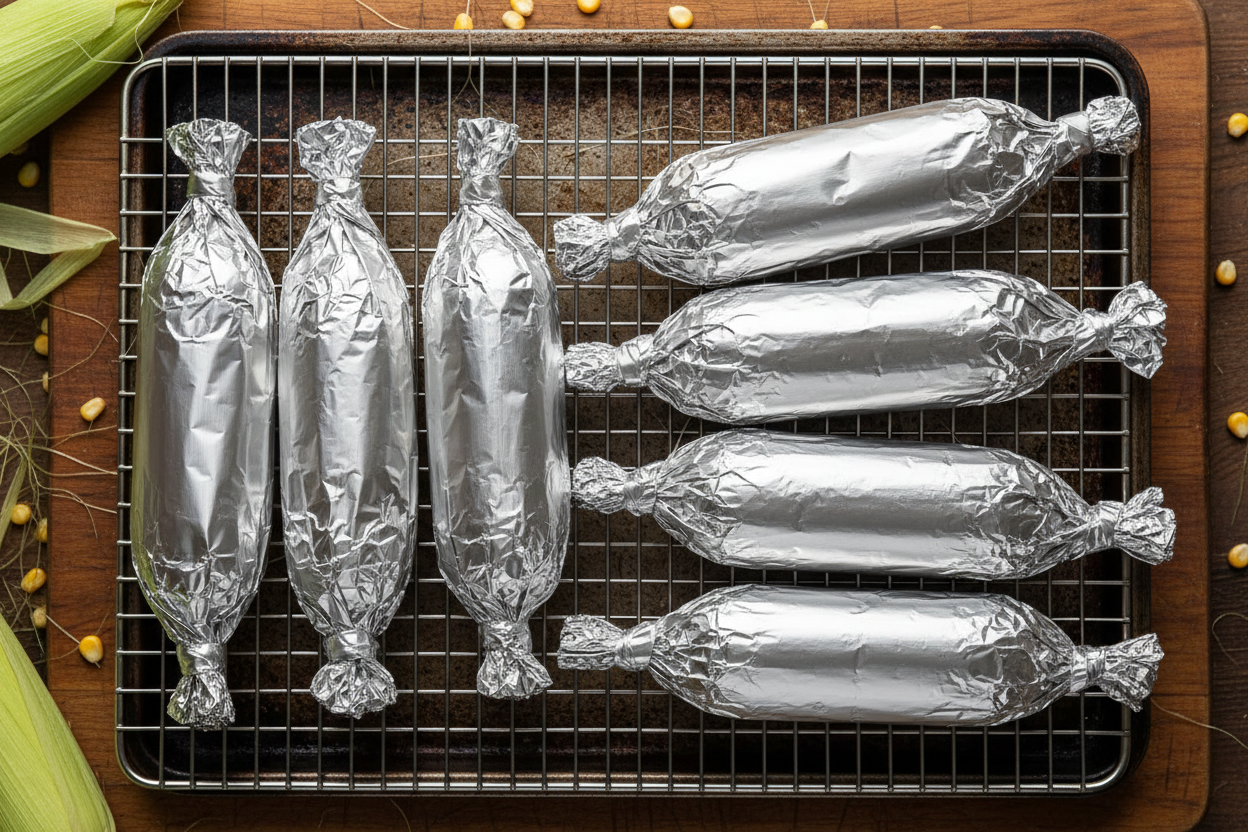
6. Bake the Corn: Place the foil-wrapped corn packets directly onto a baking sheet. Transfer the baking sheet to the preheated 400°F (200°C) oven. Bake for precisely 30 minutes. During this time, the corn will steam and roast within its foil cocoon, becoming incredibly tender and sweet.
7. Serve Immediately: Once the 30 minutes are up, carefully remove the baking sheet from the oven. Be cautious when opening the foil packets, as hot steam will escape. Serve the oven roasted corn hot, directly from its foil wrapper, or transfer it to a serving platter. Each bite will be tender, juicy, and perfectly seasoned.
Expert Tips for Flavor Variations
While the classic preparation of oven roasted corn with butter and black pepper is undeniably delicious, sometimes you might want to introduce a subtle twist. These optional additions can elevate the flavor profile without complicating the core recipe. Remember, these are suggestions for variety, not replacements for the foundational ingredients.
* Garlic Infusion: For those who appreciate an aromatic depth, consider adding a hint of garlic. Before wrapping the corn in foil, after applying the butter, sprinkle a small amount of finely minced fresh garlic or garlic powder over the ears. The garlic will roast alongside the corn, mellowing in flavor and infusing the butter with its distinctive aroma. This subtle addition creates a fragrant and savory version of baked corn on the cob that pairs wonderfully with a variety of main dishes. The heat of the oven will transform the raw garlic into a sweet and nutty complement.
* Parmesan Kick: If you enjoy a savory, umami note, a touch of Parmesan cheese can be a delightful addition. After the corn has finished roasting and you open the foil packets, sprinkle a light dusting of grated Parmesan cheese over the hot ears. The residual heat will slightly melt the cheese, creating a thin, flavorful coating. This variation adds a salty, cheesy layer that enhances the natural sweetness of the roasted sweet corn. It works particularly well if you are serving the corn alongside Italian-inspired meals or grilled dishes. Ensure to add Parmesan *after* roasting to prevent it from burning or hardening during the baking process.
These variations are designed to be simple enhancements, allowing the core flavors of the corn, butter, and black pepper to remain prominent while offering a new dimension. Always taste a small piece after adding any variation to ensure the balance of flavors meets your preference. These tips encourage a little experimentation within the established framework of the recipe, catering to different palates without overcomplicating the cooking process.
Frequently Asked Questions
Understanding the best practices for preparing, storing, and reheating your oven roasted corn can enhance your culinary experience. Here are some common questions and their concise answers to help you get the most out of this delightful side dish.
* How long does it last in the fridge?
Cooked baked corn on the cob, once cooled and properly stored in an airtight container, can last for 3 to 4 days in the refrigerator. To maintain its freshness and prevent spoilage, ensure it cools completely before refrigerating. Leaving it wrapped in its foil can also help, but an additional airtight container provides better protection against drying out and absorbing other odors from the fridge.
* Can I prepare the corn ahead of time?
Yes, you can prepare the corn slightly ahead. You can shuck the 4 ears of corn, butter them with 4 tablespoons of butter, and season them with 1 teaspoon of black pepper. Then, wrap them individually in foil as described. Store the foil-wrapped corn in the refrigerator for up to 24 hours before baking. When ready to cook, simply transfer them directly from the fridge to the preheated 400°F (200°C) oven and bake for the standard 30 minutes. This prep-ahead step is particularly useful for entertaining or busy weeknights.
* What is the best way to reheat leftover roasted corn?
To reheat leftover roasted sweet corn, you have a few options. If the corn is still on the cob, you can re-wrap it tightly in aluminum foil and bake it in a preheated oven at 350°F (175°C) for 10-15 minutes, or until heated through. Alternatively, you can remove the kernels from the cob and gently warm them in a skillet over medium-low heat with a tiny bit of butter or water, stirring occasionally, until hot. Microwaving is also an option for speed; place the corn in a microwave-safe dish, add a tablespoon of water, cover, and microwave in 30-second intervals until warmed. Reheating gently helps maintain its tender texture and flavor.
* Is it necessary to use foil?
While not strictly “necessary” in the sense that corn can be roasted without it, using foil for foil wrapped corn offers significant benefits. It helps to steam the corn, keeping it incredibly moist and tender. It also concentrates the butter and seasonings, infusing the corn with more flavor. Furthermore, it simplifies cleanup significantly by containing all the juices and butter. Roasting without foil will result in a drier, more charred corn, which some prefer, but for tender, buttery results, foil is highly recommended.
Enjoy Your Perfect Oven Roasted Corn
There you have it – a comprehensive guide to mastering oven roasted corn. This method offers unparalleled simplicity, resulting in incredibly tender, sweet, and flavorful corn on the cob with minimal effort and cleanup. Whether you are looking for easy dinner sides or a standout dish for a summer gathering, baked corn on the cob proves to be a versatile and satisfying choice.
The beauty of this recipe lies in its reliance on quality ingredients and straightforward techniques. By understanding the simple steps and a few expert tips, you can consistently achieve perfect roasted sweet corn every time. It is a testament to how uncomplicated cooking can be when focusing on fresh produce and simple enhancements. So, next time you are craving that distinct sweetness, reach for the oven.
For more delicious recipes, cooking tips, and culinary inspiration, follow us on Facebook. We share a variety of dishes designed to bring flavor and joy to your kitchen.

Best Ever Baked Sweet Corn
Ingredients
- 4 ears Corn on the cob shucked and cleaned
- 4 tbsp Butter softened
- 1 tsp Black pepper freshly ground
Instructions
- Preheat the oven to 400 degrees F and prepare four sheets of aluminum foil.
- Place each ear of shucked corn on a separate piece of foil.
- Rub 1 tablespoon of softened butter over each ear, then sprinkle evenly with the black pepper.
- Wrap each ear tightly in the foil and place them directly on the center oven rack.
- Bake for 30 minutes, turning once halfway through, until the kernels are tender.
For more daily recipes and tips, follow us on Facebook!
Click here to join our community!