
The vibrant taste of fresh sweet corn is one of summer’s greatest joys. Imagine being able to capture that peak flavor and enjoy it months later, long after the harvest season has passed. Learning how to freeze fresh corn is a straightforward process that allows you to do just that, extending the delight of juicy kernels into the colder months. This guide provides a detailed method for preserving summer corn, ensuring you have a steady supply of this versatile vegetable for all your culinary needs. With a little preparation, your freezer can become a vault of seasonal goodness, offering long-term food storage solutions for your pantry.
Why Keep Sweet Corn for the Winter?
The window for enjoying truly fresh, sweet corn is often short. Farmers markets overflow with plump ears during peak season, offering an abundance at optimal prices. Buying corn in bulk during this time and properly storing it means you can savor that incomparable taste year-round. This practice is not only economical but also guarantees a higher quality product than most store-bought frozen alternatives. By preparing your own harvest, you control the freshness and method of preservation, making it an ideal approach for efficient how to store harvest produce. You gain consistent access to a healthy, vibrant ingredient that can elevate winter meals.
Equipment and Ingredients Needed
To successfully prepare your sweet corn for freezing, gather these essential items. Adhering to these specific quantities ensures optimal results for this batch.
- Fresh sweet corn on the cob: 6 ears
- Water: 1 gallon (for boiling)
- Ice: 4 cups (for the ice bath)
Step-by-Step Processing Guide
This detailed guide outlines each critical step to ensure your frozen corn retains its flavor and texture. Follow these instructions carefully for the best outcome.
1. Husking and Prepping
Begin by thoroughly preparing the 6 ears of sweet corn. Carefully peel back the green husks, exposing the golden kernels. Once the husks are removed, diligently work to eliminate all silks from each ear. This step is crucial for a clean final product. Ensure no stray strands remain clinging to the kernels.
2. Boiling and Blanching
Fill a large stockpot with 1 gallon of water. Place it on high heat and bring the water to a vigorous, rolling boil. Once the water is boiling rapidly, carefully submerge the husked and destranded ears of corn into the pot. Allow the corn to blanch for exactly 4 minutes. This brief cooking period helps to set the color, retain flavor, and stop enzyme activity, which is vital for effective blanching sweet corn.
3. The Ice Bath Technique
Immediately after the 4-minute blanching period, transfer the hot ears of corn from the boiling water into a large bowl filled with 4 cups of ice and cold water. This sudden temperature drop, known as the ice bath technique, is essential. Let the corn sit in the ice water for an additional 4 minutes. The cold water rapidly halts the cooking process, preventing the corn from becoming mushy and preserving its crisp texture.

4. Drying and Cutting
Remove the ears of corn from the ice bath and pat them completely dry using a clean kitchen towel. Ensuring the corn is thoroughly dry is paramount for preventing ice crystals and freezer burn. Once dry, stand each ear upright in a shallow pan or bowl. Using a sharp knife, carefully slice downwards, cutting corn off the cob. Aim to remove the kernels as close to the cob as possible without cutting into the cob itself. Collect the loose kernels.
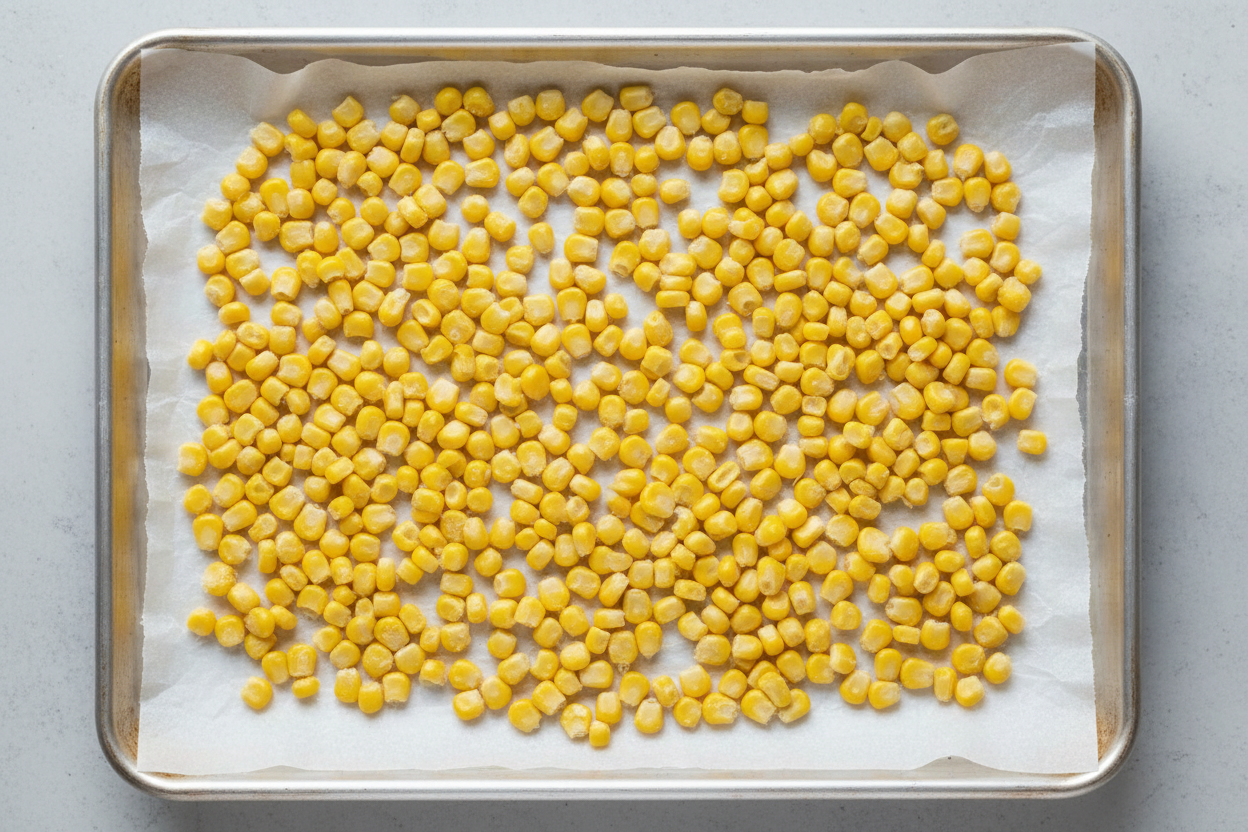
5. Flash Freezing
To prevent the corn kernels from sticking together in a large frozen block, employ the flash freezing produce method. Spread the freshly cut kernels in a single, even layer on a parchment-lined baking sheet. Place this baking sheet into the freezer for 1 hour. This brief initial freeze ensures each kernel freezes individually, making them easy to portion and use later.
6. Final Storage Methods
Once the kernels are individually frozen after 1 hour, remove them from the baking sheet. Transfer the frozen kernels into high-quality airtight zip-top freezer bags or, for superior preservation, use bags suitable for vacuum sealing vegetables. Whichever method you choose, press out as much air as possible before sealing. Air is the enemy of frozen food, causing freezer burn. Label each bag with the date. Properly prepared and packaged, your storing corn kernels can last effectively for up to 12 months in the freezer, ready for use whenever you need them.
Ways to Cook Thawed Corn
When you are ready to use your frozen corn, there is no need to thaw it completely. Simply toss the frozen kernels directly into your favorite soups, stews, or casseroles during the last few minutes of cooking. Adding them frozen helps maintain their crisp texture. For dishes where the corn is meant to be a standalone side, you can quickly sauté them in a little butter or steam them until just heated through. The goal is to warm them without overcooking, preserving that vibrant summer snap you worked so hard to capture. They integrate seamlessly into chili, cornbread, or even a quick corn salsa.
Frequently Asked Questions
Addressing common concerns about freezing corn helps ensure success for every home cook.
Do I have to blanch the corn first?
Yes, blanching sweet corn is a non-negotiable step for long-term freezing. Blanching stops the enzymatic processes that can degrade the corn’s flavor, texture, and color over time. Corn frozen without blanching will often develop a tough, chewy texture and a “starchy” flavor after a few months in the freezer. The quick boil and subsequent ice bath are crucial for preserving quality.
How long will the stored kernels last?
When properly blanched, dried, flash-frozen, and stored in airtight containers or vacuum-sealed bags, your frozen corn kernels can maintain excellent quality for up to 12 months in a standard freezer. This makes it an effective method for long-term food storage. Beyond a year, the quality may begin to decline, though it often remains safe to eat for longer.
Can I leave the corn on the cob?
While it is possible to freeze corn on the cob, it is generally not recommended for optimal quality and practicality. Freezing kernels off the cob saves significant freezer space. Whole cobs take up more room and can be more prone to freezer burn if not perfectly wrapped. Moreover, cutting corn off the cob before freezing makes it much easier to portion and incorporate into recipes without extra preparation later.
Freezing fresh corn is a rewarding process that connects you to the bounty of the summer season all year long. By following these steps for preserving summer corn, you ensure a delicious, high-quality ingredient is always on hand. Enjoy the taste of sunshine in every dish.
Follow us on Facebook for more seasonal tips and recipes! Our Facebook Page

Preserved Summer Sweet Corn Kernels
Ingredients
- 6 ears Fresh sweet corn on the cob Husked and silks removed
- 1 gallon Water For boiling
- 4 cups Ice For the ice bath
Instructions
- Husk the 6 ears of sweet corn and remove all silks.
- Bring 1 gallon of water to a rolling boil in a large pot.
- Carefully submerge the ears of corn in the boiling water for 4 minutes to blanch.
- Transfer immediately to a large bowl filled with the 4 cups of ice and cold water. Let sit for 4 minutes to halt the cooking process.
- Remove the ears from the water and pat completely dry with a clean kitchen towel.
- Stand each ear upright on a cutting board and cut the kernels off the cob using a sharp knife.
- Spread the kernels in a single layer on a parchment-lined baking sheet and place in the freezer for 1 hour to flash freeze.
- Transfer the frozen kernels into airtight zip-top bags or vacuum-sealed bags, squeezing out as much air as possible, and store for up to 12 months.
For more daily recipes and tips, follow us on Facebook!
Click here to join our community!