
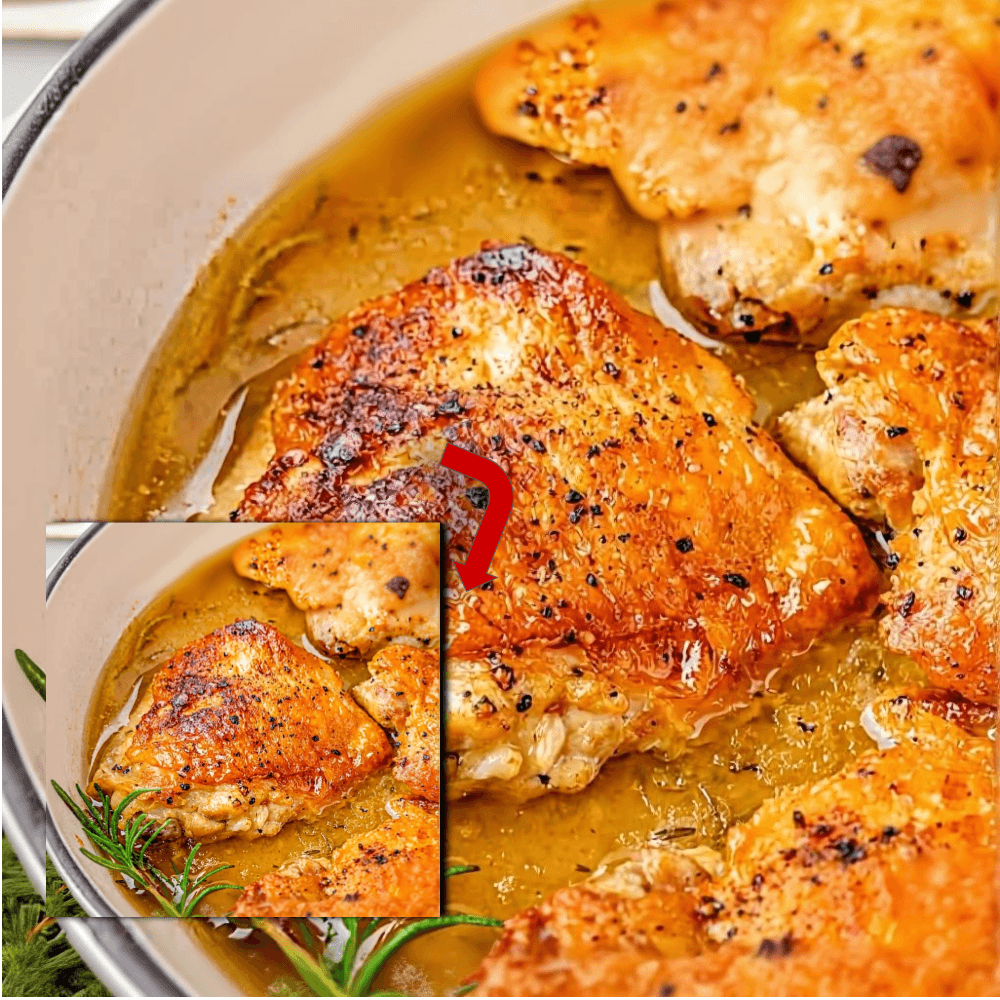
There are few things as comforting and satisfying as a perfectly braised dish, especially when it features succulent chicken. Imagine sinking your fork into meat so tender it practically melts off the bone, while the skin above remains beautifully crisp and golden. This is the magic of well-executed Braised Chicken Thighs – a dish that masterfully balances textures and delivers an explosion of deeply savory flavor with every bite.
Forget dry, bland chicken. We’re talking about a culinary journey that transforms simple ingredients into an extraordinary meal. Our recipe for braised chicken thighs with garlic and rosemary isn’t just a meal; it’s an experience, promising both the crispy skin everyone craves and the incredibly juicy, tender meat that defines true comfort food.
Why This is the Best Braised Chicken Recipe
What sets this particular recipe apart from the countless others? It boils down to a few key elements that elevate it from good to absolutely unforgettable.
- Flavor Depth Beyond Compare: The secret lies in building layers of flavor right from the start. Searing the chicken thighs develops a rich, golden crust and renders out fat, creating a foundation of intense flavor. Deglazing the pan then captures all those caramelized bits (the coveted fond) – turning them into the heart of your luxurious sauce. This isn’t just cooking; it’s flavor engineering.
- Unbeatable Simplicity – A True One-Pot Wonder: For those busy weeknights or when you simply don’t want a mountain of dishes, this recipe is a godsend. Everything, from searing to simmering, happens in one pot, ideally a sturdy Dutch oven. This makes cleanup a breeze and truly earns its title as an easy weeknight chicken meal. It’s also a fantastic contender for any collection of Dutch oven chicken recipes.
- Incredible Versatility: While it’s undoubtedly an easy and impressive one-pot chicken dinner for a casual evening, the sophisticated flavors of garlic rosemary chicken also make it elegant enough for a special dinner party. It’s the kind of dish that adapts to your needs, always delivering delicious results.
“Braiding is more than just cooking; it’s a celebration of flavor and texture, transforming humble ingredients into something truly spectacular.”
Ingredients Notes & Substitutions
The beauty of this dish lies in its quality ingredients. Here’s a closer look at what makes them shine:
- Chicken Thighs: We absolutely recommend bone-in, skin-on chicken thighs for braising. The bone adds incredible flavor to the braising liquid, acting like a natural stock enhancer. The skin, when properly seared, renders out fat and develops that irresistible crispness, protecting the meat below and keeping it incredibly moist. While boneless, skinless thighs can be used, they won’t yield the same depth of flavor or texture contrast.
- Fresh Herbs: Rosemary is the star here, infusing the dish with its aromatic, slightly piney notes, creating that signature garlic rosemary chicken profile. If fresh rosemary isn’t available, fresh thyme is an excellent alternative, offering an earthy, savory complement. Dried herbs can work in a pinch, but use about half the amount as their flavor is more concentrated.
- Braising Liquid: A dry white wine (like Sauvignon Blanc or Pinot Grigio) adds acidity and complex fruity notes, forming the base of our exquisite chicken thighs white wine sauce. For those preferring to skip the wine, an equal amount of good quality chicken stock or broth can be used. A splash of apple cider vinegar or lemon juice can be added to the stock to replicate the wine’s acidity.
- Aromatics: Fresh garlic is non-negotiable! For a bolder flavor, smash the cloves rather than mincing them; this allows them to slowly release their essence without burning, creating a mellow, sweet garlic flavor that permeates the dish. Onions, shallots, or leeks can also be added for an additional layer of aromatic sweetness.
Step-by-Step: How to Braise Chicken Thighs
Mastering how to braise chicken is all about technique. Follow these steps for perfectly tender chicken every time.
Step 1: The Sear
This is arguably the most crucial step for developing deep flavor and achieving those coveted crispy skin chicken thighs. Pat your chicken thighs thoroughly dry with paper towels – moisture is the enemy of a good sear. Season generously with salt and black pepper. Heat a heavy-bottomed pot or Dutch oven over medium-high heat with a tablespoon or two of oil (like olive or avocado oil). Once shimmering, place the chicken thighs skin-side down, without overcrowding the pan. You want to hear that sizzle! Let them sear undisturbed for 8-10 minutes, or until the skin is deeply golden brown and beautifully crispy. Flip and sear for another 2-3 minutes on the flesh side. Remove the chicken from the pot and set aside.
Step 2: The Aromatics
Reduce the heat to medium. Add a little more oil if needed. Add your smashed garlic cloves and sprigs of fresh rosemary to the pot. Sauté gently for 1-2 minutes, stirring occasionally, until fragrant. Be careful not to burn the garlic, as this will result in a bitter taste. The goal is to soften them and release their beautiful aromas, creating a fragrant base for your sauce.
Step 3: Deglazing the Pan
With the aromatics fragrant, pour in your white wine (or chicken stock). Using a wooden spoon or spatula, aggressively scrape up all the browned bits (the fond) stuck to the bottom of the pot. These flavorful morsels are pure gold and will add incredible depth and complexity to your sauce. Bring the liquid to a simmer, allowing it to reduce slightly and for any alcohol to cook off if using wine.
Step 4: The Simmer
Return the seared chicken thighs to the pot, nestling them into the braising liquid. Add enough chicken stock so the liquid comes about halfway up the sides of the chicken, but importantly, leave the crispy skin exposed above the liquid line. Bring the liquid back to a gentle simmer, then cover the pot tightly with a lid. Transfer to a preheated oven at 325°F (160°C) or continue to simmer gently on the stovetop over low heat. Cook for 30-45 minutes, or until the chicken is incredibly tender and cooked through. This slow, moist heat is what creates that luscious, tender chicken thigh recipe.
Expert Tips for Success
- Keep the Skin Above the Liquid Line: This is a critical tip for maintaining that glorious crispy skin. If the skin is submerged in the braising liquid, it will become soft and soggy. We want the best of both worlds: crisp skin and tender meat!
- Internal Temperature Checks: While visual cues are good, for perfect doneness, always check the internal temperature of the thickest part of the thigh, avoiding the bone. The chicken is cooked when it reaches 165°F (74°C). However, for braised chicken, often cooking it slightly past this to around 175-180°F (79-82°C) makes it even more fall-off-the-bone tender without drying it out, thanks to the moist cooking environment.
- Resting the Meat: Once cooked, remove the chicken from the pot and let it rest, loosely covered, for 5-10 minutes before serving. This allows the juices to redistribute throughout the meat, resulting in an even more succulent and flavorful experience. While the chicken rests, you can reduce the braising liquid on the stovetop to thicken your exquisite sauce.
Serving Suggestions
This garlic rosemary chicken with its rich, savory white wine sauce demands companions that can soak up every last drop. Here are some of our favorites:
- Creamy Mashed Potatoes: The ultimate classic pairing. The mashed potatoes act as a perfect sponge for the flavorful sauce.
- Crusty Bread: A warm, crusty baguette is ideal for dipping and savoring the delicious braising liquid.
- Roasted or Steamed Vegetables: Green beans, asparagus, or broccoli provide a lovely fresh contrast.
- Polenta or Risotto: For a heartier, more luxurious meal, serve over creamy polenta or a simple risotto.
Storage and Reheating
This dish is often even better the next day as the flavors have more time to meld!
- Fridge: Store leftover braised chicken thighs in an airtight container in the refrigerator for up to 3-4 days.
- Freezer: For longer storage, freeze the chicken and sauce together in an airtight, freezer-safe container for up to 3 months. Thaw overnight in the refrigerator before reheating.
- Reheating: To reheat, gently warm the chicken and sauce in a covered pot on the stovetop over low heat, or in an oven-safe dish covered with foil at 300°F (150°C) until heated through. If you want to crisp up the skin again, place the chicken skin-side up under a broiler for a few minutes after it’s heated, watching carefully to prevent burning.
Frequently Asked Questions (FAQ)
Q: Can I use boneless, skinless chicken thighs for this recipe?
A: While you can, we highly recommend bone-in, skin-on for the best flavor and texture. Bone-in thighs add more depth to the sauce, and the skin helps keep the meat moist while providing a crispy contrast if properly seared and kept out of the liquid.
Q: What kind of white wine is best for braising?
A: A dry white wine like Sauvignon Blanc, Pinot Grigio, or even a dry Vermouth works wonderfully. Avoid sweet wines, as they will alter the savory profile of the dish. If you prefer not to use wine, chicken stock is a great substitute.
Q: How can I thicken the sauce?
A: After removing the cooked chicken, you can simmer the braising liquid over medium-high heat to reduce and thicken it naturally. For a quicker option, you can create a slurry of 1 tablespoon cornstarch mixed with 1 tablespoon cold water, whisk it into the simmering sauce, and cook until thickened.
Q: My chicken skin isn’t crispy after braising. What went wrong?
A: The most common reason is that the chicken skin was submerged in the braising liquid. Always ensure the skin remains above the liquid line during the simmering process. Also, ensure a good, deep sear was achieved in Step 1. You can always crisp it up under the broiler for a few minutes before serving.
Q: Can I prepare this dish ahead of time?
A: Absolutely! This dish is fantastic for meal prepping. You can braise the chicken thighs completely, cool them, and store them in the refrigerator. Reheat gently as described in the Storage & Reheating section. The flavors often deepen overnight.
There you have it – your ultimate guide to creating truly phenomenal Braised Chicken Thighs. We hope this tender chicken thigh recipe becomes a cherished favorite in your kitchen. We love sharing delicious recipes and cooking tips with our community!
For more delicious inspiration, behind-the-scenes glimpses, and to join our growing community of food lovers, be sure to follow us on Facebook at https://www.facebook.com/profile.php?id=61568538666337. We can’t wait to connect with you there!
Garlic Rosemary Braised Chicken Thighs
Ingredients
- 6-8 pieces bone-in, skin-on chicken thighs Pat dry thoroughly
- 1 tbsp olive oil
- 1 tsp kosher salt Plus more to taste
- 1/2 tsp black pepper Freshly ground
- 6 cloves garlic Smashed and peeled
- 4 sprigs fresh rosemary
- 1/2 cup dry white wine Sauvignon Blanc or Pinot Grigio
- 1 cup chicken broth Low sodium preferred
- 1 tbsp unsalted butter Optional, for finishing sauce
Instructions
- Pat the chicken thighs completely dry with paper towels. Season liberally on all sides with kosher salt and black pepper.
- Heat olive oil in a large Dutch oven or heavy-bottomed skillet over medium-high heat. Once shimmering, place chicken thighs skin-side down.
- Sear undisturbed for 6-8 minutes until the skin is deep golden brown and crispy. Flip and cook for 2 more minutes. Remove chicken to a plate and set aside.
- Drain all but 1 tablespoon of rendered fat from the pan. Reduce heat to medium.
- Add the smashed garlic cloves and rosemary sprigs. Sauté for 1-2 minutes until fragrant and garlic is lightly browned.
- Pour in the white wine to deglaze the pan, using a wooden spoon to scrape up the browned bits (fond) from the bottom. Simmer for 3 minutes to reduce slightly.
- Add the chicken broth and bring to a gentle simmer.
- Return the chicken thighs to the pan, skin-side up. Ensure the skin remains above the liquid level to stay crispy.
- Reduce heat to low, cover partially, and braise for 20-25 minutes, or until the internal temperature reaches 165°F (74°C).
- Optional: Remove chicken, whisk butter into the sauce to thicken, then serve sauce spooned around the chicken (not over the skin).
For more daily recipes and tips, follow us on Facebook!
Click here to join our community!