Welcome, food lovers! Today, we’re diving into the heart of Indian cuisine with a dish that’s nothing short of a culinary masterpiece: the ultimate Chicken Biryani Recipe. Forget everything you thought you knew about rice and chicken; this isn’t just a meal, it’s an experience. We’re talking about aromatic, long-grain rice, succulent, perfectly spiced chicken, and a symphony of flavors that will transport your taste buds straight to the bustling streets of India.
Creating this iconic dish at home might seem daunting, but with our step-by-step guide and expert tips, you’ll be serving up a restaurant-style biryani that will impress everyone at your table. Get ready to embark on a flavorful journey!
What is Chicken Biryani?
Chicken Biryani is more than just a dish; it’s a celebration. At its core, it’s a fragrant, spiced rice dish made with Basmati rice and chicken, cooked in layers. Originating from the Indian subcontinent, it has evolved into countless regional variations, with the Hyderabadi biryani being one of the most famous for its distinctive preparation style.
The magic of biryani lies in its unique cooking method, often referred to as Dum biryani. This technique involves sealing the pot with dough or a tight lid, allowing the ingredients to slow-cook in their own steam and juices. This gentle, moist heat infuses the rice and meat with incredible flavor, resulting in incredibly tender chicken and beautifully fluffy rice, each grain separate and perfectly cooked. It’s a symphony of textures and tastes, a true testament to the rich tapestry of Indian spices.
Essential Ingredients for the Best Biryani
The secret to a truly outstanding biryani lies in the quality of its ingredients. Don’t skimp on these essentials!
Choosing the Right Chicken
For the most flavorful and tender result, we highly recommend using bone-in chicken pieces, such as marinated chicken drumsticks or thighs. The bone adds depth of flavor to the dish as it cooks. Ensure your chicken is fresh and of good quality. You’ll want about 1.5 to 2 pounds for a family-sized portion.
The Importance of Aged Basmati Rice
This is non-negotiable! For that authentic aroma and perfectly separated, fluffy rice, you absolutely must use high-quality, aged Basmati rice. Aged Basmati rice has a lower moisture content, which helps it elongate beautifully without becoming sticky. Look for brands that specify “aged” on the packaging. Soaking the rice before cooking is also a crucial step to achieve the desired texture.
Aromatic Spices and Herbs
The soul of biryani comes from its vibrant blend of Indian spices. You’ll need a mix of whole and ground spices to build complex layers of flavor. Key whole spices include cinnamon sticks, green cardamom pods, cloves, and bay leaves. Ground spices will typically include turmeric, red chili powder, coriander powder, cumin powder, and a good quality garam masala. Fresh ingredients like ginger-garlic paste, green chilies, fresh mint, and cilantro are equally vital for that signature fresh and zesty kick.
How to Make Chicken Biryani (Step-by-Step)
Get ready to cook! This process is broken down into manageable steps to ensure your biryani turns out spectacular.
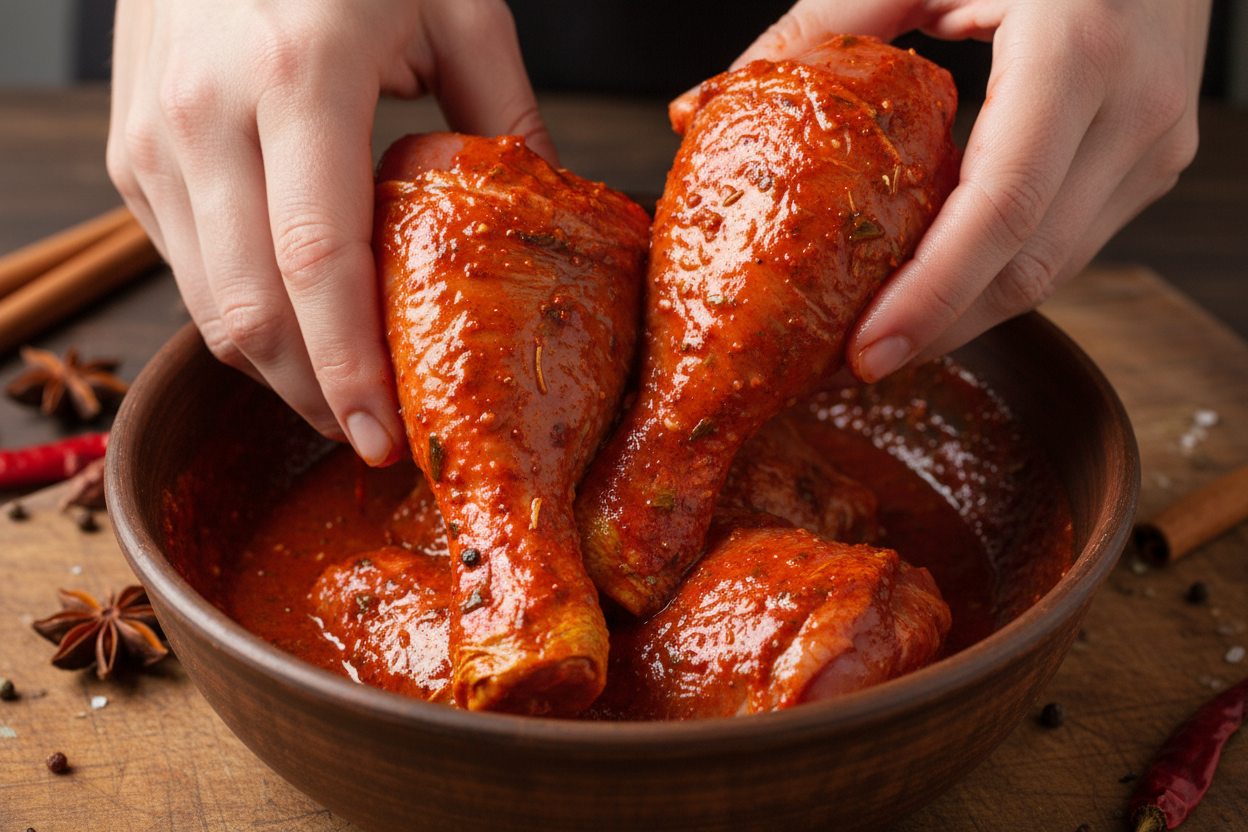
Step 1: Marinating the Chicken
The foundation of a great biryani is a well-marinated chicken. This step not only tenderizes the meat but also infuses it with deep flavors.
- In a large bowl, combine your bone-in chicken pieces with plain yogurt, ginger-garlic paste, green chilies (finely chopped), red chili powder, turmeric powder, coriander powder, cumin powder, garam masala, salt, and a squeeze of lime juice.
- Add a handful of chopped fresh mint leaves and cilantro.
- Mix everything thoroughly, ensuring each piece of chicken is coated.
- Cover the bowl and refrigerate for at least 2 hours, or ideally, overnight for maximum flavor absorption. This lengthy marination is key to achieving succulent, tender chicken.
Step 2: Parboiling the Rice
Achieving perfect rice is a delicate balance. We parboil the rice to about 70-80% doneness before layering, ensuring it cooks fully with the chicken during the dum process without becoming mushy.
- Rinse the Basmati rice several times under cold water until the water runs clear. This removes excess starch, which helps the grains remain separate.
- Soak the rinsed rice in fresh water for at least 30 minutes, but no more than an hour.
- Bring a large pot of water to a rolling boil. Add whole spices like bay leaves, green cardamom, cloves, cinnamon stick, and a generous amount of salt (the water should taste like seawater). A teaspoon of oil can also be added to prevent sticking.
- Drain the soaked rice and add it to the boiling water. Cook for 5-7 minutes, or until the rice is about 70-80% cooked. It should still have a slight bite but not be hard.
- Immediately drain the rice through a colander and spread it out on a large tray to cool slightly and stop further cooking. Do not rinse the rice after draining.
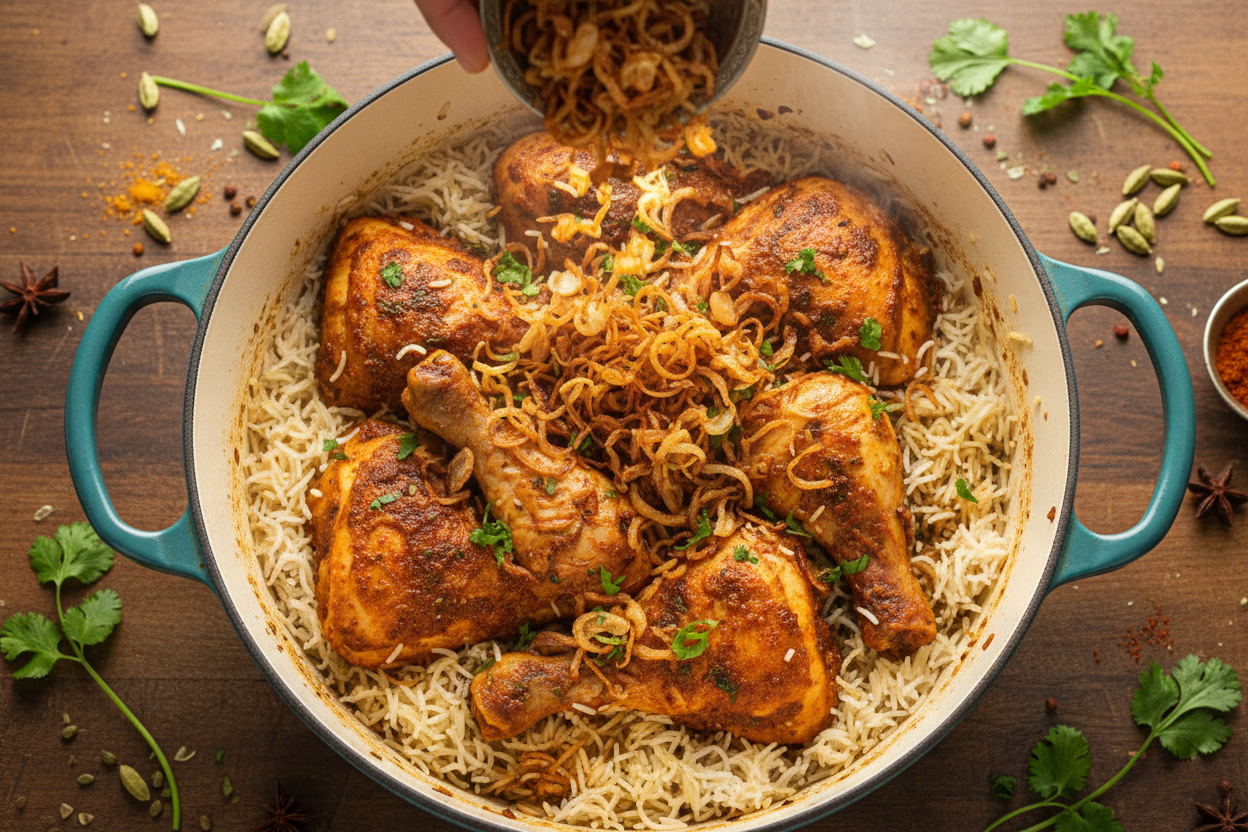
Step 3: Layering and Dum Cooking
This is where the magic happens! The layering and subsequent Dum biryani cooking create an incredible fusion of flavors.
- Choose a heavy-bottomed pot or Dutch oven with a tight-fitting lid. If your lid isn’t tight, you can seal it with a strip of dough or aluminum foil.
- Grease the bottom of the pot with a tablespoon of ghee or oil.
- Spread half of the marinated chicken mixture evenly at the bottom of the pot.
- Sprinkle a layer of fried onions (birista), chopped mint, and cilantro over the chicken.
- Carefully layer half of the parboiled rice over the chicken and herb mixture.
- Repeat with the remaining chicken, followed by more fried onions, mint, and cilantro.
- Top with the remaining parboiled rice.
- Garnish the top layer with a generous sprinkling of fried onions, saffron-infused milk (saffron strands soaked in warm milk), a drizzle of ghee, and a few drops of kewra or rose water for an extra aromatic touch.
- Cover the pot tightly with its lid. If using dough, seal the edges securely.
- Place the pot on high heat for 5-7 minutes until steam starts to escape, then reduce the heat to the absolute lowest setting.
- Let the biryani cook on low heat for 30-45 minutes. This slow-cooked rice method allows the flavors to meld beautifully and the chicken to become incredibly tender.
- After 45 minutes, turn off the heat and let the biryani rest, undisturbed, for another 10-15 minutes. This resting period is crucial for the flavors to settle and the rice to become truly fluffy.
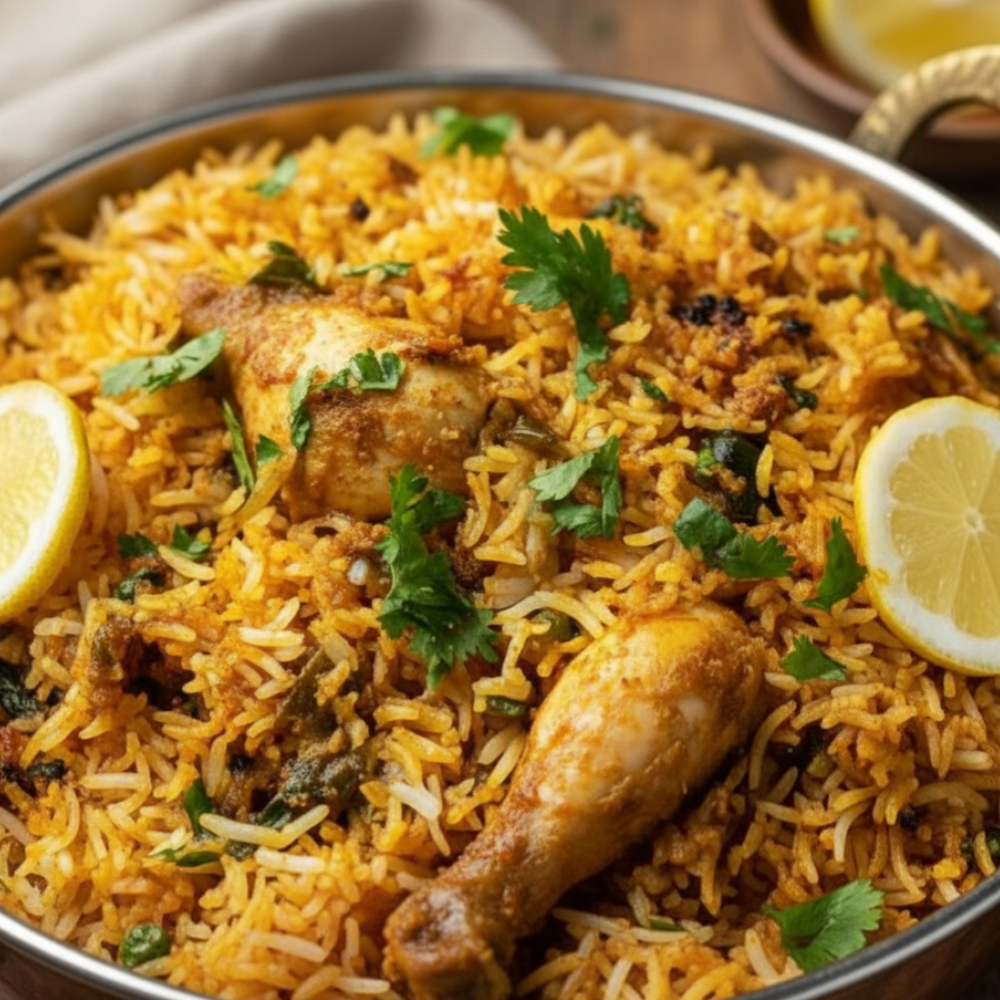
- Gently fluff the biryani with a fork from the bottom up to mix the layers before serving.
Expert Tips for Fluffy Rice and Tender Meat
- Rinse and Soak Your Rice: Don’t skip rinsing and soaking the Basmati rice. It removes starch, leading to longer, separate grains.
- Perfect Parboiling: Ensure your rice is only 70-80% cooked. It will finish cooking with the steam during the dum process.
- Marinate Well: The longer the chicken marinates, the more tender and flavorful it will be. Overnight is best for those truly restaurant-style biryani results.
- Tight Seal for Dum: A good seal on your pot is paramount for the dum biryani method. It traps the steam and allows everything to cook perfectly.
- Low and Slow: Patience is key. The low, slow cooking ensures even cooking and prevents burning, allowing the aromas to fully develop.
- Don’t Peek! Resist the urge to open the lid during the dum cooking. Let the steam do its job!
- Resting Period: Always allow the biryani to rest after cooking. This allows the steam to redistribute, resulting in perfectly moist and separate grains of rice.
“The true beauty of biryani lies in the symphony of textures – from the tender meat to the fluffy, separate grains of rice, each bite is a revelation. It’s a dish that rewards patience and a love for deep, aromatic flavors.”
Popular Biryani Variations to Try
While chicken biryani holds a special place, the world of biryani is vast and exciting. Once you’ve mastered this classic, you might want to explore other delightful variations:
- Lamb Biryani: A rich and hearty option, often featuring tender cuts of lamb marinated and cooked similarly to chicken.
- Vegetable Biryani: A flavorful vegetarian alternative packed with a medley of fresh vegetables like potatoes, carrots, peas, and green beans.
- Paneer Biryani: Features cubes of Indian cottage cheese (paneer) along with vegetables, offering a creamy and delightful texture.
- Egg Biryani: Hard-boiled eggs are a simple yet satisfying addition to a classic biryani, often added during the layering stage.
Frequently Asked Questions (FAQs)
Q: Can I use boneless chicken for biryani?
A: While bone-in chicken is recommended for flavor, you can use boneless chicken thighs. Adjust cooking time slightly as boneless chicken cooks faster. Ensure they are still well-marinated for tenderness.
Q: How do I prevent the rice from getting mushy?
A: The key is to rinse the rice thoroughly, soak it for the correct duration, and most importantly, parboil it to only 70-80% doneness. Overcooking the rice in the initial stage will lead to mushy biryani.
Q: What is the best way to reheat biryani?
A: To reheat, gently warm it in a microwave, or place it in an oven-safe dish, cover it tightly with foil, and warm at 300°F (150°C) until heated through. You can also add a splash of water before reheating to help create steam and keep it moist.
Q: Can I prepare biryani ahead of time?
A: You can marinate the chicken a day in advance. The assembled and cooked biryani is best enjoyed fresh, but leftovers can be stored in an airtight container in the refrigerator for up to 3 days.
There you have it – your comprehensive guide to making a truly spectacular chicken biryani. This dish is a labor of love, but every fragrant mouthful is absolutely worth the effort. Enjoy the process, savor the aromas, and delight in the incredible flavors you’ve created.
For more delicious recipes, cooking tips, and behind-the-scenes peeks into our culinary adventures, make sure to follow us on Facebook! You can find us at https://www.facebook.com/profile.php?id=61568538666337. We’d love to connect with you there!

Ultimate Chicken Biryani
Ingredients
- 1.5 lbs Chicken drumsticks Skinless, bone-in
- 2 cups Basmati rice Aged long-grain
- 1 cup Plain yogurt For marinade
- 2 tbsp Biryani masala Store-bought or homemade
- 1 tbsp Ginger garlic paste
- 2 large Onions Thinly sliced
- 2 tbsp Ghee Or vegetable oil
- 1/4 cup Fresh cilantro Chopped
- 1/4 cup Fresh mint Chopped
- 1 tsp Salt To taste
- 4 cups Water For boiling rice
- 2 Lemon wedges For garnish
Instructions
- Rinse the basmati rice in cold water until the water runs clear, then soak for 30 minutes.
- In a bowl, combine the yogurt, biryani masala, ginger garlic paste, salt, and chicken drumsticks. Let it marinate for at least 1 hour.
- Bring the water to a boil in a large pot. Add the soaked rice and cook for 5 to 6 minutes until 70% cooked, then drain well.
- Heat the ghee in a heavy-bottomed Dutch oven over medium heat. Fry the sliced onions until golden brown, then remove half for later use.
- Add the marinated chicken to the pot with the remaining onions and cook for 15 minutes until the chicken is lightly browned and tender.
- Layer the parboiled rice evenly over the cooked chicken. Top with the reserved fried onions, chopped cilantro, and fresh mint.
- Cover the pot tightly with a lid and cook on very low heat using the dum method for 15 to 20 minutes.
- Remove from heat and let the biryani rest for 10 minutes. Gently fluff the rice with a fork and serve hot with lemon wedges.
For more daily recipes and tips, follow us on Facebook!
Click here to join our community!