
Welcome to your culinary journey to master the art of a truly exceptional
Chicken Milanese. This isn’t just a meal; it’s a celebration of simple, fresh ingredients transformed into something extraordinary. Imagine tender, thin chicken cutlets, coated in a golden, crispy crust, perfectly complemented by a bright, peppery arugula salad. It’s the kind of dish that feels gourmet but is surprisingly easy to whip up, making it an ideal candidate for an elegant yet easy weeknight meal that will impress everyone at your table.
Forget complicated techniques and lengthy ingredient lists. This guide provides a comprehensive approach to creating a perfectly crisp, quick-and-easy version of this classic that brings a touch of Italian flair to your kitchen any night of the week. Let’s get cooking!
What is Chicken Milanese?
At its heart, the Milanese preparation style is a testament to the elegance of simplicity in Italian cuisine. Originating in Milan, Italy, the technique involves taking a thinly pounded cutlet, coating it lightly in breadcrumbs, and then pan-frying it to a beautiful, crispy golden brown. Traditionally, this dish began with veal, known as Cotoletta alla Milanese, a cherished staple of Northern Italian dinner tables.
Over time, the versatility and deliciousness of this method led to its popularization with other proteins. While veal remains a classic, chicken has become the go-to choice for many home cooks due to its accessibility and quick cooking time. You’ll also find delightful variations using beef, showcasing how this culinary technique can elevate various meats into a deeply satisfying and surprisingly light meal. The magic lies in the tender interior and the incredible crunch of the exterior, making every bite a delight.
Essential Ingredients for the Perfect Cutlet
Creating this iconic dish starts with a handful of quality ingredients. Each component plays a vital role in achieving that perfect balance of flavor and texture that defines a great Milanese.
- The Protein: For the ultimate experience, start with thin chicken cutlets. You can buy them pre-sliced or make your own by butterflying boneless, skinless chicken breasts and then pounding them thin. Aim for about 1/4-inch thickness. This ensures quick, even cooking and maximum crispiness. As referenced in traditional variations, thinly pounded beef cutlets also work brilliantly using this exact method, offering a slightly richer flavor profile if you desire.
- The Breading Station: This is where the magic happens! You’ll need three shallow dishes.
- All-Purpose Flour: Seasoned lightly with salt and freshly ground black pepper, this creates the crucial first layer for adhesion.
- Eggs: Whisk two large eggs with a touch of mayonnaise (just a teaspoon or so) and a splash of milk or water. The mayonnaise is a secret weapon; it adds a subtle richness and helps the breadcrumbs adhere even better, leading to superior binding and moisture.
- Crispy Breadcrumbs: A generous amount of plain breadcrumbs, seasoned with dried parsley and basil, plus a pinch of garlic powder, forms the delicious outer crust. For an even lighter, crunchier texture, consider mixing in some Japanese panko breadcrumbs.
- The Vibrant Topping: The perfect counterpoint to the rich, fried chicken. We’re talking fresh baby arugula, sweet and juicy cherry tomatoes, halved, and bright lemon wedges ready for squeezing.
Step-by-Step Breading and Frying Process
Mastering the technique for this dish is all about precision and a bit of patience. Follow these steps for consistently perfect results.
1. Pounding the Meat
This is a critical first step. Place your chicken cutlets between two sheets of plastic wrap. Using a meat mallet or the bottom of a heavy pan, pound the chicken evenly until it reaches a uniform 1/4-inch thickness. Why is this important? Pounding not only tenderizes the meat but also ensures that each cutlet cooks evenly and quickly, preventing the exterior crust from burning while the interior remains undercooked. Uniformity is key for that perfect golden finish.
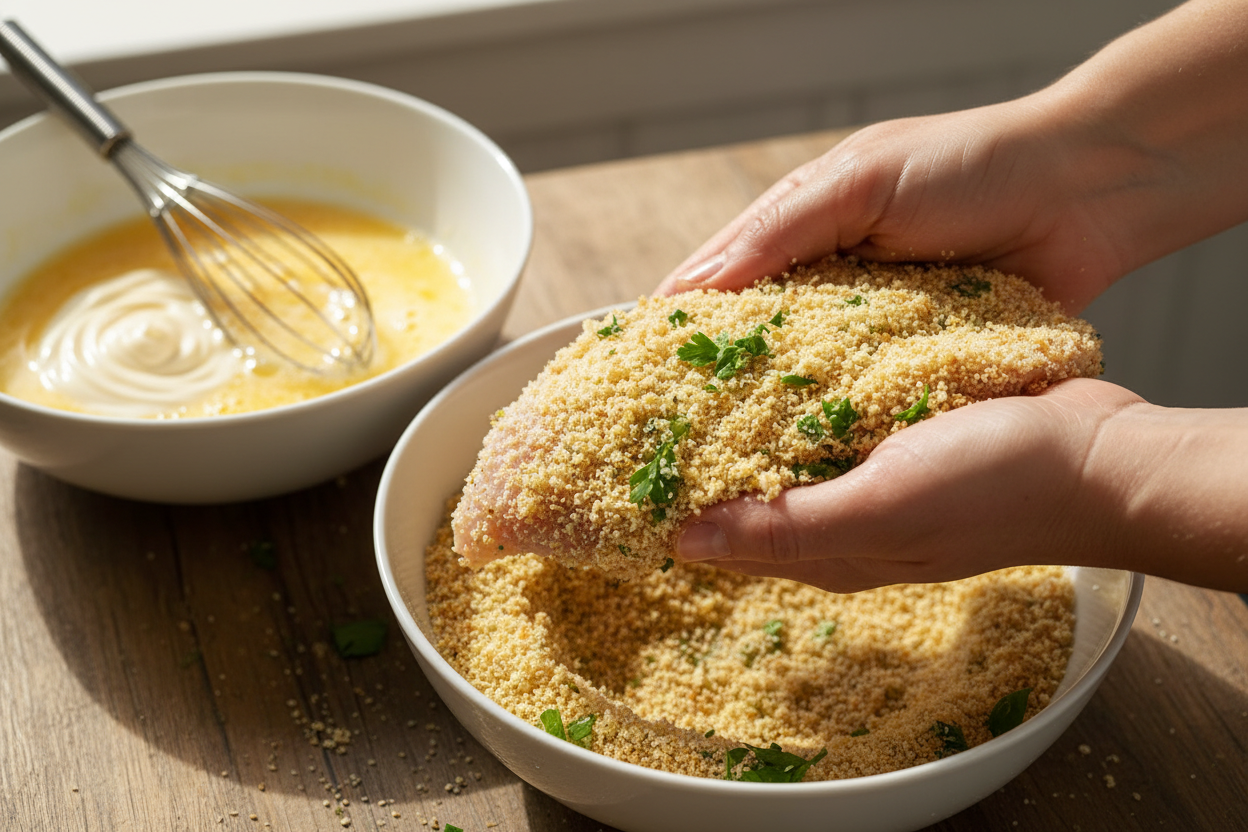
2. Standard Breading Procedure
Set up your dredging station in an assembly line: flour, then egg wash, then breadcrumbs. This makes the process efficient and cleaner.
- First, lightly dredge each chicken cutlet in the seasoned all-purpose flour, shaking off any excess. This creates a dry surface for the egg to cling to.
- Next, dip the floured cutlet into the egg wash, ensuring it’s completely coated. Let any excess egg drip off.
- Finally, press the cutlet firmly into the seasoned breadcrumb mixture. Make sure to press down on both sides, ensuring thorough, even coverage. You want every inch of that chicken coated for maximum crispiness.
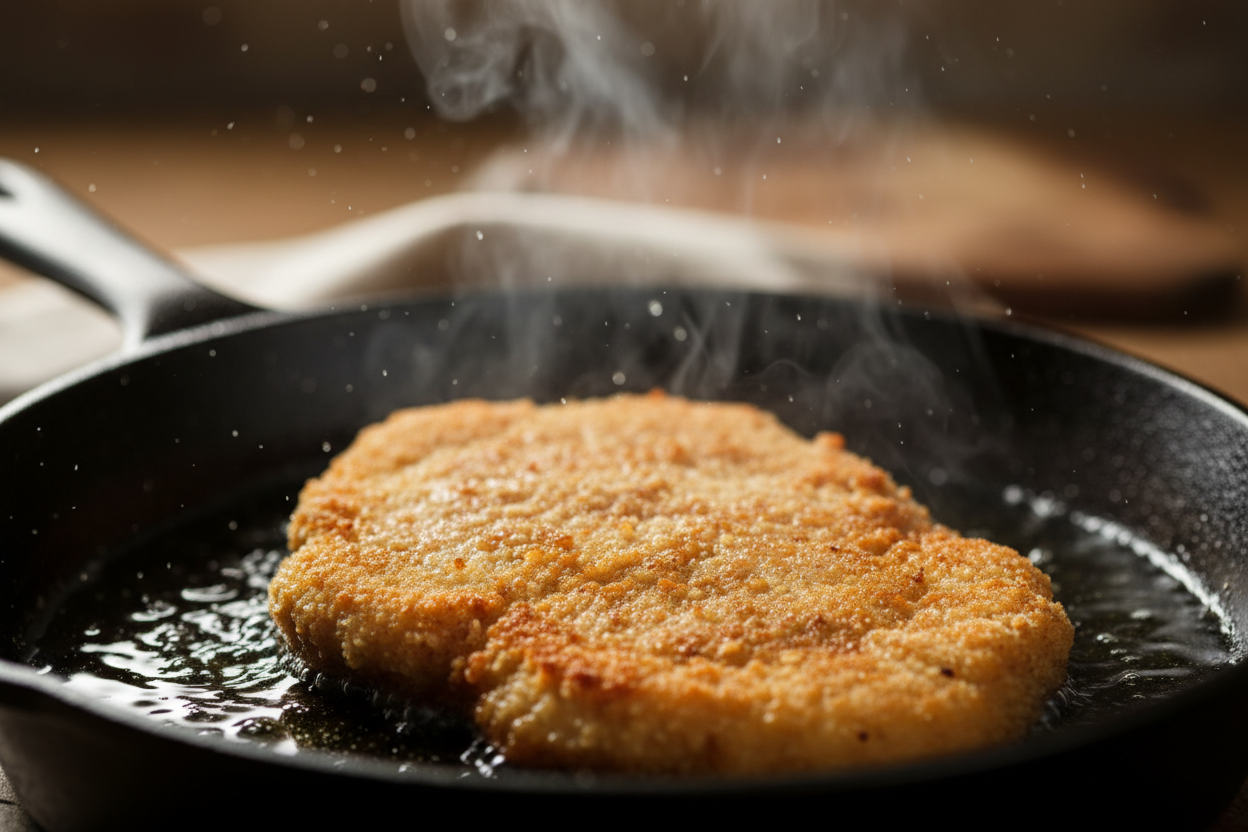
3. Pan-Frying to Golden Perfection
The frying stage is where your Milanese truly comes to life. Choose a large, heavy-bottomed skillet, such as cast iron or stainless steel.
- Pour a shallow layer of olive oil or a neutral oil (like canola or grapeseed) into the skillet, about 1/4 to 1/2 inch deep. Heat the oil over medium to medium-high heat. You want the oil to shimmer gently, indicating it’s hot enough, but not smoke. To test, drop a tiny pinch of breadcrumbs into the oil; if it sizzles immediately, you’re ready.
- Carefully place one or two breaded chicken cutlets into the hot oil, ensuring you do not overcrowd the pan. Overcrowding will lower the oil temperature and lead to soggy, rather than crispy, chicken.
- Cook the cutlets for 3-4 minutes per side, or until they are deeply golden brown and cooked through. The internal temperature of the chicken should reach 165°F (74°C).
- Once cooked, use tongs to transfer the golden-brown, pan-fried chicken to a wire rack set over a paper towel-lined baking sheet. This allows excess oil to drain and air to circulate, keeping the crust crisp.
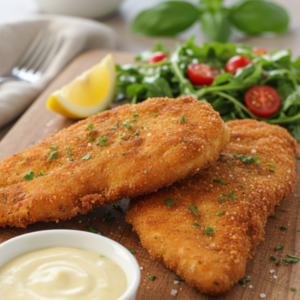
The Perfect Pairing: Arugula and Cherry Tomato Salad
No crispy chicken recipe is complete without its classic companion: a bright and vibrant arugula salad. The peppery bite of fresh baby arugula, combined with the juicy sweetness of halved cherry tomatoes, offers a delightful contrast to the rich, fried chicken. To create this simple yet essential topping, gently toss the arugula and cherry tomatoes with a light lemon vinaigrette. A squeeze of fresh lemon juice, a drizzle of good quality olive oil, and a pinch of salt and pepper are all you need. This fresh, zesty salad not only adds a burst of flavor but also cuts beautifully through the richness of the chicken, making each bite feel balanced and invigorating. It’s the perfect, refreshing accompaniment that elevates the entire dining experience, transforming your plate into a complete and satisfying Italian dinner.
Pro-Tips for the Best Crispy Chicken
Achieving restaurant-quality results at home is easier than you think with a few expert tricks up your sleeve. These pro-tips will ensure your chicken is exceptionally crunchy and perfectly cooked every time.
- Rest the Cutlets: After breading, let your cutlets rest on a wire rack for 10-15 minutes before frying. This crucial step allows the breading to “set,” helping the coating adhere perfectly to the chicken and preventing it from falling off in the hot oil.
- Panko Upgrade: For an unbelievably light and crunchy texture, elevate your breading. Mix traditional breadcrumbs with Japanese panko breadcrumbs in a 1:1 ratio. Panko crumbs are larger, flakier, and absorb less oil, resulting in a superiorly crisp crust that truly crackles with every bite.
- Do Not Overcrowd the Pan: This is perhaps one of the most important rules for crispy frying. Fry the cutlets in batches, giving each piece enough space in the pan. Overcrowding drops the oil temperature, leading to steamed, soggy chicken instead of a beautifully crispy crust. Patience here pays off in spades.
- Drain Properly: Once cooked, always transfer your golden-brown cutlets to a paper towel-lined wire rack. Placing them on a flat plate can trap steam underneath, making the bottom crust soft and soggy. A wire rack allows air circulation, ensuring your chicken stays wonderfully crisp from top to bottom.
Serving and Storage Suggestions
To enjoy your culinary masterpiece at its absolute best, consider these serving and storage tips:
- Serve Immediately: Chicken Milanese is a dish best enjoyed hot, straight out of the pan, when the crust is at its maximum crispiness. The contrast of the hot, crunchy chicken with the cool, fresh arugula salad is simply divine. A final squeeze of lemon juice over the top brightens everything beautifully.
- Storage: Should you have any leftovers (a rare occurrence, we predict!), store the fried cutlets and the arugula salad in separate airtight containers in the refrigerator. The chicken will last for up to 3 days, and the salad is best consumed within 1-2 days.
- Reheating: To revive the crunch of leftover chicken, avoid the microwave at all costs! Microwaving will steam the crust, making it rubbery and unappetizing. Instead, preheat your oven or air fryer to 375°F (190°C) and reheat the cutlets for 5-10 minutes, or until warmed through and crispy again. This method will bring back much of that glorious crunch you created initially.
Enjoy crafting this classic Italian dinner that’s sure to become a cherished part of your recipe repertoire. It’s a testament to the fact that incredibly delicious and satisfying meals can be both approachable and utterly impressive.
Want more delicious recipes and cooking tips? Follow our culinary adventures on Facebook! You can find us at https://www.facebook.com/profile.php?id=61568538666337. We’d love to see your kitchen creations!
Crispy Chicken Milanese with Arugula Salad
Ingredients
- 4 pieces Chicken breast cutlets Pounded to 1/4-inch thickness
- 1/2 cup All-purpose flour
- 2 large Eggs Lightly beaten
- 2 tbsp Mayonnaise Whisked into the eggs
- 1 cup Breadcrumbs Panko or standard, unseasoned
- 2 tbsp Fresh parsley Finely chopped
- 1 tbsp Fresh basil Finely chopped
- 1/2 tsp Salt Plus more to taste
- 1/3 cup Olive oil For pan-frying
- 4 cups Baby arugula
- 1 cup Cherry tomatoes Halved
- 1 whole Lemon Cut into wedges
Instructions
- Place the chicken breast cutlets between two sheets of plastic wrap. Using a meat mallet, pound them to an even 1/4-inch thickness to ensure even cooking.
- Set up a breading station with three shallow bowls: place the flour in the first; whisk the eggs and mayonnaise together in the second; and combine the breadcrumbs, chopped parsley, chopped basil, and salt in the third.
- Dredge each chicken cutlet in the flour, shaking off any excess. Dip it into the egg mixture to coat completely, and finally press it firmly into the breadcrumb mixture until evenly coated on both sides.
- Heat the olive oil in a large skillet over medium-high heat until shimmering. Working in batches, carefully add the breaded chicken cutlets and pan-fry for 3 to 4 minutes per side, until deeply golden brown and cooked through (165°F internal temperature).
- Transfer the cooked cutlets to a wire rack set over a baking sheet to drain excess oil. Sprinkle immediately with a pinch of salt.
- In a medium bowl, toss the baby arugula and halved cherry tomatoes. Squeeze the juice from two lemon wedges over the salad, add a drizzle of olive oil, and season lightly with salt.
- Serve the warm, crispy chicken cutlets immediately, topped generously with the fresh arugula and cherry tomato salad. Garnish with the remaining lemon wedges.
For more daily recipes and tips, follow us on Facebook!
Click here to join our community!