
Easy Chicken Enchiladas: The Ultimate Family Dinner
There are some dishes that just scream comfort, flavor, and family. For many, that dish is a plate of perfectly baked enchiladas. And when it comes to a hassle-free, utterly delicious meal, nothing beats a batch of Easy Chicken Enchiladas. This isn’t just a recipe; it’s an invitation to bring the vibrant, heartwarming tastes of Mexican food at home right to your dinner table, without spending hours slaving away in the kitchen.
The Perfect Weeknight Meal
In the whirlwind of busy lives, finding a meal that satisfies everyone and doesn’t require an extensive shopping list or complex culinary techniques is a true win. Our Easy Chicken Enchiladas recipe is precisely that kind of gem. It’s the quintessential easy weeknight dinner, offering layers of savory shredded chicken, a rich, creamy sauce, and plenty of gooey cheese, all baked to golden perfection. Imagine the aroma filling your home, promising a dish that’s both comforting and incredibly flavorful. This recipe proves that you don’t need a passport to enjoy authentic-tasting Mexican cuisine; just a few simple ingredients and a love for good food.
Key Ingredients
The magic of these Easy Chicken Enchiladas lies in the synergy of a few humble ingredients. Each component plays a vital role in creating that irresistible flavor and texture. Gather these essentials, and you’re well on your way to enchilada bliss:
- Cooked Shredded Chicken: The heart of our filling.
- Tortillas: Your choice of flour or corn.
- Red Enchilada Sauce: The base for our creamy sauce.
- Sour Cream: For ultimate creaminess.
- Shredded Cheese: A blend like Monterey Jack, cheddar, or a Mexican blend.
- Onion & Garlic: Aromatic foundation.
- Green Chilies: For a mild, tangy kick.
- Spices: Cumin, chili powder, salt, and pepper.
- Fresh Parsley or Cilantro: For garnish.
Shredded Chicken Options
The star of our filling is, of course, the chicken. For this shredded chicken recipe, you have a few convenient options. You can:
- Boil and Shred: Simply boil chicken breasts or thighs until cooked through, then shred with two forks or a stand mixer.
- Rotisserie Chicken: A fantastic shortcut! A store-bought rotisserie chicken can be shredded in minutes, saving you valuable time on a busy weeknight.
- Leftover Chicken: Have grilled or baked chicken from a previous meal? Perfect! Dice or shred it to use in your enchiladas.
No matter your method, aim for about 3-4 cups of cooked, shredded chicken. The chicken should be tender and easy to pull apart, ready to soak up all the delicious flavors of the filling.
Tortillas: Flour vs. Corn
Choosing the right tortilla is key to the texture of your Easy Chicken Enchiladas. Both flour and corn tortillas have their merits:
- Flour Tortillas: These are generally softer and more pliable, making them easier to roll without tearing. They result in a tender, slightly chewy enchilada. Many prefer flour for its mild flavor that complements the creamy filling.
- Corn Tortillas: For a more traditional Mexican flavor and a slightly firmer texture, corn tortillas are an excellent choice. To prevent them from cracking when rolling, lightly warm them in a dry skillet or microwave them briefly between damp paper towels until pliable. This step is crucial for perfectly rolled corn enchiladas.
Experiment to see which you prefer! For beginners, flour tortillas often offer an easier rolling experience.
The Creamy Sauce: Red Enchilada Sauce Meets Sour Cream
This is where our creamy chicken enchiladas truly shine, transforming a simple dish into something extraordinary. We’re going for a rich, flavorful, and incredibly smooth sauce that envelops every bite. While many enchilada recipes use a traditional red sauce, we’re elevating it by creating a luscious, sour cream chicken enchiladas base that gives them that distinct “white sauce enchiladas” feel.
Our secret is combining good quality red enchilada sauce with tangy sour cream. The sour cream not only adds incredible creaminess but also mellows the spice of the red sauce, creating a balanced and utterly delicious flavor profile. Some recipes might use cream cheese, but sour cream offers a lighter, tangier finish that pairs beautifully with the chicken and cheese.
Melted Cheese and Fresh Parsley
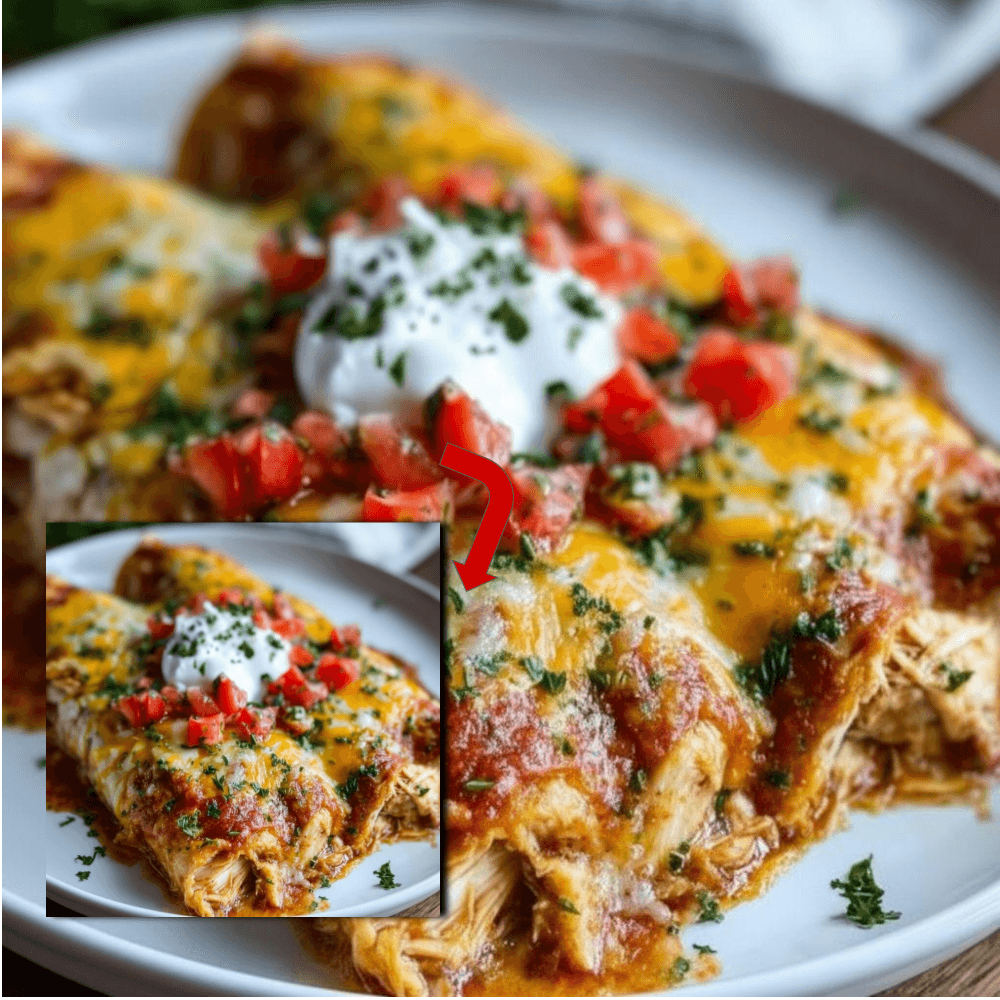
No enchilada is complete without a generous blanket of cheese. For truly cheesy baked enchiladas, a good melting cheese is essential. Monterey Jack, a mild cheddar, or a pre-shredded Mexican blend work wonderfully, providing that coveted gooey, golden-brown crust. And for a final flourish, a sprinkle of fresh parsley or cilantro not only adds a pop of color but also a fresh, herbaceous counterpoint to the rich flavors. Don’t skip this step – it elevates the dish from great to unforgettable!
Step-by-Step Instructions
Creating these Easy Chicken Enchiladas is a straightforward process. Follow these steps for a perfect batch every time:
1. Preparing the Creamy Sauce
In a medium saucepan, sauté a diced onion and minced garlic in a little oil until softened. Pour in the red enchilada sauce and bring it to a gentle simmer. Reduce the heat to low, then gradually stir in the sour cream until fully combined and smooth. Season with a pinch of salt and pepper. Keep warm.
2. Mixing the Chicken Filling
In a large bowl, combine your cooked, shredded chicken with a portion of the creamy sauce (about half a cup), a cup of shredded cheese, diced green chilies, and a tablespoon of your chosen spices (cumin, chili powder). Mix until everything is well incorporated. This ensures every bite of your creamy chicken enchiladas is bursting with flavor.
3. Assembling and Rolling
Preheat your oven to 375°F (190°C). Lightly grease a 9×13 inch baking dish. Pour a thin layer of the creamy sauce onto the bottom of the dish. Take one tortilla at a time (warmed if using corn), place a generous spoonful of the chicken filling down the center, and sprinkle with a little more cheese. Roll the tortilla tightly and place it seam-side down in the prepared baking dish. Repeat with the remaining tortillas and filling, arranging them snugly in the dish.
4. Baking to Bubbly Perfection
Once all the enchiladas are rolled and arranged, pour the remaining creamy sauce evenly over the top. Sprinkle generously with the remaining shredded cheese. Cover the baking dish loosely with foil and bake for 20 minutes. Remove the foil and bake for another 10-15 minutes, or until the sauce is bubbly and the cheese is melted and golden. Let them rest for a few minutes before serving. This creates truly magnificent cheesy baked enchiladas.
Helpful Cooking Tips and Variations
Even the simplest recipes benefit from a few expert tips. Here’s how to make your Easy Chicken Enchiladas even better:
How to Prevent Soggy Tortillas
Soggy enchiladas are a common pitfall, but easily avoidable! Here’s how:
- Lightly Fry or Dip: Briefly dip each tortilla in the warm enchilada sauce before filling and rolling. This creates a protective barrier.
- Don’t Over-Sauce the Bottom: A thin layer of sauce on the bottom of the dish is sufficient; too much can make the bottom tortillas waterlogged.
- Bake Covered, Then Uncovered: Baking covered initially helps the enchiladas cook through and absorb flavors, while removing the foil allows the cheese to brown and excess moisture to evaporate.
Adding Extra Veggies
Want to sneak in more nutrition or texture? Finely diced bell peppers, zucchini, or corn can be sautéed and mixed into the chicken filling. Sauté them first to remove excess moisture and enhance their flavor.
Spice It Up
If you love a little heat, there are several ways to kick up the spice:
- Add a pinch of cayenne pepper or a dash of hot sauce to the chicken filling or the creamy sauce.
- Use a spicier red enchilada sauce.
- Include diced jalapeños (fresh or pickled) in the chicken mixture.
What to Serve with Chicken Enchiladas
Round out your Easy Chicken Enchiladas with some classic Mexican side dishes:
- Mexican Rice: A staple that complements the enchiladas perfectly.
- Refried Beans: Creamy and satisfying, they’re a must-have.
- Fresh Salad: A simple green salad with a zesty vinaigrette provides a refreshing contrast to the rich enchiladas.
- Guacamole and Salsa: Essential for dipping and adding fresh, vibrant flavors.
- Elote (Mexican Street Corn): A grilled corn dish bursting with flavor.
Storage, Freezing, and Reheating Instructions
These Easy Chicken Enchiladas are fantastic for meal prep and make wonderful leftovers!
- Storage: Store cooled leftovers in an airtight container in the refrigerator for up to 3-4 days.
- Freezing: You can freeze baked or unbaked enchiladas.
- Baked: Cool completely, then wrap the entire baking dish tightly with plastic wrap and foil. Freeze for up to 3 months.
- Unbaked (Make Ahead): Assemble the enchiladas in a freezer-safe dish, cover tightly, and freeze for up to 3 months. When ready to bake, add about 30-45 minutes to the baking time, baking covered for longer.
- Reheating:
- From Refrigerator: Reheat individual portions in the microwave until hot, or cover the baking dish with foil and bake at 350°F (175°C) for 20-30 minutes until heated through.
- From Freezer (Baked): Thaw overnight in the refrigerator, then reheat as above. For quicker reheating, you can bake from frozen, increasing the covered baking time significantly (e.g., 45-60 minutes at 350°F, then uncovered until bubbly).
Frequently Asked Questions (FAQs)
Q: What kind of chicken is best for Easy Chicken Enchiladas?
A: Cooked and shredded chicken breast or thighs work equally well. Chicken breasts offer a leaner option, while thighs provide more moisture and flavor. Using a rotisserie chicken is a fantastic time-saver for this shredded chicken recipe.
Q: Can I make these sour cream chicken enchiladas ahead of time?
A: Absolutely! You can assemble the enchiladas (without the final cheese topping) and refrigerate them, tightly covered, for up to 24 hours. Add the cheese just before baking. This makes them a perfect easy weeknight dinner option for busy schedules.
Q: How do I keep corn tortillas from breaking when rolling?
A: The trick is to warm them first. You can quickly fry them in a little oil for 10-15 seconds per side until pliable, or microwave them in stacks of 5-6 between damp paper towels for 30-60 seconds. This makes them flexible and less prone to tearing.
Q: Is there a dairy-free option for the creamy sauce?
A: Yes! You can replace sour cream with a dairy-free sour cream alternative or a cashew cream. For the cheese, use your favorite dairy-free shredded cheese blend. This allows you to still enjoy delicious creamy chicken enchiladas.
With this comprehensive guide, you’re ready to create truly memorable Easy Chicken Enchiladas that will become a cherished family favorite. From the rich, sour cream chicken enchiladas sauce to the perfectly cheesy baked enchiladas, every bite is a celebration of flavor and comfort. Get ready to enjoy the best of Mexican food at home!
For more delicious recipes and cooking tips, make sure to follow us on Facebook: Our Facebook Page. We love sharing our culinary adventures with you!

Easy Creamy Chicken Enchiladas
Ingredients
- 3 cups shredded chicken cooked
- 10 tortillas flour or corn, 8-inch
- 2 cups Monterey Jack cheese shredded, divided
- 15 oz red enchilada sauce
- 1 cup sour cream
- 1/2 cup diced tomatoes for garnish
- 1/4 cup fresh parsley chopped, for garnish
Instructions
- Preheat your oven to 375°F (190°C) and lightly grease a 9x13-inch baking dish.
- In a medium bowl, whisk together the red enchilada sauce and sour cream to create a smooth, creamy sauce.
- In a separate bowl, mix the shredded chicken with half a cup of the creamy sauce and half a cup of the shredded Monterey Jack cheese.
- Spoon about 1/4 cup of the chicken mixture onto each tortilla, roll them up tightly, and place them seam-side down in the prepared baking dish.
- Pour the remaining creamy sauce evenly over the rolled tortillas and sprinkle the rest of the shredded cheese on top.
- Bake uncovered for 20 to 25 minutes until the cheese is completely melted and bubbling.
- Remove from the oven, garnish with diced tomatoes and fresh parsley, and serve hot.
For more daily recipes and tips, follow us on Facebook!
Click here to join our community!