When summer temperatures climb, the thought of turning on the oven can feel like a daunting task. Fortunately, there is a refreshing, beautiful, and completely no-bake solution that satisfies cravings without heating the kitchen. This layered berry dessert reimagines a classic, offering a delightful experience for everyone at the table. By expertly utilizing simple, allergy-friendly alternatives, you can enjoy a quintessential no-bake summer dessert, transforming humble ingredients into something truly special. This creation brings the charm of a vintage refrigerator cake right into your modern kitchen, designed for both ease and enjoyment.
The beauty of this particular dessert lies in its thoughtful construction, accommodating dietary restrictions without any compromise on flavor or texture. For many, finding delicious treats that are both gluten free and dairy free can be a challenge. This recipe specifically addresses those needs, providing an option that is both satisfying and safe. It employs plant-based ingredients to create a remarkably soft, creamy texture that develops beautifully as it chills. The magic of this GF DF layered dessert unfolds in the refrigerator, allowing its components to meld together into a cohesive, luscious treat. The absence of baking means less fuss and more time to enjoy warm weather gatherings, making it an ideal choice for an easy gluten-free treat that impresses without effort.
Creating an allergy-friendly berry cake does not require an extensive list of obscure ingredients. In fact, the components for this delightful confection are straightforward and accessible. The key is understanding how each element contributes to the overall structure and taste, ensuring a harmonious balance that delights the palate. This approach makes preparation manageable, even for novice dessert makers.
The foundation of this delectable creation relies on a few core ingredients:
- Gluten-Free Dairy-Free Sponge Cake: This serves as the primary structural element, providing a soft, absorbent layer that soaks up the creamy goodness. For those seeking an even simpler route, allergy-friendly graham crackers or wafers can be used as an alternative, offering a slightly different texture but equally delicious result. The choice between cake and crackers depends on your preference for softness versus a slight chew.
- Coconut Cream: This ingredient is the star of our dairy-free vanilla dessert. When properly chilled and whipped, it transforms into a light, airy, and rich cream, mimicking traditional heavy whipping cream with remarkable accuracy. It provides the essential creamy mouthfeel that defines an icebox cake.
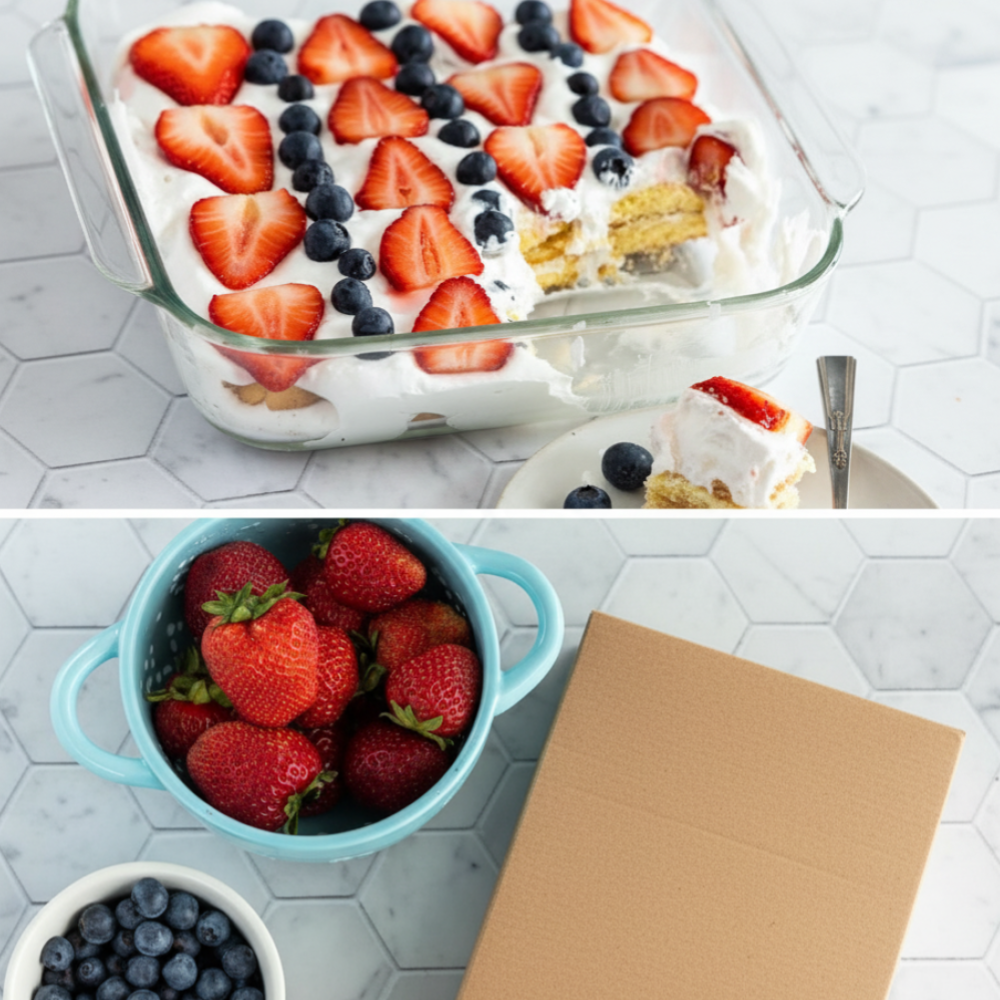
- Fresh Berries: A vibrant mix of strawberries and blueberries introduces a refreshing tartness and a stunning visual appeal. These fruits not only provide flavor bursts but also contribute a natural sweetness and important antioxidants to the dessert. They are integral to the aesthetic and taste profile.
- Powdered Sugar & Vanilla: These two ingredients are crucial for sweetening and enhancing the flavor of the coconut whipped cream. Powdered sugar dissolves seamlessly, creating a smooth texture, while vanilla extract adds a warm, aromatic depth that complements the berries beautifully.
As an expert food blogger, I emphasize that the success of any layered dessert often comes down to precise execution and patience. This particular Gluten Free Dairy Free Icebox Cake is forgiving, yet following these steps will ensure a perfect result every time.
Here is a step-by-step guide to assembling your exquisite, allergy-friendly treat:
- Begin by preparing the coconut whipped cream. In a large mixing bowl, combine the thoroughly chilled coconut cream, a measured amount of powdered sugar, and pure vanilla extract. Use an electric mixer to whip these ingredients vigorously until stiff peaks form. This indicates the cream is properly aerated and stable enough to hold its shape within the layers.
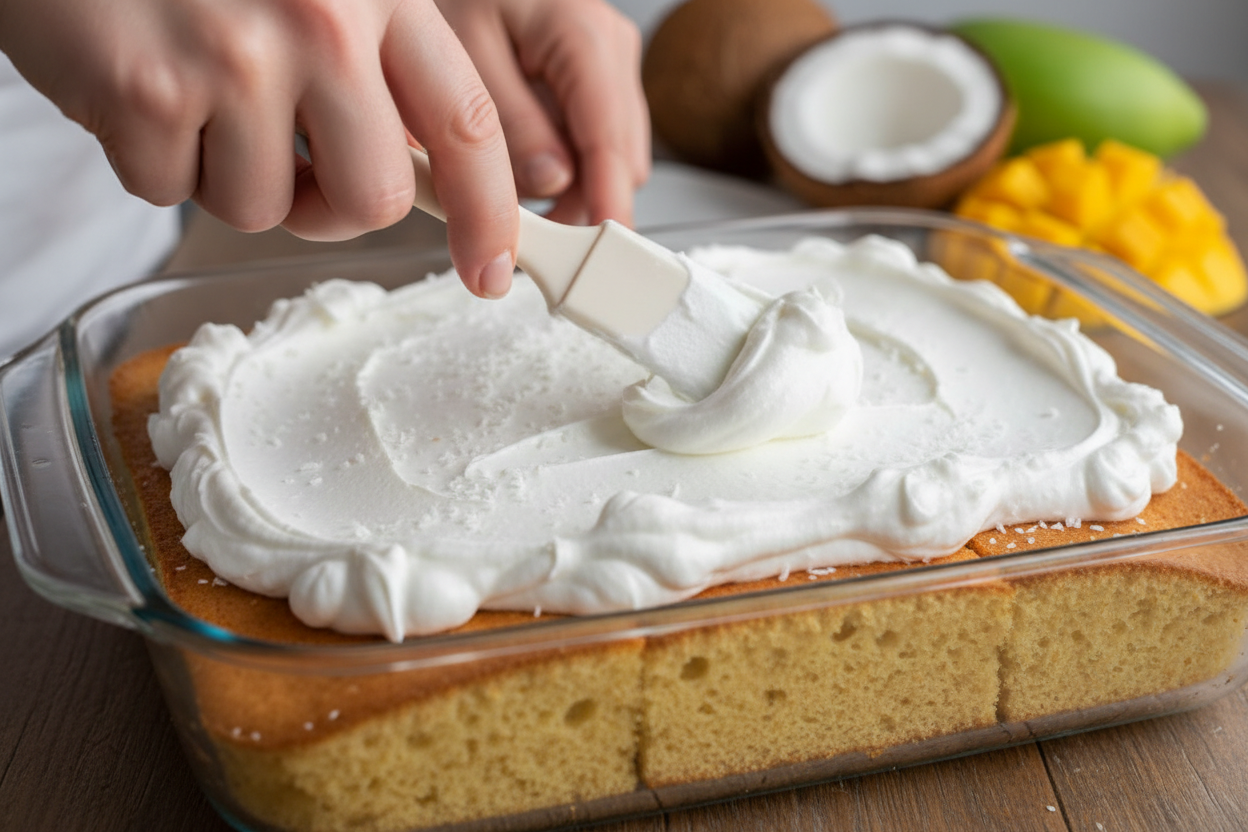
- Spread a thin, even layer of the freshly whipped coconut cream across the bottom of a 9×13 inch baking dish. This initial layer acts as an adhesive and a moisture barrier, preparing the dish for the subsequent layers.
- Carefully arrange a single, uniform layer of gluten-free dairy-free sponge cake slices over the cream base. Ensure that the cake pieces fit snugly together, covering as much of the cream layer as possible. This creates a solid foundation for the berries.
- Next, top the cake layer with precisely half of the sliced strawberries and one-third of the fresh blueberries. Distribute them evenly to ensure every bite contains a medley of fruit.
- Spread a thick, generous layer of the remaining whipped cream over the berries. Be gentle to avoid disturbing the fruit arrangement. This cream layer acts as a buffer and provides additional moisture to soften the cake.
- Repeat the layering process: first with more sponge cake, then with the remaining sliced strawberries and another third of the blueberries. Follow this with another thick layer of whipped cream. Continue this sequence until all ingredients are utilized, making sure to finish with a final, decadent layer of cream. Adorn this top cream layer with the remaining fresh blueberries, creating an inviting visual finish.
- Once assembled, cover the dish tightly with plastic wrap or an airtight lid. Refrigerate the assembled cake for a minimum of 4 hours, or ideally, overnight. This crucial chilling period allows the cake layers to absorb moisture from the cream, softening to a delightful, melt-in-your-mouth consistency.

Achieving perfection with any no-bake dessert often involves understanding a few critical nuances. These helpful cooking tips will elevate your Gluten Free Dairy Free Icebox Cake from good to truly exceptional.
“Patience in chilling ingredients and allowing ample rest time are the silent keys to a no-bake dessert’s success. Rushing these steps can compromise the final texture and flavor.”
* **Chill the Coconut Cream Diligently:** This step is perhaps the most vital. For successful whipping, ensure your full-fat coconut cream cans are refrigerated overnight, or for at least 12 hours. This allows the dense cream to separate from the liquid, making it easier to scoop out the thick cream and whip it into stiff peaks. Do not skip this preparation step.
* **Uniform Slicing of Strawberries:** While seemingly minor, the consistency of your strawberry slices contributes significantly to the cake’s structure and visual appeal. Slice them uniformly so that the layers lay flat and stack neatly, preventing gaps and ensuring even distribution of fruit throughout the dessert.
* **Embrace the Rest Period:** The phrase “let it rest” is more than just a suggestion for this dish; it is a fundamental instruction. The longer the cake sits in the refrigerator, the more time the cake or crackers have to absorb moisture from the coconut cream. This process is what transforms dry cake into a soft, cohesive, and remarkably tender dessert. A minimum of 4 hours is necessary, but an overnight chill truly unlocks its full potential.
One of the many advantages of a vintage refrigerator cake is its inherent make-ahead nature. This dessert is designed to improve with time in the chill, making it a perfect option for entertaining or for preparing ahead of a busy week.
* Store any leftover Gluten Free Dairy Free Icebox Cake in an airtight container within the refrigerator. It will maintain its delightful freshness and texture for up to 3 days. Beyond this period, the fruit may begin to soften excessively, though it will still be edible.
* Regarding freezing, while technically possible, it is not the ideal method for this particular dessert. Freezing can cause the fresh berries to become overly mushy upon thawing, diminishing their vibrant texture and flavor. Therefore, refrigeration is strongly recommended over freezing to preserve the dessert’s intended quality. Plan to enjoy this delightful creation within its refrigerated lifespan for the best experience.
This Gluten Free Dairy Free Icebox Cake stands as a testament to the fact that dietary restrictions do not necessitate sacrificing deliciousness. It is an approachable, elegant, and incredibly satisfying no-bake summer dessert that caters to various palates. Its layered structure and fresh berry flavors make it a perfect centerpiece for any gathering or a simple, refreshing treat for a quiet evening. Embrace the ease and flavor of this allergy-friendly berry cake.
We constantly share new and exciting easy gluten-free treats and dairy-free vanilla dessert recipes, along with helpful tips and insights into allergy-friendly cooking. For more delightful recipes and inspiration, be sure to follow our community on Facebook. Join us and become part of a growing network of food lovers exploring the joys of inclusive cooking.
Follow our Facebook page for more delicious inspiration.

Layered Berry No-Bake Dessert
Ingredients
- 14 oz Gluten-free dairy-free sponge cake Sliced into thin pieces, or substitute with GF/DF graham crackers
- 2 cups Coconut cream Chilled in the fridge overnight
- 1/2 cup Powdered sugar Sifted
- 1 tsp Vanilla extract Pure extract
- 2 cups Fresh strawberries Hulled and sliced
- 1 cup Fresh blueberries Washed and dried well
Instructions
- In a large mixing bowl, whip the chilled coconut cream, powdered sugar, and vanilla extract until stiff peaks form.
- Spread a thin layer of the whipped coconut cream on the bottom of a 9x13 inch baking dish.
- Arrange a single, even layer of gluten-free dairy-free sponge cake slices over the cream.
- Top the cake layer with half of the sliced strawberries and a third of the blueberries.
- Spread a thick layer of whipped cream over the berries, then repeat the layers (cake, berries, cream) until all ingredients are used, finishing with a layer of cream topped with the remaining fresh berries.
- Cover the dish tightly and refrigerate for at least 4 hours, or overnight, to allow the cake layers to soften.
For more daily recipes and tips, follow us on Facebook!
Click here to join our community!