The Irresistible Magic of No-Knead Pot Bread
Imagine a loaf of bread, so wonderfully rustic, with an impossibly crackling crust and a tender, airy crumb, that tastes like it came straight from an artisan bakery. Now, imagine achieving this masterpiece with minimal effort, no complex machinery, and absolutely no kneading. Welcome to the world of No-Knead Pot Bread – a revolutionary method that transforms simple ingredients into culinary magic.
This ingenious technique has captivated home bakers worldwide, proving that you don’t need years of experience or a fancy stand mixer to create truly extraordinary homemade bread. By harnessing the power of a long, slow fermentation and the unique environment of a heated pot, you can consistently bake loaves that rival, if not surpass, anything you’d find at your local boulangerie. It’s an easy yeast bread process that feels almost too good to be true, yet delivers every single time, making it the ultimate beginner bread recipe.
The “pot” technique, often utilizing a Dutch oven, is the secret weapon here, creating a steamy, oven-within-an-oven environment that is perfect for developing that coveted crust and airy texture. Get ready to embrace simplicity and savor the incredible reward of a warm, crusty homemade bread that fills your kitchen with an aroma of pure comfort.
Why Bake Bread in a Pot? The Science Behind the Superior Loaf
Baking bread in a pot, particularly a heavy-bottomed one like a Dutch oven or cast iron, isn’t just a trend; it’s a scientific approach that guarantees exceptional results. Here’s why this method stands head and shoulders above traditional open-oven baking:
The Science of Steam: How a Sealed Pot Traps Moisture for Oven Spring
The moment bread hits a hot oven, it undergoes a crucial process called “oven spring.” This is when the yeast, invigorated by the heat, gives one last burst of activity, causing the dough to rapidly expand. For optimal oven spring and a light, open crumb, a moist environment is key. A sealed pot perfectly traps the steam released from the dough as it bakes, mimicking the conditions of a professional bakery’s steam-injected oven. This steam keeps the crust soft and pliable for longer, allowing the loaf to expand fully before the crust sets into its glorious, crispy shell. Without this trapped steam, the crust would harden too quickly, restricting expansion and resulting in a denser loaf.
Heat Distribution: Why Cast Iron or Enamel Creates the Perfect Crust
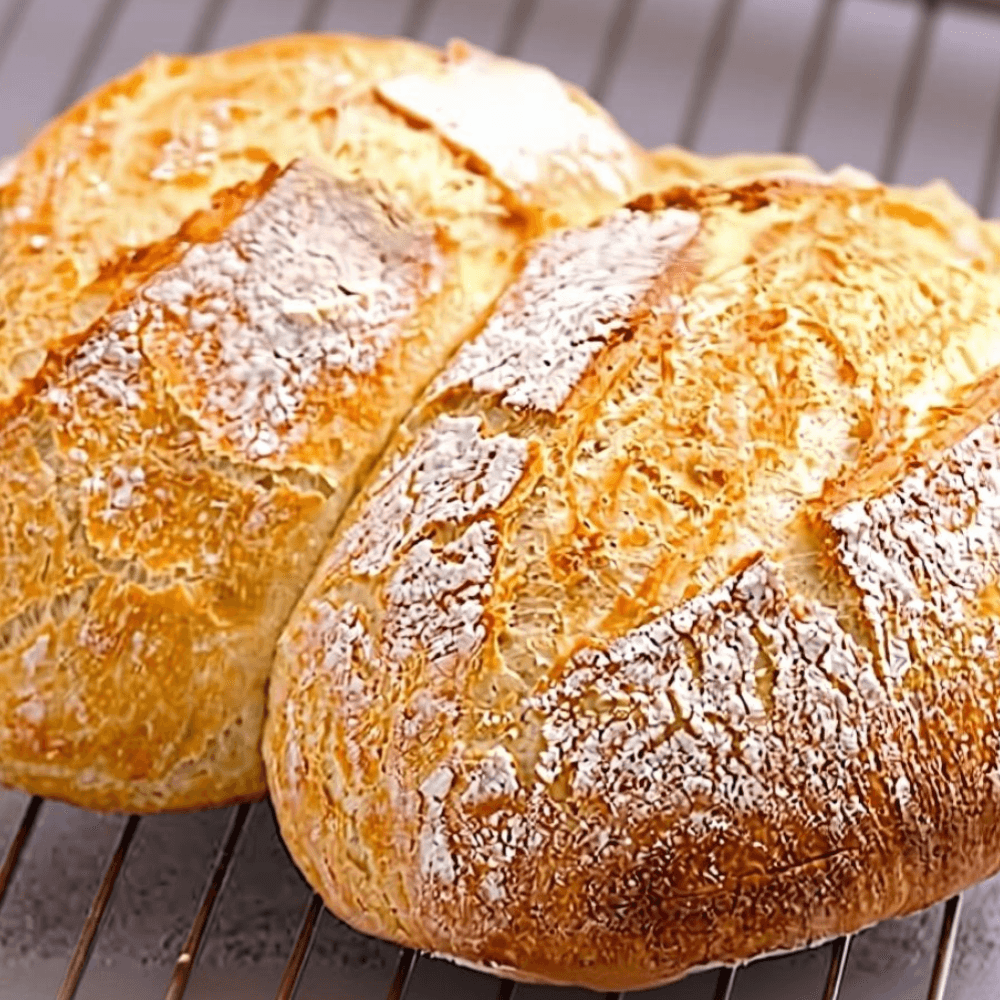
Heavy pots like cast iron bread vessels or enameled Dutch ovens excel at retaining and distributing heat evenly. When preheated to a high temperature, the pot acts as a radiant heat source, transferring intense, consistent heat directly to the bottom and sides of the dough. This uniform heat promotes incredible crust development, ensuring every inch of your rustic white bread turns golden brown and achieves that satisfying crunch. The dark, heavy material of these pots also helps to prevent uneven baking, eliminating pale spots and creating a deep, caramelized flavor in the crust that’s characteristic of artisan no knead bread.
No-Knead Physics: How Time Replaces Mechanical Kneading to Develop Gluten
The magic of no-knead bread lies in its simplicity: time does the work that your hands (or a mixer) typically would. Gluten, the protein network responsible for bread’s structure and chewiness, develops naturally over a long fermentation period. When flour and water combine, glutenin and gliadin proteins start to link up. Over 12 to 18 hours, these proteins hydrate and form strong, elastic gluten strands all on their own. This slow, passive development creates a beautifully complex flavor profile and an open, airy crumb without any physical effort. The high hydration of no-knead doughs further aids in this process, allowing the gluten network to expand and capture the gases produced by the yeast, leading to that wonderful, bubbly interior.
Ingredients for No-Knead Pot Bread: Simple Yet Potent
One of the beauties of a No-Knead Pot Bread is its humble ingredient list. Often referred to as a “4 ingredient bread,” it truly focuses on quality over quantity.
Flour: Best Types to Use (All-Purpose vs. Bread Flour)
- All-Purpose Flour: This is perfectly suitable and often recommended for its accessibility and ability to produce a delightful, tender crumb. It contains enough protein (around 10-12%) to develop a good gluten structure with the long fermentation method.
- Bread Flour: With a higher protein content (12-14%), bread flour will yield a chewier crumb and a slightly stronger structure. If you prefer a more robust, “chewy” artisan no knead bread, bread flour is an excellent choice. Feel free to experiment with a blend of both for your perfect texture.
Yeast: Instant vs. Active Dry (and why less is more)
- Instant Yeast: This is generally preferred for no-knead recipes because it can be mixed directly into the flour without prior activation. Its fine granules disperse easily.
- Active Dry Yeast: If using active dry, ensure it’s fresh. While it typically needs to be proofed in warm water, for no-knead doughs with a long fermentation, you can often just mix it directly with the dry ingredients, as the extended time will allow it to activate.
For an overnight bread recipe, using less yeast than traditional recipes is crucial. A small amount (often 1/4 to 1/2 teaspoon) over a long period prevents over-proofing and allows for maximum flavor development, leading to a more complex, less yeasty taste.
Water: Ideal Temperature for Long Fermentation
Lukewarm or room temperature water (around 70-75°F / 21-24°C) is ideal. It helps the yeast awaken gently and ensures a steady, controlled fermentation over many hours. Avoid hot water, which can kill the yeast, or very cold water, which can drastically slow down the process.
Salt: Importance for Flavor and Structure
Salt is not just for flavor; it’s vital for controlling yeast activity and strengthening the gluten network. Without salt, your bread would taste bland and have a loose, uncontrolled structure. Use a good quality kosher or sea salt for the best results in your crusty homemade bread.
Equipment Essentials for Your Dutch Oven Bread Recipe
Part of the beauty of this easy yeast bread is that it requires very little specialized equipment beyond the pot itself.
- Choosing the Right Pot:
- Dutch Oven: The undisputed champion for No-Knead Pot Bread. A 5 to 6-quart cast iron or enameled cast iron Dutch oven is perfect. Its heavy construction and tight-fitting lid are ideal for heat retention and steam trapping.
- Cast Iron Pot: Similar benefits to a Dutch oven, excellent for high heat and developing a dark, crusty exterior.
- Pyrex/Ceramic Pot: While possible, ensure it’s oven-safe to very high temperatures (typically 450-500°F / 232-260°C) and has a tight-fitting lid. Always check manufacturer instructions. Avoid glass lids with plastic knobs, as they may not withstand high heat.
- Lid Requirements: The lid must fit snugly to trap steam effectively. A metal or oven-safe ceramic knob is essential, as plastic knobs will melt at high baking temperatures.
- Parchment Paper: A game-changer for easy dough transfer and preventing sticking. Don’t skip this!
- Mixing Bowls: One large bowl for mixing and rising, and optionally a smaller bowl or proofing basket for the second rise.
- Bench Scraper (optional but helpful): For gently handling sticky dough.
Step-by-Step Instructions: Mastering Your Artisan No Knead Bread
Follow these simple steps to create your perfect No-Knead Pot Bread.

1. Mixing the Dough
- In a large bowl, combine the flour, yeast, and salt. Whisk briefly to distribute evenly.
- Add the water to the dry ingredients.
- Using a wooden spoon or spatula, mix until just combined. The dough will be very wet, sticky, and “shaggy” – this is exactly what you want!
- Why you shouldn’t overmix: Excessive mixing develops gluten too quickly, potentially making the dough tough. The no-knead method relies on time for gluten development, so minimal initial mixing is key.
2. The Long Rise (Fermentation)
- Cover the bowl tightly with plastic wrap or a damp kitchen towel.
- Let the dough rise at room temperature (ideally 68-72°F / 20-22°C) for 12 to 18 hours. This overnight bread recipe can be left longer in cooler temperatures.
- Visual cues for readiness: The dough should have roughly doubled in size, be covered in tiny bubbles, and jiggle slightly when the bowl is gently shaken. It will also smell pleasantly yeasty.
3. Shaping the Loaf
- Lightly flour your work surface and gently scrape the risen dough out onto it.
- With floured hands or a bench scraper, gently fold the edges of the dough towards the center a few times to create a relatively taut ball. Avoid deflating it too much.
- Place the shaped dough, seam-side down, onto a large piece of parchment paper. If desired, you can place the parchment paper with the dough into a proofing basket or another bowl for a second short rise (30-60 minutes). This helps it hold its shape.
4. The Baking Process
- Preheating the pot (Crucial step): Place your Dutch oven (with its lid on) into your cold oven. Preheat the oven to 450°F (232°C). Let the pot preheat for at least 30 minutes once the oven reaches temperature. This ensures the pot is screaming hot, which is vital for oven spring and crust development.
- Carefully remove the hot pot from the oven (use oven mitts!). Gently lift the dough using the parchment paper and lower it into the preheated pot.
- Baking covered vs. uncovered:
- Bake covered for 30 minutes. This traps the steam, promoting maximum oven spring and a light crumb.
- Remove the lid and continue to bake uncovered for another 15-25 minutes, or until the crust is deep golden brown and reaches an internal temperature of 200-210°F (93-99°C). This allows the crust to crisp up and achieve that beautiful, crackling texture.
- Carefully remove the bread from the pot and transfer it to a wire rack to cool completely.
Tips for the Perfect Crust and Crumb
Achieving that glorious, crusty homemade bread is within reach with a few expert tips:
- Oven Temperature Accuracy: Ensure your oven thermometer is accurate. An underheated oven won’t provide the necessary initial burst for oven spring, and an overheated oven can burn the crust before the interior cooks.
- Cooling Times to Prevent Gummy Texture: This is arguably the most crucial step often overlooked! Let your No-Knead Pot Bread cool on a wire rack for at least 1-2 hours (or even longer if you can resist!). Slicing hot bread traps steam, leading to a gummy, dense crumb. Cooling allows the internal structure to set and residual moisture to redistribute, resulting in a perfect texture.
- Scoring the Dough (optional): While not strictly necessary for no-knead bread (it tends to burst naturally), a quick score with a razor blade or sharp knife can guide the expansion, creating an attractive pattern and helping the loaf rise more evenly.
Flavor Variations for Your Rustic White Bread
Once you master the basic No-Knead Pot Bread, the possibilities for customization are endless!
- Savory:
- Rosemary and Sea Salt: Add 1-2 tablespoons of fresh chopped rosemary and a sprinkle of coarse sea salt to the dough.
- Jalapeño Cheddar: Fold in 1/2 cup shredded cheddar cheese and 1-2 finely diced fresh jalapeños (seeds removed for less heat).
- Garlic Parmesan: Mix in 2-3 cloves minced garlic and 1/4 cup grated Parmesan cheese.
- Sweet:
- Cinnamon Raisin: Add 1/2 cup raisins and 1-2 teaspoons ground cinnamon. A touch more sugar (1-2 tablespoons) can be added to the dough.
- Cranberry Walnut: Fold in 1/2 cup dried cranberries and 1/2 cup chopped walnuts.
- Seeded:
- Sesame, Poppy, and Sunflower blends: Mix 2-3 tablespoons of your favorite seed blend into the dough or sprinkle generously on top before baking.
Troubleshooting Common Issues
Even the simplest recipes can present challenges. Here’s how to tackle common No-Knead Pot Bread problems:
- Dense crumb: This is often due to inactive yeast, insufficient rise time, or dough that was too cold during fermentation. Ensure your yeast is fresh, allow the full 12-18 hours for rising, and keep the dough in a reasonably warm spot. Over-kneading (mixing too much initially) can also lead to a dense crumb.
- Burnt bottom: If your cast iron bread or Dutch oven bread frequently burns on the bottom, your oven rack might be too low. Try moving your pot to a higher rack (middle or slightly above middle). Alternatively, you can place a baking sheet or a second piece of parchment paper under the loaf during the uncovered baking phase to insulate the bottom.
- Dough spreading too much (flat loaf): This indicates over-proofed dough or hydration levels that are too high. If the dough has risen for too long, the gluten structure weakens, and it can’t hold its shape. Reduce the rise time next time. If hydration is the issue, try reducing the water by 1-2 tablespoons. Proper shaping with gentle folds can also help create surface tension.
Storage and Freezing Your Homemade Loaf
You’ve baked a magnificent loaf of No-Knead Pot Bread; now ensure it stays fresh!
- Keeping the crust crispy: Store your cooled bread cut-side down on a cutting board, or loosely wrapped in a clean kitchen towel at room temperature for 1-2 days. Avoid airtight containers if you want to preserve the crispy crust, as they trap moisture and soften it.
- Freezing slices vs. whole loaves: For longer storage, freezing is excellent.
- Whole Loaves: Once completely cooled, wrap the entire loaf tightly in plastic wrap, then in foil. It will keep for up to 3 months.
- Slices: Slice the cooled bread, then arrange slices in a single layer on a baking sheet and freeze for an hour. Once firm, transfer them to a freezer bag, separating layers with parchment paper to prevent sticking. This allows you to grab just a few slices at a time.
- Reheating instructions:
- Whole Loaf: Thaw overnight at room temperature. For a refreshed crust, spritz with water and bake in a preheated 350°F (175°C) oven for 10-15 minutes.
- Slices: Can be toasted directly from frozen or warmed in a toaster oven for a few minutes.
Frequently Asked Questions (FAQ)
Here are answers to common questions about making this fantastic easy yeast bread:
How long does no-knead bread take from start to finish?
While the active hands-on time for mixing and shaping is minimal (about 10-15 minutes), the entire process takes 12 to 18 hours due to the long fermentation period, plus about 45-55 minutes for baking and 1-2 hours for cooling.
Can I make no-knead dough in advance and store it in the fridge?
Yes! After its initial 12-18 hour rise at room temperature, you can punch down the dough slightly, cover it tightly, and refrigerate it for up to 3 days. This slows down fermentation even further. When ready to bake, let it come to room temperature for about an hour before shaping and baking as usual.
What if I don’t have a Dutch oven?
You can use any heavy, oven-safe pot with a tight-fitting lid that can withstand temperatures of 450-500°F (232-260°C). Cast iron pots, enameled cast iron, or certain ceramic/Pyrex pots can work. Ensure the lid’s knob is oven-safe (metal or ceramic). Always check your cookware’s manufacturer guidelines.
Do I really need parchment paper?
While not strictly mandatory, parchment paper is highly recommended. It makes transferring the sticky dough into a screaming hot pot incredibly easy and safe, and it prevents the bread from sticking to the bottom of the pot.
My bread didn’t rise much; what went wrong?
Lack of rise typically points to inactive yeast (check the expiry date!), water that was too hot or too cold, or the dough rising in an environment that was too cold. Ensure your yeast is fresh and your water is lukewarm for optimal activity during the long fermentation.
Ready to bake your own magnificent loaf? There’s nothing quite like the satisfaction of slicing into a warm, fragrant No-Knead Pot Bread you made yourself. Give this easy yeast bread a try, and prepare to impress!
Don’t miss out on more delicious recipes and baking tips! Follow us on Facebook: https://www.facebook.com/profile.php?id=61568538666337

Crusty No-Knead Pot Bread
Ingredients
- 3 cups All-purpose flour or bread flour Plus extra for dusting
- 1.5 cups Warm water Approx. 100°F (38°C)
- 0.25 tsp Instant yeast Or active dry yeast
- 1.25 tsp Kosher salt
- 1 tbsp Cornmeal Optional, for the pot bottom
Instructions
- In a large mixing bowl, whisk together the flour, salt, and yeast.
- Pour in the warm water and stir with a wooden spoon or spatula until a sticky, shaggy dough forms. Do not knead.
- Cover the bowl tightly with plastic wrap and let it rest at room temperature for 12 to 18 hours until the surface is dotted with bubbles.
- When ready to bake, place a Dutch oven or heavy pot with a lid into the oven and preheat to 450°F (230°C) for 30 minutes.
- While the pot heats, turn the dough out onto a generously floured surface. Gently fold the edges over a few times to shape it into a round ball.
- Place the dough ball on a large piece of parchment paper.
- Carefully remove the hot pot from the oven. Lift the parchment paper with the dough and lower it into the pot. Cover with the hot lid.
- Bake for 30 minutes with the lid on to trap steam.
- Remove the lid and bake for another 15 to 20 minutes until the crust is deep golden brown.
- Remove the bread from the pot and let it cool completely on a wire rack before slicing.
For more daily recipes and tips, follow us on Facebook!
Click here to join our community!