
Introduction to Perfect Pan Seared Scallops
There’s a certain magic in preparing a meal that rivals your favorite restaurant experience, right in your own kitchen. Today, we’re diving into that magic with one of the most elegant and surprisingly simple dishes you can master: Pan Seared Scallops. Imagine plump, succulent scallops, kissed with a beautiful golden-brown crust, swimming in a vibrant lemon herb butter sauce. Sounds intimidating? It doesn’t have to be.
Why This Recipe Is a Game-Changer
This isn’t just a recipe; it’s a technique. Once you understand the fundamentals of high-heat searing and how to treat these delicate morsels, you’ll unlock a world of impressive culinary possibilities. Forget tough, rubbery seafood. We’re aiming for a restaurant quality seafood dinner that will impress guests and satisfy your cravings for something truly special. This guide promises perfectly cooked scallops every single time, transforming a simple ingredient into a gourmet delight.
The Art of the Pan Sear
The secret to incredible scallops lies in the sear. It’s about creating that exquisite contrast: a deeply caramelized, flavorful exterior that gives way to a sweet, tender, almost buttery interior. We’re going to explore how a few simple steps and the right equipment can achieve this coveted texture, making your scallops sing. It’s a dance between heat, fat, and timing, and mastering it is incredibly rewarding.
Essential Ingredients for Restaurant-Quality Scallops
Great dishes start with great ingredients. For a dish as simple and pure as seared scallops, the quality of what you choose truly shines through.
The Importance of Dry-Packed Scallops vs. Wet Scallops
This is arguably the most critical decision you’ll make. Always, always opt for dry-packed sea scallops. “Dry-packed” means they haven’t been treated with a sodium tripolyphosphate solution, which many conventional scallops (often labeled “wet-packed”) are. This solution makes them absorb water, increasing their weight and shelf life, but it’s detrimental to searing. Wet scallops release too much moisture in the pan, steaming rather than searing, and preventing that desired golden crust. Dry-packed scallops are naturally sweet, slightly off-white, and will sear beautifully. Ask your fishmonger for them specifically.
Choosing the Right Oil for High-Heat Searing
To achieve that beautiful sear, you need an oil with a high smoke point. Avoid olive oil here, as it will burn and impart a bitter flavor. Instead, reach for oils like grapeseed, avocado, or refined canola oil. These oils can withstand the intense heat required for quick, effective searing without smoking up your kitchen. A neutral flavor is also key, allowing the natural sweetness of the scallops to shine.
Building Flavor: Butter, Lemon, and Fresh Herbs
While the scallops themselves are the star, a simple yet elegant sauce elevates them. Unsalted butter provides richness and helps with basting. Fresh lemon juice cuts through the richness, adding brightness and acidity. For herbs, think delicate and complementary: fresh parsley, chives, or a hint of thyme work wonderfully. These simple additions create a harmonious lemon herb butter sauce that perfectly complements the sweet scallops.
Expert Tip: “Think of ingredients as collaborators. Each one plays a crucial role in the symphony of flavor. For scallops, less is often more, letting their natural sweetness take center stage.” – Chef Isabella Rossi
Step-by-Step Guide: How to Sear Scallops
This is where the magic happens. Follow these steps precisely for truly phenomenal results.
Step 1: Prepping and Drying
- Rinse Gently: Place your sea scallops in a colander and rinse them under cold water. Pat them dry with paper towels.
- Remove Side Muscle: On the side of each scallop, you might find a small, tough, crescent-shaped piece of muscle. This is the adductor muscle that connects the scallop to its shell. It’s edible but has a chewier texture than the rest of the scallop. Removing scallop side muscle ensures a uniform, tender bite. Simply pinch and pull it off. Discard it.
- Dry Thoroughly (Again!): This step cannot be overstated. Lay the scallops on a plate lined with several layers of paper towels. Place more paper towels on top and gently press to absorb as much moisture as possible. Let them sit like this for at least 10-15 minutes, or even longer in the fridge if time permits. The drier the scallops, the better the sear.
Step 2: Achieving a Screaming Hot Pan
- Choose Your Weapon: A heavy-bottomed skillet is essential. A cast iron skillet seafood is ideal because it retains and distributes heat incredibly well, leading to an even, consistent sear. Stainless steel also works well.
- Heat the Pan: Place your skillet over medium-high to high heat. You want it smoking hot. Add your high smoke point oil (grapeseed, avocado, or canola) – just enough to lightly coat the bottom, about 1-2 tablespoons for a dozen scallops.
- Check the Temperature: The oil should shimmer, and you might see a wisp of smoke. This indicates it’s hot enough. If it’s not hot enough, the scallops will stick and steam.
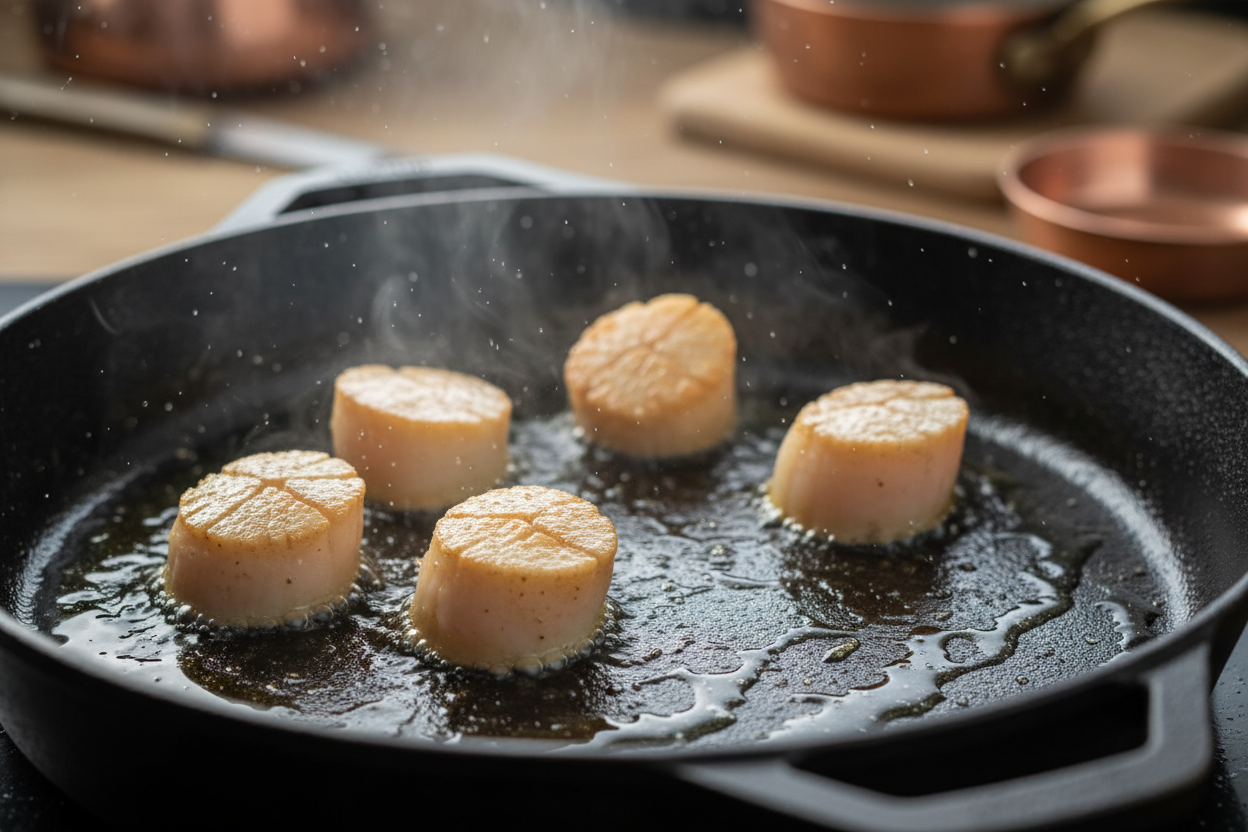
Step 3: The Searing and Flipping Technique
- Season: While the pan heats, season your thoroughly dried scallops generously with salt and freshly ground black pepper. Do this just before searing to prevent moisture from being drawn out too early.
- Place Scallops: Carefully place the scallops into the hot pan, ensuring they are not crowded. Work in batches if necessary; overcrowding lowers the pan temperature and prevents proper searing. Leave ample space between each scallop.
- Sear Undisturbed: Let them sear for 1.5 to 2 minutes without touching them. Resist the urge to peek or move them! This undisturbed time is crucial for developing that beautiful golden brown crust scallops crave.
- Flip: Using tongs, flip each scallop. You should see a deep, golden-brown crust. If not, increase the heat slightly for the next batch.
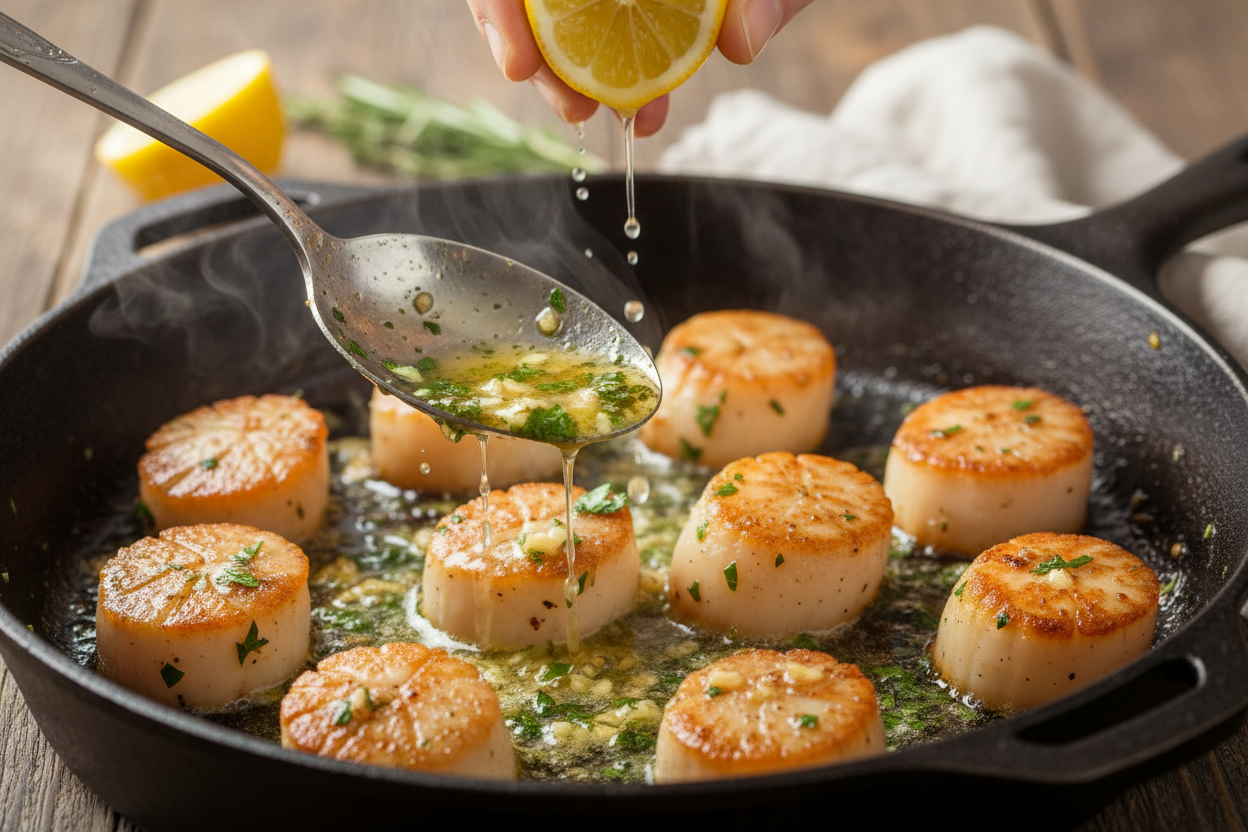
Step 4: Basting with Herb Butter
- Add Butter and Aromatics: Immediately after flipping, add 2-3 tablespoons of unsalted butter to the pan. You can also add a smashed garlic clove or a sprig of fresh thyme if desired.
- Baste: Tilt the pan slightly and, using a spoon, continuously spoon the melted butter and pan juices over the scallops. This technique, known as basting scallops in butter, adds incredible flavor and helps them cook evenly.
- Finish Cooking: Continue to sear and baste for another 1 to 1.5 minutes on the second side, until the scallops are opaque throughout and have developed a similar golden crust. They should feel firm but still have a slight give when gently pressed.
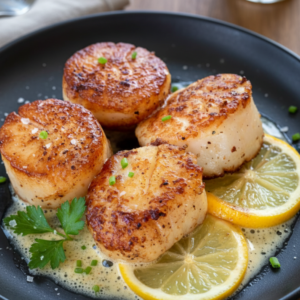
- Serve Immediately: Remove the scallops from the pan. Squeeze fresh lemon juice over them and sprinkle with fresh chopped herbs. Serve hot!
Troubleshooting Common Scallop Mistakes
Even seasoned cooks can encounter issues. Here’s how to navigate common scallop mishaps.
Why Didn’t My Scallops Brown?
The number one culprit is moisture. If your scallops weren’t thoroughly dried (remember step 1!), they release water into the pan, steaming instead of searing. The pan also might not have been hot enough, or you might have crowded the pan, which drops the temperature dramatically. Ensure a hot pan, dry scallops, and plenty of space between them for that perfect crust.
Preventing Rubber Texture
Rubberiness is a sign of overcooking. Scallops cook very quickly, often in just 3-4 minutes total. They go from perfectly tender to tough and chewy in a matter of seconds. Keep a close eye on them, and remove them from the heat as soon as they are opaque throughout with a beautiful sear. Don’t walk away from the pan!
Recognizing the Side Muscle
As mentioned in the prep section, this small, crescent-shaped piece can be tough. It’s easily identifiable on the rounded side of the scallop. While not a “mistake” to leave it on, removing it ensures a more uniformly tender bite, contributing to that desired how to cook scallops perfectly outcome.
What to Serve with Perfect Pan Seared Scallops
These elegant morsels pair beautifully with a variety of sides, whether you’re looking for something hearty or light.
Pasta and Risotto Pairings
For a truly indulgent meal, consider pairing your scallops with a creamy risotto. A lemon risotto with asparagus or a mushroom risotto would be divine. Alternatively, a light pasta dish, such as linguine with a garlic and white wine sauce or a simple aglio e olio, allows the scallops to remain the star while providing a satisfying base.
Vegetable and Low-Carb Sides
If you prefer lighter options, roasted asparagus, sautéed spinach with garlic, or green beans almondine are excellent choices. A crisp side salad with a light vinaigrette also provides a refreshing contrast. For low-carb diners, cauliflower rice or zucchini noodles tossed with a little olive oil and herbs make fantastic, guilt-free companions.
Frequently Asked Questions
Can I Use Frozen Scallops?
Yes, you can, but with caveats. Always choose “dry-packed” if possible, even for frozen. Thaw them completely in the refrigerator overnight. The absolute most important step when using frozen scallops is to ensure they are extremely dry before searing, as they tend to release more moisture than fresh ones. Press them between layers of paper towels multiple times.
Can I Use Bay Scallops Instead of Sea Scallops?
While you can sear bay scallops, this guide focuses on large sea scallops. Bay scallops are much smaller and cook even more quickly, making it harder to achieve the desired crust without overcooking. They’re typically better suited for quick sautés, stir-fries, or in dishes where they’re mixed with other ingredients rather than being the standalone star of a sear.
How Do I Reheat Leftover Scallops?
Reheating scallops is tricky, as they can easily become rubbery. It’s best to enjoy them fresh. If you must reheat, do so gently. The best method is to briefly warm them in a non-stick skillet over low heat with a tiny bit of butter or broth, just until warmed through, about 30-60 seconds per side. Avoid the microwave, as it almost guarantees a chewy texture.
Mastering pan-seared scallops is a culinary triumph that’s well within your reach. With these tips and techniques, you’re ready to create a truly memorable meal. Happy cooking!
For more delicious recipes and cooking inspiration, make sure to follow us on Facebook: https://www.facebook.com/profile.php?id=61568538666337
Perfect Pan Seared Scallops with Lemon Herb Butter
Ingredients
- 1 lb Jumbo sea scallops Dry-packed preferred, side muscle removed
- 1 tbsp Olive oil Or any high-heat neutral oil
- 3 tbsp Unsalted butter Cut into cubes
- 2 cloves Garlic Minced
- 1 tbsp Fresh lemon juice
- 2 tbsp Fresh parsley and chives Finely chopped
- 1/2 tsp Kosher salt
- 1/4 tsp Black pepper Freshly cracked
Instructions
- Remove the side muscle from each scallop if still attached. Thoroughly pat the scallops dry with paper towels, removing as much moisture as possible to ensure a proper golden crust.
- Season both sides of the scallops generously with kosher salt and black pepper immediately before placing them into the pan.
- Heat the olive oil in a large cast-iron or stainless steel skillet over medium-high heat until the oil begins to shimmer and lightly smoke.
- Carefully place the scallops into the hot skillet in a single layer, ensuring they do not touch. Cook undisturbed for 2 minutes until a deep golden-brown crust forms on the bottom.
- Using tongs, flip the scallops. Immediately add the butter, minced garlic, and chopped fresh herbs to the skillet.
- As the butter melts, tilt the pan slightly and continuously baste the scallops by spooning the hot butter over them for 1 to 2 minutes, until the scallops are opaque.
- Remove the skillet from the heat, squeeze the fresh lemon juice over the scallops, and serve immediately with the pan sauce spooned over the top.
For more daily recipes and tips, follow us on Facebook!
Click here to join our community!