
Embarking on an outdoor dining adventure is a simple pleasure, a chance to connect with nature and loved ones over a shared meal. The art of al fresco eating lies in mindful preparation, ensuring a stress-free and delicious experience. This guide focuses on creating the ultimate Picnic Lunch Spread, a classic menu designed for ease and enjoyment. We will prepare hearty sandwiches, fresh fruit, crunchy snacks, and satisfying sweet treats, all perfect for your next family outing.
Essential Components of a Great Packed Meal
A successful packed meal idea balances taste, durability, and convenience. Each element serves a purpose, from satisfying hunger to providing refreshing hydration.
- The Main Event: Sandwiches form the backbone of any good Picnic Lunch Spread. The goal is to build substantial, flavorful combinations that withstand travel without becoming soggy or falling apart. Opt for fillings that are not overly wet and bread that holds its structure.
- Fresh Sides: Fresh fruit offers a welcome burst of sweetness and hydration. For travel-friendly food, select fruits that are resilient and less prone to bruising. Grapes, berries, and firm apples are excellent choices for any park lunch idea.
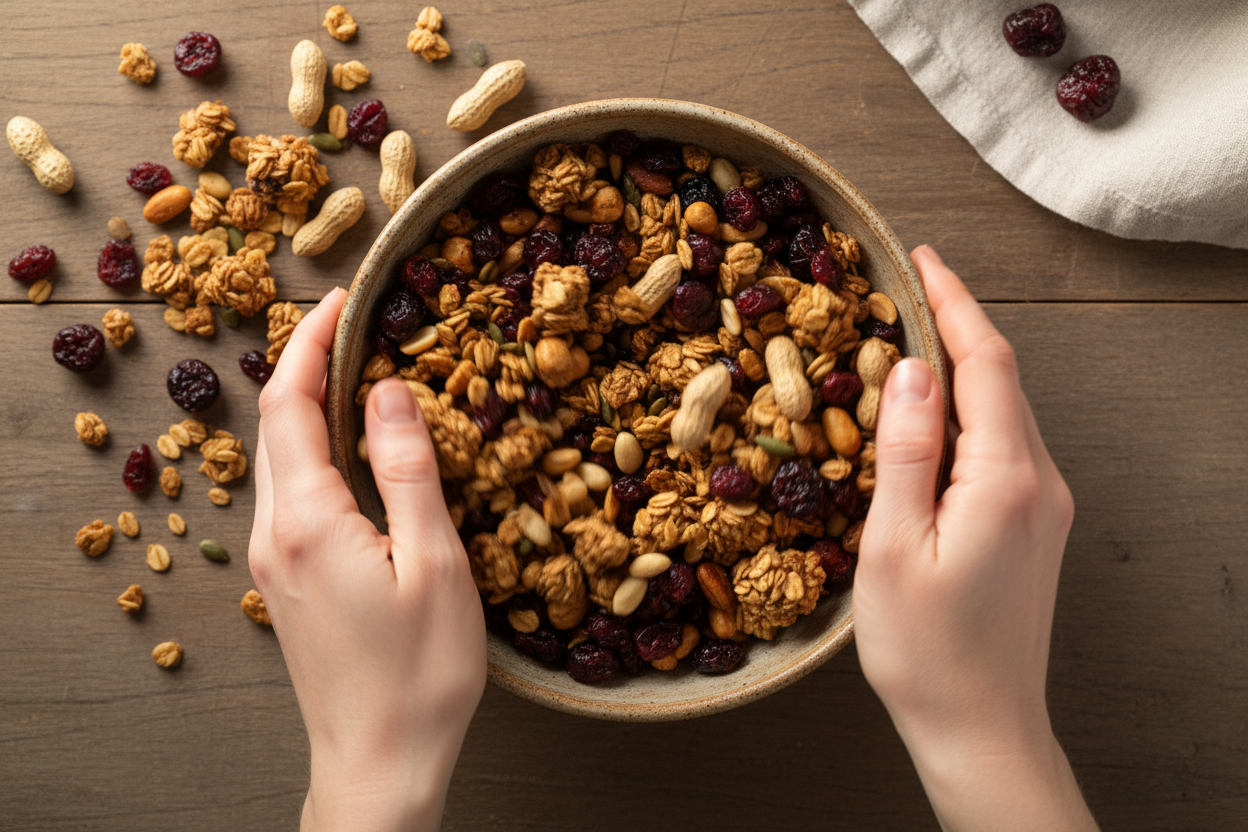
- Crunchy Snacks: A versatile trail mix or a selection of nuts and dried fruit provides an excellent source of energy and satisfying crunch. These components are perfect for grazing and make for ideal family outing snacks.
- Drinks & Sweets: Hydration is paramount for summer outdoor meals. Complement your main course with refreshing beverages. A small sweet treat provides a delightful finish, completing the picnic experience.
Step-by-Step Prep Guide (Classic Beef & Cheese Menu)
This specific menu outlines a simple yet delicious Picnic Lunch Spread, ideal for effortless assembly and transportation. All ingredients and quantities are provided for a balanced meal.
Step 1: Build the Sandwiches
Begin by laying out 8 slices of white bread on a clean surface. On 4 of these slices, carefully place 1 lettuce leaf each. Follow with 2 oz of deli roast beef per sandwich, ensuring even distribution. Next, add 1 slice of cheddar cheese to each, then top with 2 slices from 1 large tomato. Close the sandwiches with the remaining 4 slices of bread. Cut each sandwich in half to make them easier to handle and share. This makes a total of 4 robust sandwiches.

Step 2: Prepare the Fruit
Take 1 cup of green grapes and 1 cup of red grapes. Wash them thoroughly under cool running water. Pat them completely dry with a clean cloth or paper towel. Moisture can encourage spoilage, so ensuring they are dry is key for any make-ahead picnic food. Transfer the dried grapes into a hard-sided container. This prevents them from being crushed during transport, maintaining their fresh appearance.
Step 3: Mix the Trail Snacks
In a medium bowl, combine 1/4 cup dried cranberries, 1/4 cup dried cherries, 1/2 cup roasted peanuts, and 1/2 cup granola or oats. Toss these ingredients gently until they are well mixed. This combination provides a delightful balance of sweet, savory, and crunchy textures. Transfer the snack mix to an airtight zip-top bag or a sealed container to keep it fresh and prevent spillage.
Step 4: Pack the Sweets and Drinks
Carefully pack 4 large chocolate chip cookies, ensuring they do not get crushed. Gather your beverages: 2 cans of sparkling water, 2 canned sodas, and 2 fruit puree pouches. These selections offer a variety of options for different preferences. Arrange all the prepared food items and drinks inside your cooler. Surround them with ice packs to maintain a safe temperature, crucial for preserving food quality during any tailgating menu or outdoor event.
Packing Strategies for Maximum Freshness
Effective cooler packing tips are essential for keeping your Picnic Lunch Spread safe and appetizing. Proper layering and temperature control prevent spoilage and maintain food integrity.
- Layering Your Cooler: Place heavier, less fragile items like canned drinks and ice packs at the bottom of the cooler. This creates a stable base and keeps the coldest elements where they can best chill the contents. Delicate items, such as sandwiches and cookies, should go on top to avoid being squashed.
- Tomato Separation: Tomatoes release moisture over time, which can quickly make bread soggy. For optimal sandwich texture, consider packing the tomato slices in a separate small container and adding them to the sandwiches just before eating. This small step makes a significant difference in the quality of your packed meal ideas.
- Ice Packs vs. Loose Ice: While loose ice offers excellent cooling, it can melt and create a watery mess, potentially soaking your food. Reusable ice packs are a cleaner alternative. They stay cold for hours and eliminate the risk of water damage, making them superior for travel-friendly food.
For any outdoor dining experience, prioritizing food safety is paramount. Always ensure perishable items remain below 40°F (4°C) to prevent bacterial growth. A well-packed cooler is your best defense against lukewarm food and potential health risks.
Creative Variations and Dietary Swaps
This classic Picnic Lunch Spread is highly adaptable. Consider these simple variations to suit different tastes or dietary needs without compromising the ease of preparation for your al fresco eating.
- Gluten-Free: Easily swap the white bread for gluten-free wraps or gluten-free bread slices. Ensure any cheese or deli meats used are also certified gluten-free.
- Nut-Free: If allergies are a concern, replace the roasted peanuts in the snack mix with an equal amount of pumpkin seeds or sunflower seeds. These offer a similar crunch and nutritional profile without the allergen.
- Vegetarian: For a delicious meat-free alternative, substitute the deli roast beef with grilled portobello mushroom slices or a generous spread of hummus and sliced cucumber. These options provide satisfying flavor and texture for any park lunch idea.
Frequently Asked Questions
When planning your Picnic Lunch Spread, a few common questions often arise regarding food safety and preparation.
- How long can sandwiches sit out in a cooler?
With sufficient ice packs, perishable items like deli meat sandwiches can remain safe in a cooler for approximately 4-6 hours, provided the internal temperature stays below 40°F (4°C). Always check the food’s temperature with a thermometer if unsure. - What are the best containers for a packed park meal?
Hard-sided, airtight containers are ideal for protecting sandwiches and fragile fruits from crushing. For snacks like trail mix, sturdy zip-top bags or small, sealed containers work well. Insulated bags can also add an extra layer of temperature control for your cooler packing tips. - Can I assemble these sandwiches the night before?
Yes, you can prepare the sandwiches the night before. To minimize sogginess, assemble them without the tomatoes and store them tightly wrapped in plastic in the refrigerator. Add the tomatoes just before packing the cooler or right before serving. This makes them excellent make-ahead picnic food.
A well-executed Picnic Lunch Spread transforms a simple meal into a memorable occasion. With careful planning and attention to detail, your next outdoor dining experience will be effortless and enjoyable.
For more inspiring recipes and tips for delightful gatherings, follow us on Facebook: Our Facebook Page.
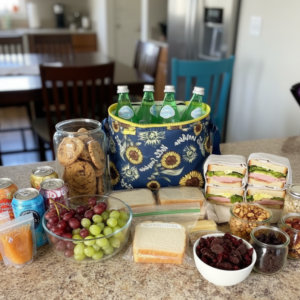
Classic Beef & Cheese Outdoor Packed Meal
Ingredients
- 8 slices White bread
- 8 oz Deli roast beef
- 4 slices Cheddar cheese
- 4 leaves Lettuce
- 1 whole Tomato Large, sliced
- 1 cup Green grapes
- 1 cup Red grapes
- 4 whole Chocolate chip cookies
- 1/4 cup Dried cranberries
- 1/4 cup Dried cherries
- 1/2 cup Roasted peanuts
- 1/2 cup Granola or oats
- 2 cans Sparkling water
- 2 cans Canned sodas
- 2 pouches Fruit puree pouches
Instructions
- Build the sandwiches: Lay out 8 slices of white bread. Top 4 of the slices each with 1 lettuce leaf, 2 oz of deli roast beef, 1 slice of cheddar cheese, and 2 slices of tomato. Place the remaining bread slices on top and cut in half.
- Prepare the fruit: Wash and thoroughly dry the 1 cup of green grapes and 1 cup of red grapes. Pack them into a crush-proof container.
- Mix the trail snacks: In a small bowl, combine the 1/4 cup dried cranberries, 1/4 cup dried cherries, 1/2 cup roasted peanuts, and 1/2 cup granola. Transfer the mixture to a sealed bag or container.
- Pack the cooler: Place the 4 chocolate chip cookies in a rigid container. Load the sandwiches, prepared fruit, snack mix, cookies, 2 cans of sparkling water, 2 canned sodas, and 2 fruit puree pouches into a cooler or insulated basket alongside cold ice packs.
For more daily recipes and tips, follow us on Facebook!
Click here to join our community!