
Spinach Artichoke Stuffed Chicken: A Weeknight Wonder
Imagine your favorite creamy, cheesy spinach and artichoke dip transformed into a spectacular, protein-packed main course. That’s exactly what you get with this incredible Spinach Artichoke Stuffed Chicken recipe. It’s an elevated take on a classic comfort food, perfect for making an ordinary weeknight feel like a special occasion.
Why You’ll Love This Recipe
This dish is a true crowd-pleaser and a fantastic addition to your culinary repertoire. We’re talking about a delicious, one-skillet chicken meal that delivers big on flavor without requiring hours in the kitchen. Tender chicken breasts are generously filled with a luscious, creamy spinach stuffing that melts in your mouth with every bite. The combination of tangy artichoke hearts, vibrant spinach, and a medley of cheeses creates a rich, savory experience that’s both comforting and satisfying. It’s a sophisticated yet approachable weeknight chicken dinner that will have everyone asking for seconds.
Beyond its incredible taste, this recipe is remarkably versatile. It’s naturally a very low-carb option, making it a fantastic keto friendly chicken recipe with just a few mindful choices. The process involves a quick pan-sear to lock in juices and develop a beautiful crust, followed by a finish in the oven, ensuring the chicken is perfectly cooked through and the filling is gloriously gooey. Get ready to impress your family and friends with a dish that looks gourmet but is surprisingly simple to master.
Key Ingredients & Substitutions
Choosing the Right Chicken
For this recipe, boneless, skinless chicken breasts are your best bet. Their uniform thickness makes them easy to butterfly and stuff, and they cook relatively quickly. Look for breasts that are roughly 6-8 ounces each for ideal portioning and cooking time. If you prefer a juicier texture and don’t mind a slightly longer cooking time, boneless, skinless chicken thighs can also be used. Just ensure they are trimmed of excess fat and pounded slightly to create a pocket for the filling.
Spinach: Fresh vs. Frozen
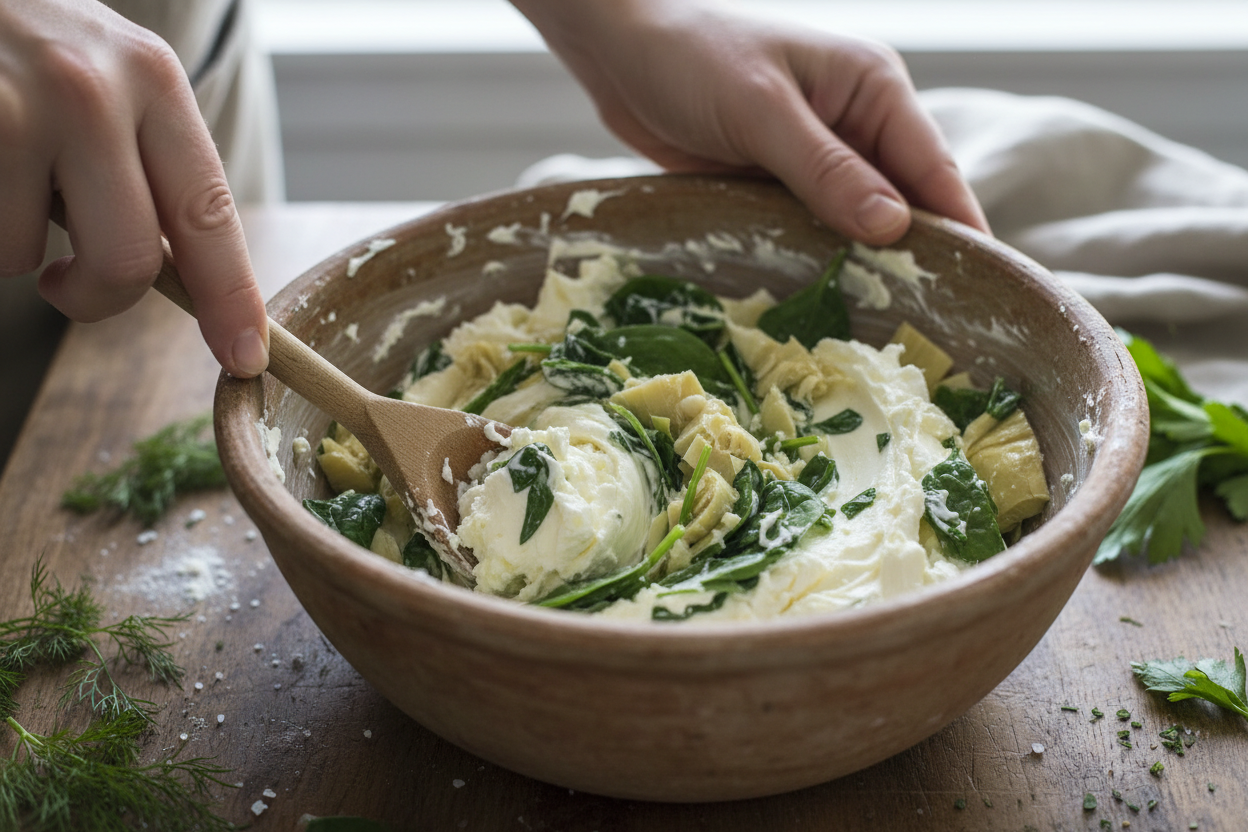
Both fresh and frozen spinach work wonderfully in this recipe, but there’s a crucial step if you opt for frozen. If using fresh spinach, you’ll need about 5-6 cups, which will wilt down significantly. Sauté it briefly until just wilted, then squeeze out any excess moisture before mixing with the other filling ingredients. For frozen spinach, you’ll need about 10 ounces. Thaw it completely, then the most important step is to squeeze out all excess moisture. Seriously, squeeze it until you think you can’t squeeze any more. This prevents a watery filling and ensures your spinach cream cheese filling remains rich and thick.
The Perfect Cheese Blend
The magic of this dish truly comes alive with the right cheese blend. We recommend a combination of shredded mozzarella and grated Parmesan cheese. The mozzarella provides that incredible, stretchy, melty texture, while the Parmesan adds a sharp, salty depth of flavor. This duo creates the ultimate indulgent stuffing. However, don’t be afraid to experiment! Gouda or provolone would also work beautifully, offering a slightly different flavor profile and equally satisfying meltiness. For an extra tang, a touch of cream cheese is essential for that signature creamy dip flavor.
Artichoke Hearts
For the artichokes, use a 14-ounce can or jar of marinated artichoke hearts. Drain them well and give them a rough chop. The marination adds an extra layer of flavor and zest that complements the creamy filling perfectly. If using unmarinated artichoke hearts, you might want to add a tiny splash of lemon juice to the filling for brightness.
How to Make Spinach Artichoke Stuffed Chicken (Step-by-Step)
Ready to create this show-stopping dish? Follow these steps for perfectly cooked, flavor-packed stuffed chicken every time.
- Prepare the Chicken: Start with 4 boneless, skinless chicken breasts. Lay each breast flat on a cutting board. Using a sharp knife, carefully slice a pocket into the thickest side of each breast, being careful not to cut all the way through to the other side. You want to create a deep pocket for the filling. Pat the chicken breasts very dry with paper towels; this is key for a good sear later.
- Make the Creamy Spinach Artichoke Filling: In a medium bowl, combine 1 cup of well-drained and chopped cooked spinach (remember, squeeze out all that moisture!), 14 ounces of drained and chopped marinated artichoke hearts, 4 ounces (half a block) of softened cream cheese, ½ cup shredded mozzarella, ¼ cup grated Parmesan cheese, 2 cloves of minced garlic, ½ teaspoon onion powder, salt, and black pepper to taste. Mix everything thoroughly until well combined.
- Stuff the Chicken: Carefully spoon the spinach and artichoke filling into each chicken breast pocket. Don’t overstuff, as the filling needs room to expand slightly and you want to keep it contained. Use about ¼ cup of filling per breast.
- Secure the Pockets: To prevent the delicious filling from oozing out during cooking, secure the opening of each chicken breast with 1-2 toothpicks.
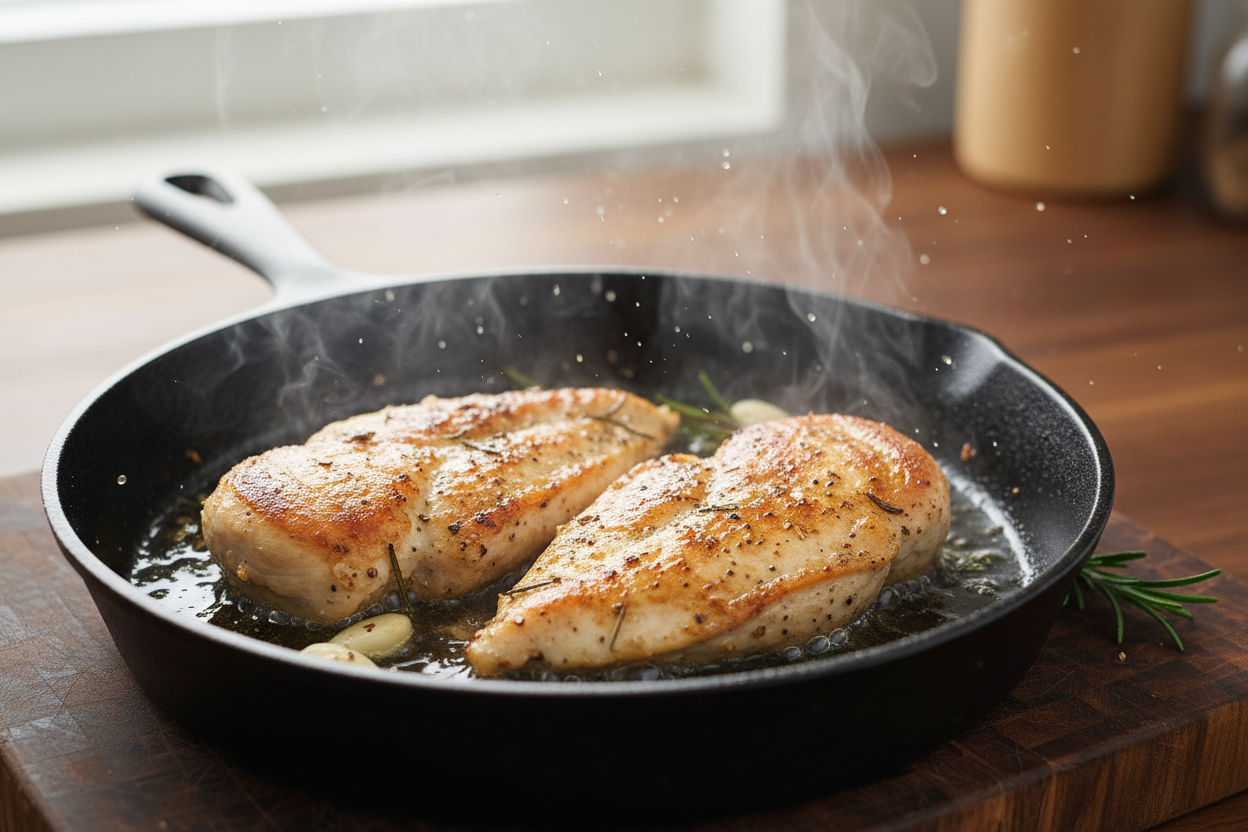
- Pan-Sear the Chicken: Heat 1 tablespoon of olive oil in a large, oven-safe skillet (cast iron works beautifully) over medium-high heat. Once the oil is shimmering, carefully place the stuffed chicken breasts into the hot skillet. Sear for 3-4 minutes per side, until beautifully golden brown. This step is crucial for developing a rich flavor and appealing crust.
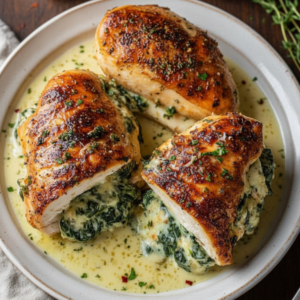
- Bake to Perfection: Transfer the skillet to a preheated oven at 375°F (190°C). Bake for 15-20 minutes, or until the internal temperature of the thickest part of the chicken reaches 165°F (74°C). The filling should be bubbly and melted.
- Rest and Serve: Once cooked, remove the skillet from the oven. Let the chicken rest for 5-10 minutes before removing the toothpicks and serving. This allows the juices to redistribute, ensuring tender, moist chicken.
Expert Tips for the Best Stuffed Chicken
Avoiding a Messy Skillet (How to Keep the Filling Inside)
One of the most common concerns with stuffed chicken is the filling escaping into the skillet. Here are my top tips for keeping that luscious spinach cream cheese filling right where it belongs:
- Don’t Overstuff: It’s tempting to cram in as much as possible, but resist the urge! Leave a little room in the pocket, as the cheese will melt and expand slightly during cooking.
- Use Toothpicks Wisely: After stuffing, bring the edges of the chicken breast together and use one or two wooden toothpicks to secure the opening. Push them through both sides of the chicken to create a seal. Remember to remove them before serving!
- Pat Chicken Dry: Before searing, ensure your chicken is thoroughly dry. This helps create a beautiful crust quickly, which in turn helps seal the chicken and keep the filling inside during the initial cooking stage.
Getting the Perfect Pan-Sear
A good sear isn’t just about looks; it adds incredible depth of flavor and texture to your pan-seared chicken breasts. Follow these guidelines:
- High Heat, Right Amount of Oil: Use medium-high heat and enough oil to lightly coat the bottom of your skillet. Don’t crowd the pan; cook in batches if necessary to maintain consistent heat.
- Don’t Touch It! Once you place the chicken in the hot pan, resist the urge to move it around. Let it cook undisturbed for 3-4 minutes per side. This allows the maillard reaction to occur, creating that desirable golden-brown crust.
- Listen and Look: You should hear a consistent sizzle. Once the edges of the chicken look opaque and a deep golden color, it’s time to flip.
“A great sear creates a ‘flavor barrier’ that locks in moisture and adds a delicious caramelized crust, elevating simple ingredients to restaurant-quality.” – Chef’s Insight
Side Dish Pairings
This rich and flavorful baked stuffed chicken breast pairs wonderfully with a variety of side dishes. For a classic, comforting meal, consider serving it alongside creamy mashed potatoes or fluffy rice pilaf. If you’re leaning into the low-carb aspect of this keto friendly chicken recipe, roasted green beans, steamed asparagus, or a light, crisp salad with a vinaigrette dressing perfectly complement the rich flavors without making the meal too heavy. A simple side of garlic bread also makes for excellent dipping in any extra sauce from the skillet!
Storing and Reheating Leftovers
Leftovers of this delightful dish are just as good, if not better, the next day. Store any remaining Spinach Artichoke Stuffed Chicken in an airtight container in the refrigerator for up to 3-4 days. To reheat, the best method is to gently warm them in a 300°F (150°C) oven, covered with foil. This helps to keep the chicken moist and prevents the filling from drying out. You can also microwave individual portions, but be mindful that the chicken might be slightly less tender. If microwaving, do so in short bursts to avoid overcooking.
Frequently Asked Questions
Can I Freeze Stuffed Chicken?
Yes, absolutely! This is a great meal prep option. Once the chicken breasts are fully cooked and cooled, you can freeze them for up to 3 months. Wrap each stuffed chicken breast individually in plastic wrap, then place them in an airtight freezer-safe bag or container. Thaw overnight in the refrigerator before reheating gently as described above. You can also freeze the raw, stuffed chicken. Place the raw, stuffed breasts on a baking sheet and freeze until solid, then transfer to a freezer bag. Thaw overnight, then proceed with the pan-searing and baking steps.
Is This Recipe Keto-Friendly?
Yes, this recipe is naturally very adaptable to a low-carb and keto diet! The primary components—chicken, spinach, artichokes, cream cheese, and other cheeses—are all low in carbohydrates. To ensure it remains a true keto friendly chicken recipe, simply be mindful of any added sugars in your artichoke hearts (opt for plain or oil-packed if possible) and avoid carby side dishes. Serve it with roasted vegetables like broccoli, cauliflower rice, or a fresh green salad for a complete, delicious, and low-carb meal.
For more delicious and easy recipes, be sure to follow us on Facebook at https://www.facebook.com/profile.php?id=61568538666337. We love sharing new ideas and cooking inspiration with our community!
Spinach Artichoke Stuffed Chicken
Ingredients
- 4 whole Boneless skinless chicken breasts About 6-8 oz each
- 4 oz Cream cheese Softened to room temperature
- 1/2 cup Frozen spinach Thawed and squeezed dry
- 1/2 cup Artichoke hearts Chopped and drained
- 1/2 cup Mozzarella cheese Shredded
- 1/4 cup Parmesan cheese Grated
- 2 cloves Garlic Minced
- 2 tbsp Heavy cream Optional, for a richer filling
- 1 tsp Fresh thyme Chopped
- 2 tbsp Olive oil For pan-searing
- 1 tsp Salt and black pepper To taste
Instructions
- Preheat the oven to 375°F (190°C). Using a sharp knife, carefully cut a pocket into the side of each chicken breast, making sure not to slice all the way through. Pat the chicken dry with paper towels, then season the outside and inside with salt, pepper, and fresh thyme.
- In a medium mixing bowl, combine the softened cream cheese, thawed and squeezed spinach, chopped artichoke hearts, mozzarella cheese, parmesan cheese, minced garlic, and heavy cream. Mix until well combined.
- Stuff each chicken breast pocket evenly with the spinach and artichoke filling. Use toothpicks to secure the openings so the filling remains inside during cooking.
- Heat the olive oil in a large oven-safe skillet over medium-high heat. Add the stuffed chicken breasts and sear for 4 to 5 minutes on each side until a golden brown crust forms.
- Transfer the skillet to the preheated oven and bake for 15 to 20 minutes, or until the chicken reaches an internal temperature of 165°F (74°C). Remove from the oven, let rest for 5 minutes, discard the toothpicks, and serve warm.
For more daily recipes and tips, follow us on Facebook!
Click here to join our community!