Gathering for summer celebrations calls for treats that are both festive and fuss-free. A vibrant 4th of July Candy Platter offers a perfect solution, bringing a burst of color and sweetness to any gathering. This patriotic dessert board makes a stunning centerpiece for your Independence Day sweets tray, providing an easy-to-customize option for guests. The beauty of a well-curated candy charcuterie board lies in its versatility, allowing you to cater to various preferences with minimal effort.
Why Build a Patriotic Dessert Tray?
Creating a festive candy arrangement like a red white and blue charcuterie board offers several distinct advantages for your summer party treats.
- Visual Appeal: The striking combination of red, white, and blue items immediately captures attention. Grouping these colors strategically creates a dynamic and inviting holiday dessert spread, reinforcing the celebratory theme. The bright hues of various candies naturally draw the eye, making it an irresistible focal point.
- No-Bake Convenience: Summer heat often makes oven-bound desserts less appealing. A 4th of July Candy Platter is inherently a no-bake option, saving you time and keeping your kitchen cool. This convenience means less stress and more enjoyment of the festivities.
- Encourages Mingling: A grazing board, by its very nature, invites guests to gather around, pick their favorites, and chat. It removes the formality of plated desserts, promoting a relaxed atmosphere where conversations flow as freely as the treats are sampled. This shared experience enhances the communal spirit of any celebration.
Essential Ingredients for the Best Results
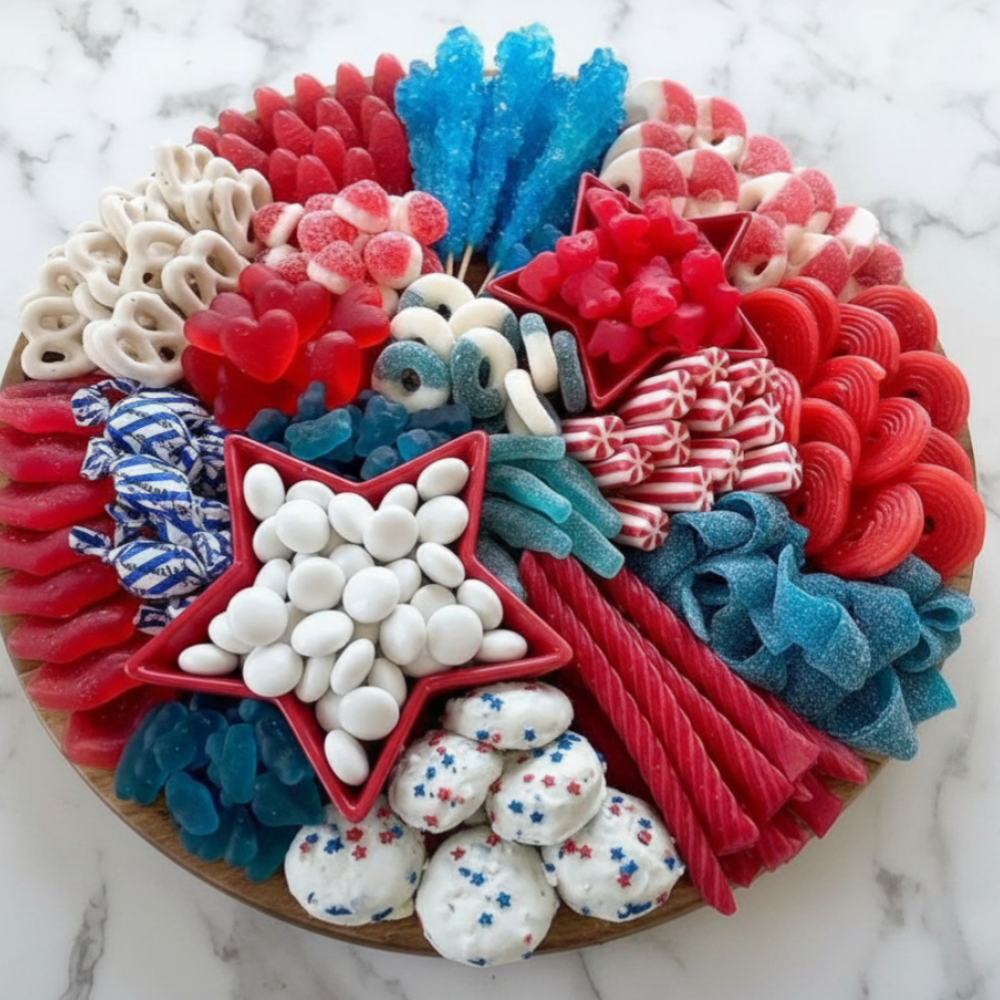
Crafting an impressive 4th of July Candy Platter starts with selecting the right components. Focus on items that offer contrasting textures and a vibrant color palette, sticking to our red, white, and blue theme. Here are the specific ingredients you will need for your ultimate summer party treats:
Gummies and Chewy Treats
- Red gummy candies: 8 oz
- Blue gummy candies: 8 oz
- White gummy candies: 8 oz
- Sour belts: 6 oz
Chocolates and Baked Goods
- Candy-coated chocolates: 1 cup
- White chocolate covered pretzels: 12 oz
- Decorated sugar cookies (star-shaped are ideal): 12 count
Hard Candies and Textural Elements
- Rock candy sticks: 6 count
- Red licorice twists: 10 oz
- Peppermint sticks: 8 oz
These carefully chosen elements ensure a balanced and visually appealing patriotic dessert board that guests of all ages will appreciate. The sugar cookie centerpiece provides a lovely anchor, while the variety of candies offers something for every sweet tooth.
Step-by-Step Assembly Guide
Assembling your DIY candy platter is a straightforward process. Follow these steps to create a stunning and inviting Independence Day sweets tray.
- Preparation: Begin by washing and thoroughly drying a large serving board or platter. Ensure it is completely dry before arranging any candies to maintain freshness and prevent sticking.
- Anchor the Board: Strategically place small bowls on the board. These bowls will hold the 1 cup of candy-coated chocolates and the smaller gummy candies, preventing them from scattering and providing structure to your arrangement.
- Establish the Base: Arrange the 12 decorated sugar cookies, ideally star-shaped, and the 12 oz of white chocolate covered pretzels around the bowls. These larger items form the foundation of your festive candy arrangement, creating distinct sections and adding volume.
- Add the Soft Textures: Fill the remaining gaps with the 8 oz portions of red gummy candies, 8 oz of white gummy candies, and 8 oz of blue gummy candies. Group these gummy candies by color for maximum visual impact, creating vibrant blocks of red, white, and blue across the board.
- Finishing Touches: Tuck the 6 rock candy sticks, 10 oz of red licorice twists, 8 oz of peppermint sticks, and 6 oz of sour belts into the edges and corners. These longer, more rigid items add height and diverse textures, giving your holiday dessert spread a professional and bountiful appearance.
Tips for Designing a Visually Appealing Layout
A truly memorable 4th of July Candy Platter is not just about the sweets but also about their presentation. Thoughtful arrangement elevates a simple collection of candies into a stunning patriotic dessert board.
- Group Similar Colors Together for High Contrast: While the goal is a red, white, and blue charcuterie, grouping similar colors creates more impact than scattering them randomly. Place a vibrant cluster of red gummy candies next to a pristine white chocolate covered pretzels section, then alongside a deep blue gummy candy cluster. This separation allows each color to pop and prevents the board from looking muddled.
- Use Odd Numbers of Anchor Items: When placing bowls or larger elements like the sugar cookie centerpiece, arrange them in odd numbers (three or five, depending on board size). This technique often feels more balanced and aesthetically pleasing to the eye than even groupings.
- Mix Textures: Variety in texture is key to an engaging holiday dessert spread. Combine the smooth surface of candy-coated chocolates with the rough, crystalline appearance of rock candy, and the soft chewiness of gummies with the crunch of pretzels. This textural interplay makes each bite more interesting and adds visual depth to your festive candy arrangement.
Storage and Make-Ahead Advice
Proper storage is crucial to ensure your 4th of July Candy Platter remains fresh and appealing, especially when preparing components in advance for your summer party treats.
- Keeping Gummies Fresh: To prevent gummies from drying out or becoming sticky and sweating, store them in airtight containers at room temperature. If preparing the board the day before, you can place them on the platter, then cover the entire board tightly with plastic wrap to minimize air exposure.
- Storing Leftover Candies Safely: Any leftover candies should be transferred to individual airtight containers. Store them in a cool, dry place away from direct sunlight. Most candies, especially hard candies and gummies, will maintain their quality for several weeks when stored correctly. Chocolate items are best kept in a slightly cooler spot, but avoid refrigeration unless absolutely necessary, as it can sometimes affect their texture and bloom.
- Preparing Components in Advance: Many elements of your DIY candy platter can be prepared a day in advance. The decorated sugar cookies can be baked and cooled. White chocolate covered pretzels can be made and allowed to set. Sort your red gummy candies, white gummy candies, and blue gummy candies into separate airtight bags. On the day of your event, simply arrange everything according to the assembly guide. This significantly reduces last-minute stress, allowing you to enjoy your Independence Day sweets tray and festivities.
Frequently Asked Questions
We often get questions about customizing and managing candy platters. Here are some common inquiries regarding your patriotic dessert board.
Can I add fresh fruit to this board?
While fresh fruit can be a lovely addition to many boards, this specific 4th of July Candy Platter focuses purely on candies and baked goods. Sticking to the listed items ensures consistency in texture and shelf stability, especially for a no-bake holiday dessert spread.
What size platter works best for 12 guests?
For 12 guests, a platter that is at least 18×12 inches or a round board with a diameter of 18-20 inches would be ideal. This size allows ample space for all the essential ingredients, ensuring a bountiful and accessible candy charcuterie board for everyone.
How do I keep chocolates from melting at an outdoor party?
To prevent candy-coated chocolates and white chocolate covered pretzels from melting at an outdoor party, place your 4th of July Candy Platter in a shaded area. Consider using a cooling tray underneath the board or placing the platter on a larger tray filled with ice. If temperatures are particularly high, bringing the board out just before serving and then putting it away after a reasonable grazing period is best.
Embrace the joy of effortless entertaining with this vibrant and delicious 4th of July Candy Platter. Your guests will delight in the visual spectacle and the array of summer party treats.
For more festive ideas and behind-the-scenes content, follow our journey on Facebook: Follow us on Facebook.

Red, White, and Blue Sweets Board
Ingredients
- 8 oz Red gummy candies
- 8 oz Blue gummy candies
- 8 oz White gummy candies
- 6 count Rock candy sticks
- 10 oz Red licorice twists
- 6 oz Sour belts (blue and red)
- 1 cup Candy-coated chocolates (red, white, and blue)
- 8 oz Peppermint sticks
- 12 oz White chocolate covered pretzels
- 12 count Decorated sugar cookies (star-shaped)
Instructions
- Wash and thoroughly dry a large serving board or platter.
- Place small bowls on the board to hold the candy-coated chocolates and smaller gummy candies.
- Arrange the decorated sugar cookies and white chocolate covered pretzels around the bowls to form a foundation.
- Fill the remaining gaps with the red, white, and blue gummy candies, grouping them by color for maximum visual impact.
- Tuck the rock candy sticks, red licorice twists, peppermint sticks, and sour belts into the edges and corners to add height and dimension.
For more daily recipes and tips, follow us on Facebook!
Click here to join our community!