
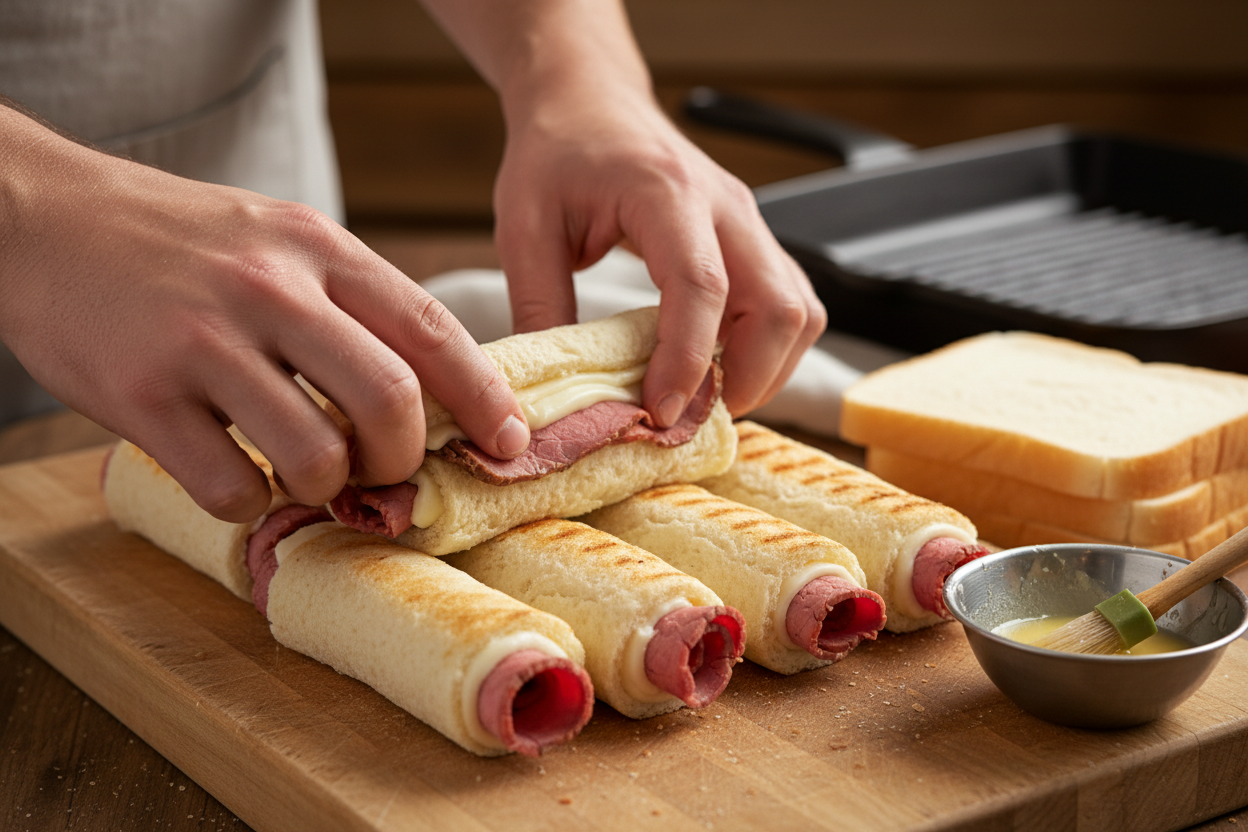
For many families, the quest for truly satisfying and easy meal solutions feels endless. From busy weeknights to weekend gatherings, finding dishes that appeal to everyone, especially the younger crowd, can be a challenge. Enter the ultimate solution: Grilled Cheese Roll Ups. These delightful bites take the classic comfort of a grilled cheese sandwich and transform it into a fun, portable, and utterly irresistible format. Imagine perfectly golden-brown toasted sandwich rolls, filled with savory deli beef and rich, melted cheese. These aren’t just sandwiches; they are a clever adaptation designed for ease and enjoyment, making them a staple in any busy household. They are particularly brilliant as kid-friendly lunch ideas, offering a twist on familiar flavors that even the most discerning eaters often adore.
Why Kids Love These Toasted Cheese Dippers
The appeal of Grilled Cheese Roll Ups for children is undeniable, making them prime candidates for satisfying picky eaters. Their unique shape is a major draw. Unlike a traditional sandwich, which can feel bulky or intimidating, these rolls are perfectly sized for small hands. They function as ideal finger foods for picky eaters, encouraging self-feeding and making mealtime less of a battle and more of an engaging experience. The act of picking up a small, cylindrical roll is inherently more fun than handling a flat, triangular or rectangular sandwich.
Beyond the shape, the texture plays a significant role. Children are often drawn to foods that offer an interesting mouthfeel. These toasted sandwich rolls deliver a delightful contrast: a slightly crisp, buttery exterior gives way to a soft, warm interior where the cheddar cheese is beautifully melted and gooey. This combination makes every bite exciting. The warm, pliable beef tucked inside the melted cheese creates a harmonious savory core. For kids who enjoy dipping, these rolls are outstanding melted cheese dippers. They hold their shape well, making them perfect for dunking into favorite sauces without crumbling apart. The entire package is designed for maximum enjoyment and minimum fuss, ensuring that mealtime is a positive experience.
Ingredients You Need
Crafting these delightful deli beef and cheese rolls requires a simple, focused list of ingredients, ensuring quick preparation and consistent results. Each component plays a crucial role in achieving the perfect balance of flavor and texture for your Grilled Cheese Roll Ups.
Here is what you will need:
- 8 slices soft bread: Choose a fresh, soft white or whole wheat bread. The key is pliability for rolling, so ensure the crusts are removed before flattening.
- 8 slices cheddar cheese: Medium or sharp cheddar works wonderfully, providing a creamy melt and a distinct flavor. Pre-sliced cheese is convenient and ensures even distribution.
- 8 slices deli roast beef: Opt for thinly sliced, high-quality roast beef. Its savory notes complement the cheese and add substantial flavor to the rolls.
- 2 tbsp butter: Unsalted butter is preferred for toasting the rolls. It provides richness and helps achieve that irresistible golden-brown crispness.
- Sides:
- 1 cup broccoli florets
- 1 cup baby carrots
- 1 cup raspberries
These fresh sides offer a perfect balance to the savory rolls, adding color, vitamins, and natural sweetness.
This concise list allows for quick assembly and focuses on creating maximum flavor with minimal effort, making these Grilled Cheese Roll Ups a practical choice for any meal.
Step-by-Step Instructions
Preparing these Grilled Cheese Roll Ups is straightforward and highly rewarding. Follow these steps precisely to achieve perfectly golden, crispy, and cheesy toasted sandwich rolls every time. Precision in technique ensures the best texture and flavor.
- Begin by preparing your bread. Take all 8 slices of soft bread and carefully cut off the crusts from each slice. The crusts can sometimes make rolling difficult and can lead to cracking. Once trimmed, place each slice on a clean, dry surface. Using a rolling pin, flatten each piece of bread as thinly as possible without tearing it. This creates the necessary surface for rolling and ensures the finished product is compact and holds together well.
- Next, assemble the filling for your deli beef and cheese rolls. On each flattened slice of bread, place one slice of cheddar cheese. Position it towards one end of the bread. Then, layer one slice of deli roast beef directly on top of the cheese. Ensure the cheese and beef are within the bread’s boundaries to prevent oozing during cooking.
- With the filling in place, it is time to roll. Starting from the end with the cheese and beef, tightly roll the bread up. Apply firm, even pressure as you roll to create a compact cylinder. A tight roll helps the roll-ups maintain their shape during cooking and keeps the filling secure. Repeat this process for all 8 slices.
- Now, prepare for cooking. Place a large skillet over medium heat on your stovetop. Add 2 tablespoons of butter to the skillet. Allow the butter to melt completely and coat the bottom of the pan evenly. The medium heat is crucial here; it allows the bread to toast to a perfect golden brown without burning, giving the cheese ample time to melt.
- Carefully place the prepared rolls into the melted butter in the hot skillet. Do not overcrowd the pan; cook them in batches if necessary to ensure even browning. Cook the rolls, turning them frequently with tongs, until they are golden brown on all sides. This usually takes a few minutes per side. The internal temperature will rise, and the cheddar cheese inside will become beautifully melted and gooey. Once golden and the cheese is melted, remove the Grilled Cheese Roll Ups from the skillet. Serve them immediately with the prepared sides: 1 cup of crisp broccoli florets, 1 cup of sweet baby carrots, and 1 cup of fresh raspberries.
These detailed steps ensure your Grilled Cheese Roll Ups are perfectly executed, delivering a satisfying, crispy exterior and a warm, cheesy interior, ready to be enjoyed as delightful melted cheese dippers.
Best Sides and Dips for Snacking
While the Grilled Cheese Roll Ups are a flavorful treat on their own, pairing them with the right accompaniments elevates the snacking experience. The included sides—1 cup of vibrant broccoli florets, 1 cup of crunchy baby carrots, and 1 cup of sweet, juicy raspberries—offer a wonderful fresh contrast to the savory, rich rolls. These additions not only provide essential nutrients but also bring a refreshing element to the plate, ensuring a balanced meal, especially for kid-friendly lunch ideas. The crispness of the vegetables and the bright burst of fruit complement the soft, cheesy interior and toasted exterior of the beef and cheese rolls.
Beyond the fresh produce, the dipping potential of these melted cheese dippers is immense. A classic pairing that transforms these rolls into a comforting meal is a warm bowl of tomato soup. The tangy, creamy soup provides a perfect counterpoint to the savory roll, allowing for a delightful dunking experience. Kids and adults alike enjoy dipping the golden toasted sandwich rolls into the warm soup, creating a harmonious blend of flavors and textures. Another popular option is a creamy ranch dressing. Its herbaceous, tangy profile offers a different kind of zest that pairs exceptionally well with the savory deli beef and rich cheddar cheese. The coolness of the ranch dressing can be particularly appealing, especially on a warmer day, making these roll-ups versatile for various meal settings. These simple additions can turn a quick snack into a more substantial and engaging meal.
Storing and Reheating Tips
One of the greatest advantages of Grilled Cheese Roll Ups is their versatility as excellent lunchbox recipes. Preparing them in advance can save valuable time during busy mornings. Proper storage and reheating are key to maintaining their delightful texture and flavor.
To store leftover deli beef and cheese rolls, first allow them to cool completely to room temperature. This prevents condensation from forming inside the storage container, which can lead to sogginess. Once cooled, place the rolls in an airtight container. For best results and to prevent sticking, you can layer them with parchment paper. Stored in the refrigerator, they will remain fresh for up to 2-3 days. This makes them an ideal component for future kid-friendly lunch ideas.
When it comes to reheating, the goal is always to restore their crispy exterior and warm, melted interior, especially when packing them for a lunchbox. For the best texture, reheating in a toaster oven or a conventional oven is recommended. Preheat your oven or toaster oven to 350°F (175°C). Place the chilled toasted sandwich rolls on a baking sheet and heat for about 5-8 minutes, or until they are warmed through and the exterior has regained some of its crispness. Alternatively, if time is short, they can be reheated in a microwave, though this method may result in a softer texture. Microwave for 15-30 seconds, checking periodically until warmed. While the microwave is quick, the oven or toaster oven will always yield a superior crispness, making them feel freshly made even hours later. For packing into lunchboxes, ensure they are fully cooled after reheating to prevent further steaming and sogginess. These practical tips make sure your Grilled Cheese Roll Ups remain a delicious and convenient option, whether served immediately or enjoyed later.
The simple joy of a Grilled Cheese Roll Up extends beyond just a meal; it is an experience. From their effortless preparation to their undeniable appeal as a finger food for picky eaters, these savory bites redefine convenience and deliciousness. They are perfect for a quick snack, a fulfilling lunch, or an easy dinner, consistently delivering that comforting combination of crisp bread, melted cheddar, and savory roast beef.
We hope this guide inspires you to create these irresistible deli beef and cheese rolls in your kitchen. For more innovative recipes, meal prep ideas, and family-friendly culinary inspiration, be sure to follow our community on social media. Join us for daily updates and connect with other food enthusiasts who love simple, delicious cooking.
Follow our food adventures and get daily recipe inspiration by visiting our Facebook page: Our Kitchen Creations on Facebook.

Toasted Beef and Cheese Rolls with Fresh Sides
Ingredients
- 8 slice Soft sandwich bread crusts removed
- 8 slice Cheddar or American cheese thinly sliced
- 8 slice Deli roast beef thinly sliced
- 2 tbsp Butter unsalted
- 1 cup Broccoli florets fresh or steamed
- 1 cup Baby carrots raw
- 1 cup Raspberries washed
Instructions
- Cut the crusts off the bread and flatten each slice completely with a rolling pin.
- Place one slice of cheese and one slice of deli beef evenly on each piece of flattened bread.
- Tightly roll up each piece of bread to form a cylinder.
- Melt the butter in a large skillet over medium heat.
- Place the rolls in the skillet seam-side down. Cook, turning frequently, for about 5 minutes until golden brown on all sides and the cheese is thoroughly melted.
- Serve warm alongside the broccoli florets, baby carrots, and raspberries.
For more daily recipes and tips, follow us on Facebook!
Click here to join our community!